background image

)

 Set AUTO BLC mode

           >> SETMENU 1 <<
    BACKLIGHT        AUTO
                  .
                  .
                  .
                  .
                  .
       
     NEXT MENU                 
             

Press NEAR(+) or FAR(-)
key  abov e 2 sec, then Backlight
mode becomes Auto.

Press MENU key  , then
display ed backlight area
that can be modif y ing 
( Ref er to B ) 

1

5

Press MENU key  , then
display ed SETUP MENU1
again. At this time bellow 
item ( color ON/Of f  )becomes
blinking status. 

           >> SETMENU 1 <<
        BACKLIGHT        AUTO
        COLOR                ON
                  .
                  .
                  .
                  .
       
         NEXT MENU                 


)

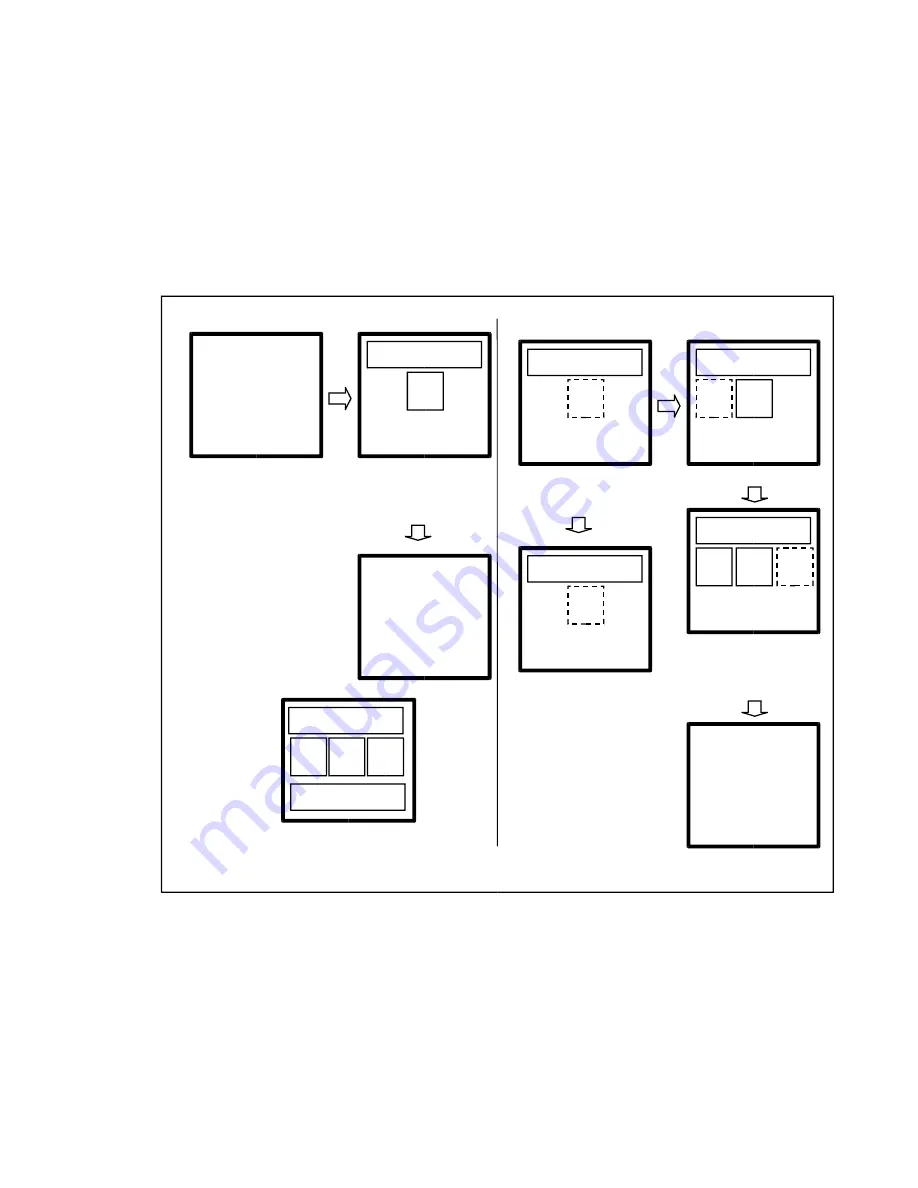
 Set BLC area in Backlight Auto mode

If  y ou want to change BLC
area , Mov e to desirable area
using TELE(up)/WIDE(down)
key  .

1

5

The selected area becomes 
blinking.

1

5

?

Press NEAR(+)or FAR(-) key  ,
New  area is selected, next 
area is blinking. It can be selected 
or remov ed all 5 areas with abov e 
setting method repeatedly .

1

5

3

?

If  y ou want to remov e current
selected area , 
Press NEAR(+)or FAR(-) key  ,
current area is remov ed.

1

5

Press MENU key  , then
PREV. to prev ious SETUP 
MENU 1.

           >> SETMENU 1 <<
        BACKLIGHT        AUTO
        COLOR                ON
                  .
                  .
                  .
                  .
       
         NEXT MENU                 
             

< Fig 5-4. Five BLC areas >

1

5

4

3

2

-  11   -

Summary of Contents for WDAC-2308X Series

Page 1: ...OPERATION MANUAL Built in x 23 ZOOM AUTO FOCUS COLOR CAMERA WDAC 2308X WDN 2308X READ AND KEEP THIS OPERATION MANUAL WELDEX CORPORATION...

Page 2: ...designed to provide reasonable protection against such interference when operated in a commercial environment Warning TO PREVENT FIRE OR SHOCK HAZARD DO NOT EXPOSE THIS APPLIANCE TO RAIN OR MOISTURE...

Page 3: ...ed stop using the camera immediately turn the pow er off then contact your supplier 9 Cleaning Turn the pow er off and w ipe off the dirt w ith a dry soft cloth If it is extremely dirty use furniture...

Page 4: ...Camera To get the best efficiency read carefully all instructions in this manual before use and keep this manual for reference If you have any problems with this camera contact your supplier to servic...

Page 5: ...lly using RS232C RS485 interf ace Compact size for various applications The WDAC 2308X comes in the compact aluminum case enabling the users put the unit into the other f orms of other outer case such...

Page 6: ...IDEO OUTPUT POWER ON LAMP This is the output terminal for composite video signal This is the output terminal for separate Y C signal In power ON state this LED is ON This is the 14 pin connector for e...

Page 7: ...BLE OPERATION MANUAL ENGLISH EDITION WDAC 2308X 14 PIN CONNECTION CABLE OPERATION MANUAL 14P CABLE DESCRIPTION 1 KEY1 RED 2 KEY2 YELLOW 3 ZOOM GREEN 4 FOCUS BLUE 5 MENU WHITE 6 COM ORANGE 7 GND BLACK...

Page 8: ...C connection Connector pin 10 11 12 Connect to Serial PORT COM1 or COM2 14P Cable 14P Cable 1 0 1 1 1 2 RD TxD TD RxD GND 14P Cable Serial Cable Serial Cable 9 Pin D Sub 2 RD 3 TD 5 SG 4 6 7 8 Connect...

Page 9: ...PORT COM1 or COM2 14P Cable Serial Cable 1 0 1 1 1 2 RD TxD TD RxD GND 14P Cable Serial Cable 9 Pin D Sub 2 RD 3 TD 5 SG 4 6 7 8 Connect internally for communication 485 Converter 9 1 0 1 1 R R T 14P...

Page 10: ...ing OSD It is disappeared about f ive seconds later if there are no other key actions b When it zoom in or out pressing TELE up or WIDE down key whole Operating OSD is displayed and then disappeared P...

Page 11: ...NU is appeared again 5 5 SETUP MENU 1 f unctions Backlight Compensation It is f or prev enting the center object too darken when the excessive light is behind the center object Press NEAR FAR key so t...

Page 12: ...N NEXT MENU Set BLC area in Backlight Auto mode If you want to change BLC area Move to desirable area using TELE up WIDE down key 1 5 The selected area becomes blinking 1 5 Press NEAR or FAR key New a...

Page 13: ...ired color temperature manually 0 99 decimal value AWC Auto White Control Consider current illumination condition do white balance by f orce and lock as manual White Balance Mode Control It displays a...

Page 14: ...OSD DISP RETURN MENU HIGH HIGH 5sec 50cm NORMAL 9600bps HIGH 24 ALL AF SENS Control High Reaction of Auto Focus is f ast It can be used when it shoot objects moving f ast Low Auto Focus is more stable...

Page 15: ...h 1byte 8bit B Start bit Stop bit 1bit C Parity bit none D Baud rate 9600bps 6 1 2 PC send 6bytes to Camera byte6 byte5 byte4 byte3 byte2 byte1 byte 4 byte5 byte 6 byte 9 byte8 byte 7 byte 3 byte2 byt...

Page 16: ...e5 dum C S dum dum 0x83 0xAA 0xC5 byte4 0x00 ATW mode byte4 0x02 INDOOR WB mode byte4 0x03 OUTDOOR WB mode byte4 0x04 MANUAL WB mode byte4 0x05 AWC mode C S ID byte 4 0x65 0xA A 0xC5 byte 4 dum dum C...

Page 17: ...adjust at ATW WB mode C S ID byte 4 0x76 0xA A 0xC5 byte 4 dum dum C S dum dum 0x76 0xAA 0xC5 byte5 0x00 AUTO Exposure mode byte5 0x01 SHUTTER FIX Exposure mode byte5 0x02 IRIS FIX Exposure mode byte...

Page 18: ...n IRIS FIX or MANUAL Exposure mode Ref er to 6 5 1 The range of IRIS data is 0x33 0xCD 6 6 3 Adjust IRIS data C S ID byte4 0x7C 0xAA 0xC5 byte4 dum dum C S dum dum 0x7C 0xAA 0xC5 6 6 IRIS mode 6 6 1 S...

Page 19: ...0 0xA A 0xC5 dum dum dum C S dum dum 0x50 0xAA 0xC5 Whether current Focus mode is Auto or Manual it is saved on EEPROM 6 6 5 Adjust Shutter Speed 6 7 2 Set Focus mode C S ID byte 4 0x73 0xA A 0xC5 byt...

Page 20: ...byte 3 0xF1 0xC5 dum byte5 dum C S dum dum byte 3 0xF1 0xC5 6 8 3 2 Read Zoom Position Focus Position D zoom Data on EEPROM rear 2K byte out of 4K byte by te3 is address to read preset data by te5 is...

Page 21: ...time lens move to the position with zoom tracking slowly byte3 is index of preset data index is f rom 0 to 63 in numerical order For example index 0 is data on address 0x00 0x03 index 1 is data on 0x...

Page 22: ...F byte4 0x01 Backlight mode ON Auto is prior to ON OFF in Backlight mode 6 10 2 Set Backlight mode It is saved on EEPROM 6 10 Backlight Mode 6 10 1 Set Backlight mode C S ID byte 4 0x70 0xA A 0xC5 byt...

Page 23: ...um dum 0x8D 0xAA 0xC5 byte4 0x00 Set MENU OSD Display OFF Once it is displayed as SAVE or QUIT and twice it is not displayed byte4 0x01 Set MENU OSD Display ON 6 11 3 Set OSD display language C S ID b...

Page 24: ...79 0xAA 0xC5 byte5 is the current Brightness data C S ID 0x00 0x89 0xA A 0xC5 0x00 byte5 dum C S dum dum 0x89 0xAA 0xC5 byte4 this value 00 99 decimal is Brightness level of Camera 6 14 Digital Ef f e...

Page 25: ...byte3 0x55 FADE OFF C S ID dum byte 3 0xA A 0xC5 dum dum dum C S dum dum byte 3 0xAA 0xC5 Reset u COM and POWER OFF ON 6 16 Read Set status of Camera 6 16 1 Read the current status 1 of the Camera 6...

Page 26: ...op command C S ID 0x00 bye3 0x5F 0xC5 0x00 dum dum C S dum dum byte 3 0x5F 0xC5 Move lens to Focus FAR byNormal Speed 0x05 at Manual Focus mode 0x08 Move lens to Focus NEAR byNormal Speed 0x05 at Manu...

Page 27: ...ON OFF 0x25 OSD Menu move up 0x27 OSD Menu move down 0x28 Switch the power of the Camera ON OFF 0x32 Switch Wide mode ON OFF 0x20 Description KeyCode Move zoom position repeatedly x1 x8 x1 0x56 Increa...

Page 28: ...the Masking Privacy Zone C S ID 0x00 bye3 0x83 0xC5 0x00 dum dum C S dum dum byte 3 0x83 0xC5 Block0 Block1 Block2 Block33 Block34 Block35 Block30 Block31 Block32 Block27 Block30 Block31 Block24 Block...

Page 29: ...5 terminated 1 0 Vpp Y C Separate output Video out RS 232C Basic RS 422 RS 485 Option Remote Control ATW MWB Indoor Outdoor AWC White Balance Internal External Line pulse lock Auto detecting selectabl...

Page 30: ...8 Dimension CONT VIDEO POWER SVIDEO 29...

Page 31: ...MEMO Printed in Korea G 110547 002...

Reviews: