background image

Shenzhen Weistek Technology Co., Ltd.                                        www.weistek.net 

19 

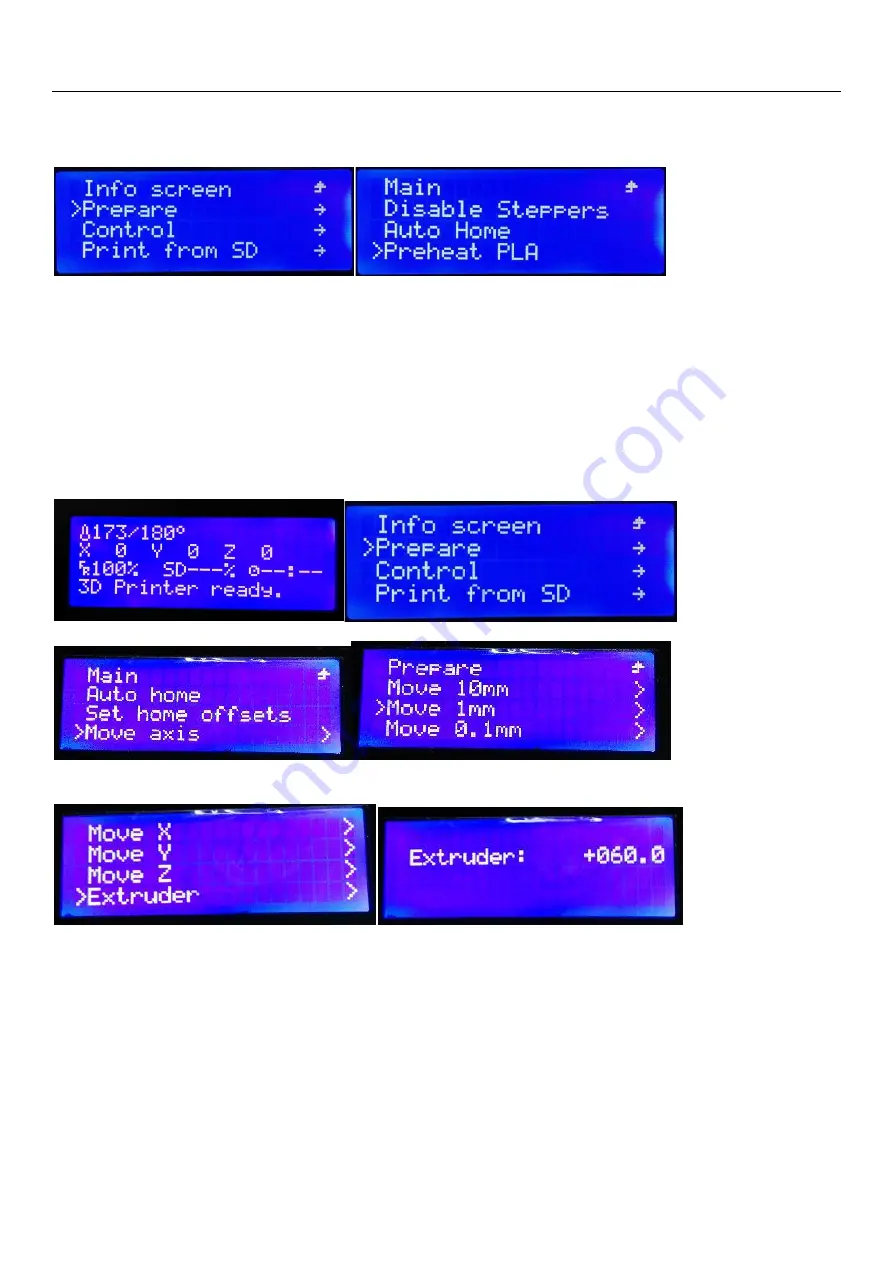
7.2.4 Press knob and enter main menu, turn knob and make “>” move to “Prepare”, press down, turn 
knob and make “>” move to “Preheat PLA”, and then press down, nozzle will be heated. 


7.2.5 When temperature rises to 170

, press knob again and enters main menu, operate as follow: 

“Prepare”-->“Move axis”-->“Move 1MM”--> “Extruder”, press down, turn knob clockwise till value 
shows “60”, later you will see filament comes out from extruding nozzle. 


Notes: In order to prevent filament inlet from getting blocked during testing and transporting, 
leave certain filament in extruder, so next time when you use printer, leftover filament can be 
extruded out and new filament can be loaded.


7.2.6 Repeat above operation, if no filament is extruded out, insert filament feeding pipe which is close 
to print head into filament inlet until it goes close to gear, after feeling filament flowing, remove your 
hand, let filament flow automatically, till new filament is extruded out of nozzle slowly and smoothly, 
filament testing is finished, you can carry on next step -- print. 
 

7.3 Off-line Print 

Since functions of connect-to-computer print and off-line print are same, and there are various 
inconvenient factors in connect-to-computer print, so off-line print is recommended.   

Summary of Contents for A-Box

Page 1: ... Co Ltd www weistek net 1 A Box 3D Printer Manual V1 1 Bigger Size Smarter Choice Dream Bigger Print Bigger Your Ideal Printer at Affordable Price Pause Printing Easy filament Changing Real Time Speed Adjust You have the Control ...

Page 2: ...o printers of this model and the manual without noticing customers The company is not responsible for printer damages caused by violation of this manual including damages caused by printing or publishing errors of the manual Any company or anyone is not allowed to revise print copy or translate this manual without our permission This manual is copyrighted and its final explanation right is reserve...

Page 3: ...w weistek net 3 Contents Instructions and Important Safety Considerations 1 Product Introduction 2 Printer Installation 3 Software Installation 4 Software Setting 5 Software Operation 6 Operation Panel 7 Start Working 8 Notes 9 Maintenance ...

Page 4: ...use the third party software to update firmwares of this printer or printing can not be conducted with the software provide by our company Please do not change parameter settings of printer or printer may not work properly Please do not reach your hand onto build bed while heating or using extruder or you may be hit or burned by moving components Please do not put or use printer in dusty highly hu...

Page 5: ...ume 210mm 180mm 200mm L W H Layer Resolution 0 05 0 4mm suggest 0 1 0 2mm Printing Speed 30 300mm S Recommended Range 40 100mm S Filament Diameter 1 75mm Consumable material type PLA Flexible WOOD HS Pearl Elastic Product Net Weight 12kg Product Gross Weight 15kg Product Volume 370 400 390 mm L W H Package Volume 467 457 470mm L W H Slicing Software Cura Printing format gcode Connectivity USB2 0 S...

Page 6: ...C 1 5A 50 60Hz Power Output 19V DC 4 74A Maximum Power 120W 2 Printer Installation 2 1 Open Package Accessories List Name Qty Note 1 Print Head Set 1 set 2 Printing Filament 1 roll 3 Build Bed Sticker 1 roll 4 Front Decoration Plate A1 1 piece 5 Glass Build Bed A2 1 piece 6 Tool Box 1 set SD card screws diagonal pliers small wrench flat shovel power cable and data cable ...

Page 7: ...istek Technology Co Ltd www weistek net 7 A Open package B Take out acrylic C Take out glass build bed D Take out fixing part of X axis move it toward arrow direction then take it up and out E Take out accessories ...

Page 8: ...n hole on the back of printer as shown bellow Take out glass build bed masking tape and knife tape the whole glass build bed with masking tape as shown below hold glass build bed with its four corner holes aiming at screws then press build bed to the bottom and make it even Tape the whole glass build bed with masking tape Aim to the screw hole and press to the bottom ...

Page 9: ...the bottom as shown below Take out print head set and tools Stuck print head in sliding rail aim screw hole which is on the bottom of print head to the screw hole on stuck piece of sliding rail install screw from the bottom as shown below Tighten up screws and fix print head Remove print head cover as shown below Use both hands to insert print head cable into location as shown below Stuck cable in...

Page 10: ... to your computer and then install it do not update the version after installation is completed Click Cura Installation Program This manual is designed for Windows operating system interface OS users need to refer corresponding operation Set path on Pre Installation Window you d better install it in English directory please do not name it in Chinese ...

Page 11: ... Co Ltd www weistek net 11 Select needed formats STL is a commonly used format Click Finish after installation is completed and start Cura software Installing Driver Window may pop up during installation click Install to continue ...

Page 12: ...istek Technology Co Ltd www weistek net 12 Select English for language select Other for machine then click Next to continue Select Customer and input parameters as shown below click Finish to enter main interface ...

Page 13: ... Ltd www weistek net 13 4 Software Settings Set parameters on main interface and maintain defaulted settings for unmarked parts as shown below Following are defaulted software settings experienced users can change them as they need ...

Page 14: ... Co Ltd www weistek net 14 About Expert Support Settings Click Expert and enter expert menu click Open expert settings and change support settings All settings are finished connect your computer to printer and carry on next step ...

Page 15: ...tek net 15 5 Software Operation Drag model file onto build bed Window G code will be formed automatically For off line printing save G code file in SD card then insert SD card into operation panel and directly conduct printing on operation panel ...

Page 16: ...Shenzhen Weistek Technology Co Ltd www weistek net 16 6 Operation Panel ...

Page 17: ... Take out filament feeding pipe and spool holder install them on printer shell open filament package cut off curve filament beginning press about 10cm of filament straight transport filament into filament feeding pipe till it goes into the hole which is on top of print head as shown below ...

Page 18: ...Home and then press down printer operation system resets automatically as shown below 7 2 3 After printer resets if the distance between nozzle and build bed is of soft contact about as thick as a piece of A4 paper then turn off power freely push extruder with your hands on X Y direction if the distance between the whole build bed and nozzle is same then you can carry on next step or build bed nee...

Page 19: ...sting and transporting leave certain filament in extruder so next time when you use printer leftover filament can be extruded out and new filament can be loaded 7 2 6 Repeat above operation if no filament is extruded out insert filament feeding pipe which is close to print head into filament inlet until it goes close to gear after feeling filament flowing remove your hand let filament flow automat...

Page 20: ...while heating or using extruder or you may be hit or burned by moving components Please do not put or use printer in dusty highly humid or strong sunlight environment Please do not put printer on an inclining platform or printing effect may be affected printer may fall get damaged or break other things Please do not uninstall model from build bed without wearing protective gloves or you may get bu...

Page 21: ...st to clean extruding nozzle after model printing is completed each time keep extruding nozzle clean and avoid blocking Cleaning method After model printing is completed while temperature of extruding nozzle is still high hold a piece of clean cloth or soft napkins with tweezers or diagonal pliers repeatedly mop leftover filament until completely remove it If temperature of extruding nozzle drops ...

Page 22: ...of Z axis on upper left of build bed stop when you hear a sound of ka as shown below 9 3 3 Examine distance between nozzle and build bed if the nozzle is too further or closer to the build bed adjust screw which is under build bed and form soft touch between build bed and nozzle about as thick as a piece of A4 paper as shown below ...

Page 23: ...r three spots in same way if screws are adjusted to their limitation it means height of the whole build bed needs to be adjusted then adjust height of build bed and limit switch after that adjust four spots again as shown below Attention After build bed is adjusted it should be placed in the same direction each time or build bed may be uneven ...

Reviews: