background image

3

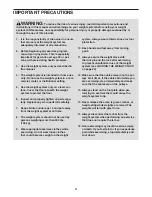
IMPORTANT PRECAUTIONS

1.  It is the responsibility of the owner to ensure 

that all users of the weight system are 
adequately informed of all precautions.

2.  Before beginning any exercise program, 

consult your physician. This is especially 
important for persons over age 35 or per-
sons with pre-existing health problems.

3.  Use the weight system only as described in 

this manual.

4.  The weight system is intended for home use 

only. Do not use the weight system in a com-
mercial, rental, or institutional setting.

5.  Use the weight system only on a level sur-

face. Cover the floor beneath the weight 
system to protect the floor.

6.  Inspect and properly tighten all parts regu-

larly. Replace any worn parts immediately.  

7.  Keep children under age 12 and pets away 

from the weight system at all times.

8.  The weight system should not be used by 

persons weighing more than 300 lbs. 
(136 kg).

9.  Wear appropriate exercise clothes while 

exercising; do not wear loose clothes 
that could become caught on the weight 

system. Always wear athletic shoes for foot 
protection.

10. Keep hands and feet away from moving 

parts.

11. Always secure the weight stack with 

the lock pin and the lock after exercising 
to prevent unauthorized use of the weight 
system (see LOCKING THE WEIGHT STACK 
on page 23).

12. Make sure that the cables remain on the pul-

leys at all times. If the cables bind while you 
are exercising, stop immediately and make 
sure that the cables are on the pulleys.

13. Always stand on the foot plate when per-

forming an exercise that could cause the 
weight system to tip.

14. Never release the arms, leg lever, lat bar, or 

handle strap while weights are raised. The 
weights will fall with great force. 

15. Always disconnect the lat bar from the 

weight system when performing an exercise 
that does not require the lat bar.

16. Over exercising may result in serious injury 

or death. If you feel faint or if you experience 
pain while exercising, stop immediately and 
cool down.

    WARNING:

 To reduce the risk of serious injury, read all important precautions and 

instructions in this manual and all warnings on your weight system before using your weight 
system. ICON assumes no responsibility for personal injury or property damage sustained by or 
through the use of this product.

Summary of Contents for 6900 831.14922.2

Page 1: ...autions and instruc tions in this manual before using this equipment Keep this manual for future reference Model No 831 14922 2 Serial No Write the serial number in the space above for reference Assem...

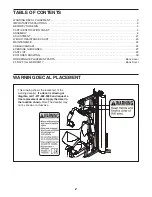
Page 2: ...the location shown Note The decal s may not be shown at actual size WARNING DECAL PLACEMENT 2 IMPORTANT PRECAUTIONS 3 BEFORE YOU BEGIN 4 PART IDENTIFICATION CHART 5 ASSEMBLY 6 ADJUSTMENT 21 WEIGHT RE...

Page 3: ...hoes for foot protection 10 Keep hands and feet away from moving parts 11 Always secure the weight stack with the lock pin and the lock after exercising to prevent unauthorized use of the weight syste...

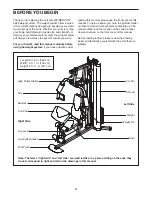
Page 4: ...tem the weight system will help you to achieve the speci c results you want For your bene t read this manual carefully before using the weight system If you have questions after reading this manual pl...

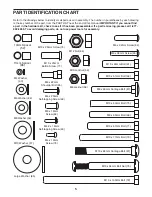
Page 5: ...x 86mm Carriage Bolt 67 M10 x 25mm Button Screw 77 M10 x 130mm Bolt 72 M10 x 25mm Screw 74 M10 x 64mm Bolt Set 76 M10 x 63mm Bolt 75 11mm Spacer 86 13mm Spacer 52 M12 Nut 84 PART IDENTIFICATION CHART...

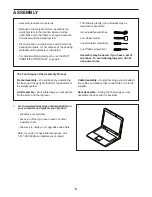
Page 6: ...o walk around the weight system Place all parts in a cleared area and remove the packing materials Do not dispose of the packing materials until assembly is completed For help identifying small parts...

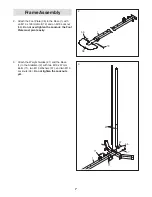
Page 7: ...56 Do not overtighten the Locknut the Foot Plate must pivot easily Frame Assembly 2 1 38 3 Attach the Weight Guides 21 and the Base 1 to the Stabilizer 2 with two M10 x 67mm Bolts 71 two M10 Washers...

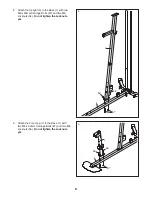
Page 8: ...two M8 x 63mm Carriage Bolts 87 and two M8 Locknuts 58 Do not tighten the Locknuts yet 4 5 7 58 58 4 Attach the Upright 3 to the Base 1 with two M8 x 63mm Carriage Bolts 87 and two M8 Locknuts 58 Do n...

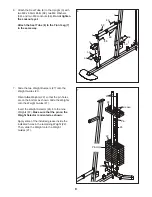
Page 9: ...in on the Weight Selector is oriented as shown Apply some of the included grease inside the indicated holes in the remaining Weight 22 Then slide the Weight onto the Weight Guides 21 6 7 21 6 Attach t...

Page 10: ...x 64mm Bolt Set 76 Make sure that the barrel of the Bolt Set is inserted through both sides of the bracket on the Front Leg 9 10 8 Attach the Top Frame 4 to the Upright 3 with two M10 x 67mm Bolts 71...

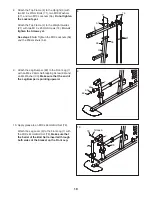
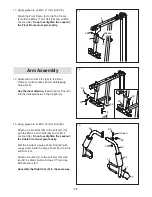
Page 11: ...nto the indicated holes in the Upright 3 5 69 69 40 40 13 11 10 39 57 77 66 56 9 42 Grease 13 Apply grease to an M10 x 51mm Bolt 66 Attach a Cable Pivot 39 to the Left Arm 10 with the M10 x 51mm Bolt...

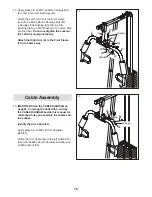
Page 12: ...ivot easily Attach the Right Arm 9 to the Pivot Frame 5 in the same way 10 9 44 56 67 57 20 5 44 Grease Grease 15 IMPORTANT See the CABLE DIAGRAM on page 25 Cut along the dotted line and lay the CABLE...

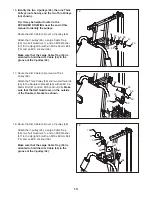
Page 13: ...in the groove of the V pulley 46 56 3 57 46 50 41 75 54 41 16 17 Route the Arm Cable 54 around a Thick Pulley 48 Attach the Thick Pulley 48 and two Half Guards 43 to the Double U bracket 63 with an M1...

Page 14: ...Cable 53 through the Leg Lever 8 and the Front Leg 7 Attach a Thick Pulley 48 inside the Leg Lever 8 above the Low Cable 53 with an M10 x 67mm Bolt 71 two M10 Washers 57 two 13mm Spacers 52 and an M1...

Page 15: ...ards 43 to the Double U bracket 63 with an M10 x 46mm Bolt 81 and an M10 Locknut 56 Make sure that the Half Guards are on the outside of the Double U bracket as shown 22 56 23 48 81 81 3 24 Route the...

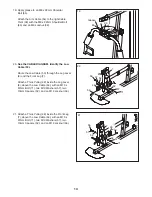
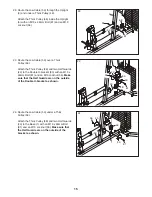
Page 16: ...lley 47 inside the Top Frame 4 with an M10 x 67mm Bolt 71 an M10 Washer 57 and an 11mm Spacer 86 Make sure that the Thin Pulley does not fall out of the Top Frame while you complete steps 28 and 29 No...

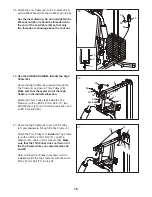
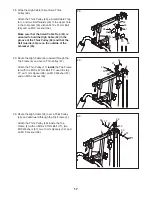
Page 17: ...outside of the U bracket 45 30 Route the High Cable 55 over a Thick Pulley 48 and downward through the Top Frame 4 Attach the Thick Pulley 48 inside the Top Frame 4 with an M10 x 67mm Bolt 71 two M10...

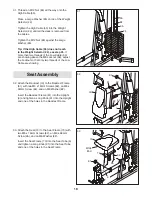
Page 18: ...ut so that only two threads of the Low Cable are showing 55 84 85 24 32 Attach the Backrest 16 to the Backrest Frame 61 with two M6 x 16mm Screws 62 an M6 x 32mm Screw 64 and an M6 Washer 82 Insert th...

Page 19: ...Left Shroud 17 and the Shroud Support 19 with two M4 x 12mm Screws 78 and two M4 Washers 33 Do not tighten the Screws yet 34 Insert the Pad Tube 29 into the Front Leg 7 Slide a Small Foam Pad 28 onto...

Page 20: ...not properly installed they may be damaged when heavy weight is used See the CABLE DIAGRAM on page 25 for proper cable routing If there is any slack in the cables you will need to remove the slack by...

Page 21: ...tack Turn the bent end downward Note Due to the cables and pulleys the amount of resistance at each exercise station may vary from the weight setting Use the WEIGHT RESISTANCE CHART on page 23 to find...

Page 22: ...o the Front Leg and secure it in place with the Short Knob 25 Remove the Curl Pad 14 when it is not in use When performing an exercise that does not require the Curl Pad remove the Curl Pad After you...

Page 23: ...below shows the approximate weight resistance at each exercise station The numbers in the left col umn refer to the 12 5 lb weights Note The weight resistance shown for the butter y arm station is for...

Page 24: ...e M10 Locknut 56 and the M10 x 51mm Bolt 66 from the two Half Guards 43 the U bracket 45 the Small Cable Trap 51 and the Thick Pulley 48 Reattach the Thick Pulley 48 Small Cable Trap 51 and Half Guard...

Page 25: ...s in each drawing show the proper route of that cable Cut along the dotted line and refer to this diagram while you assemble the cables and the pulleys If the cables and the pulleys are not assembled...

Page 26: ...26 NOTES...
Page 27: ...Familiarize yourself with the equipment and learn the proper form for each exercise Use your own judgment to determine the appropriate length of time for each workout and the numbers of repetitions a...

Page 28: ...nd enjoyable part of your life Exercise Lbs Sets Reps Exercise Lbs Sets Reps 1 6 2 7 3 8 4 9 5 10 Strength Date Exercise Lbs Sets Reps Exercise Lbs Sets Reps 1 6 2 7 3 8 4 9 5 10 Exercise Lbs Sets Rep...

Page 29: ...e 55 1 High Cable 56 22 M10 Locknut 57 22 M10 Washer 58 11 M8 Locknut 59 5 M8 Washer 60 1 Leg Bumper 61 1 Backrest Frame 62 6 M6 x 16mm Screw 63 1 Double U bracket 64 1 M6 x 32mm Screw 65 2 M8 x 22mm...

Page 30: ...77 13 14 62 36 35 36 37 6 95 82 62 68 68 68 68 28 29 28 30 52 57 56 52 48 57 30 71 34 28 53 28 56 31 87 87 81 43 43 56 48 71 71 8 34 9 10 40 57 57 83 80 57 30 38 15 57 34 34 20 42 69 73 58 59 72 25 5...

Page 31: ...43 48 56 51 58 59 45 49 56 56 81 43 48 43 48 43 43 63 81 88 89 90 90 91 74 19 49 33 33 19 49 33 33 32 56 56 41 57 46 50 41 75 41 57 46 50 41 75 62 61 58 59 56 64 81 58 58 48 12 3 56 57 71 56 57 86 86...

Page 32: ...1 800 4 MY HOME 1 800 469 4663 to arrange for free repair or replace ment if repair proves impossible This warranty does not apply when the Weight System Exerciser is used commercially or for rental p...

Reviews: