background image

21

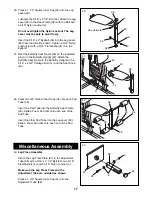
Attaching the Leg Lever to the Low Pulley
Station

To use the Leg Lever (29), the seat must be attached to
the Butterfly upright (see ATTACHING AND REMOVING
THE BUTTERFLY SEAT on page 20).

Attach one end of the Chain (52) to the Medium Cable
(86) with a Cable Clip (53). Attach the other end of the
Chain to the Eyebolt (35) with a Cable Clip. 

Always

remove the Chain (52) from the Eyebolt (35) before
removing the seat.

29

53

52

35

86

Attaching the Lat Bar or Nylon Strap to the
Low Pulley Station

Attach the Lat Bar (54) to the Medium Cable (86) with a
Cable Clip (53). For some exercises, the Chain (52)
should be attached between the Lat Bar and the Long
Cable with two Cable Clips. 

Adjust the length of the

Chain between the Lat Bar and the Long Cable so the
Lat Bar is in the correct starting position for the exer-
cise to be performed.

The Nylon Strap (39) can be attached in the same
manner. 

54

86

52

53

39

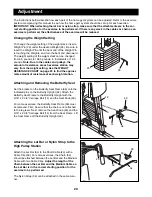
Adjusting the Position of the Foot Plate

To adjust the position of the foot plate, pull out the Small
Lock Pin (90). Move the Adjustment Tube (88) to the
desired position and re-insert the Lock Pin.

88

90

Summary of Contents for Pro 9628

Page 1: ...ENT PENDING QUESTIONS As a manufacturer we are committed to providing complete customer satisfaction If you have questions or if there are missing or damaged parts we will guarantee complete satisfac tion through direct assistance from our factory TO AVOID UNNECESSARY DELAYS PLEASE CALL DIRECT TO OUR TOLL FREE CUSTOMER HOT LINE The trained techni cians on our customer hot line will provide immedia...

Page 2: ... on a level surface Cover the floor or carpet beneath the home gym system for protection 5 Inspect and tighten all parts often Replace any worn parts immediately 6 Make sure the cables remain on the pulleys at all times If the cables bind while you are exercising stop immediately and make sure the cables are on all of the pulleys 7 Always stand on a foot plate when perform ing an exercise that cou...

Page 3: ...ou to achieve the results you want For your benefit read this manual carefully before using the WEIDER PRO 9628 Home Gym System If you have additional questions please call our Customer Service Department toll free at 1 800 999 3756 Monday through Friday 6 a m until 6 p m Mountain Time excluding holidays To help us assist you please note the product model number and serial number before calling Th...

Page 4: ...t Unpacking the Box To make the assembly process as smooth as possi ble we have broken it into separate stages All parts used in each stage are found in individual packages in the shipping box Place all parts in a cleared area and remove the packing materials Do not dispose of the packing materials until assembly is completed Important Wait until you begin each assembly stage to open the parts bag...

Page 5: ...erfly Base 4 on the floor with the holes in the mounting bracket over the Carriage Bolts in the Stabilizer 5 3 Insert four 5 16Ó x 2 1 2Ó Carriage Bolts 1 up through the Press Base 51 and secure them with tape Place the Press Base 51 on the floor with the holes in the mounting bracket over the Carriage Bolts in the Stabilizer 5 Note The mounting bracket on the Press Base 51 should be on top of the...

Page 6: ...ghten the Nylon Locknuts yet Note The Press Upright 56 must be leaning towards the center of the unit with the side arm facing outward 5 6 6 Slide the Butterfly Upright 42 onto the 5 16Ó x 2 1 2Ó Carriage Bolts 1 in the Butterfly Base 4 Hand tighten a 5 16Ó Nylon Locknut 3 onto each Carriage Bolt Do not tighten the Nylon Locknuts yet Note The Butterfly Upright must be leaning towards the center of...

Page 7: ... 7 8 Press the Weight Tube Bumper 64 into the end of the Weight Tube 63 Insert the Weight Tube into the stack of Weights 25 Make sure the pin on the Weight Tube is resting in the pin groove in the upper Weight Lubricate the insides of the holes in the Top Weight 76 With the slot B facing down slide the Top Weight onto the Weight Guides and set it on the stack of Weights 25 8 9 Press a 2Ó Square In...

Page 8: ...ack et on the Seat Frame and through the holes in the Press Upright 42 Hand tighten a 5 16Ó Nylon Locknut 3 and a 5 16Ó Flat Washer 8 onto each Carriage Bolt Tighten all Nylon Locknuts used in steps 4 through 12 12 11 Attach the upper ends of the Weight Guides 62 to the Top Frame 55 with a 3 8Ó x 6Ó Bolt 60 two 1 2Ó x 3 4Ó Spacers 61 and a 3 8Ó Nylon Locknut 21 Tighten the Nylon Locknut fully 11 1...

Page 9: ...eft Arm 47 by imagining yourself sitting on the seat Note the posi tion of the welded bracket A on each Arm Arm identification is very important for the next step 15 14 Press a 1 3 4Ó Square Inner Cap 44 into the lower end of each Press Arm 46 Press a 1Ó Round Inner Cap 49 into the side of each Press Arm Attach each Press Arm to the Press Frame 17 with two 5 16Ó x 2 1 2Ó Bolts 22 and two 5 16Ó Nyl...

Page 10: ...nd of the Leg Press Arm 89 Lubricate the 3 8Ó x 3 1 4Ó Bolt 85 Attach the Leg Press Arm 89 to the Press Base 51 with the Bolt and a 3 8Ó Nylon Locknut 21 17 16 16 Lubricate both axles A on the Top Frame 55 Slide the Right Arm 48 onto the right axle Note Be careful not to confuse the Right and Left Arm Make sure the upper end of the Right Arm is behind the indicated bracket B on the Top Frame Tap t...

Page 11: ...e pulley bracket D Route the Short Cable 23 around the Pulley in the direc tion shown Make sure the Long Cable Trap 50 is positioned to hold the Cable in place 21 20 Locate the Short Cable 23 It has a ball on one end and a threaded tip on the other Feed the threaded end of the Short Cable 23 between the pre assembled 3 1 2Ó Pulley 15 and the hook C on the Top Frame 55 Next route the Short Cable ar...

Page 12: ... Cable 23 to the Small ÒUÓ Bracket 67 with a 1 4Ó Nylon Locknut 2 and a 1 4Ó Flat Washer 10 Do not completely tighten the Nylon Locknut It should be threaded onto the end of the Cable only a couple of turns as shown in the inset drawing Attach the small ÒUÓ Bracket 67 to the Weight Tube 63 with the 5 16Ó x 1 3 4Ó Bolt 72 and a 5 16Ó Nylon Locknut 3 23 23 67 72 2 23 2 67 10 80 50 6 56 17 9 21 25 At...

Page 13: ...und the 3 1 3Ó Pulley 15 on the Press Upright in the direction shown 27 26 Attach a ÒVÓ Pulley 6 and a Long Cable Trap 50 to the bracket on the Press Seat Frame 77 with a 3 8Ó x 2 1 2Ó Bolt 7 and a 3 8Ó Nylon Locknut 21 It may be necessary to place the Long Cable Trap on top of the bracket Make sure the Long Cable Trap is positioned as shown Attach two 3 1 2Ó Pulleys 15 and two Cable Traps 66 to t...

Page 14: ...e ball around a 3 1 2Ó Pulley 15 in the direction shown Attach the Pulley to the Butterfly Upright 42 with a 3 8Ó x 3 3 4Ó Bolt 71 a 3 8Ó Flat Washer 9 and a 3 8Ó Nylon Jam Nut 83 30 31 29 Move to the other side of the unit Route the Long Cable 58 around the second 3 1 2Ó Pulley 15 on the Leg Press Arm 89 in the direction shown 29 15 89 10 57 2 57 15 4 71 15 86 83 9 42 58 58 2 10 32 Wrap the Mediu...

Page 15: ...66 is positioned as shown 33 15 57 66 86 41 43 10 43 10 34 Attach the closed loop on the end of the Medium Cable 86 to the Top Frame 55 with a 5 16Ó x 2 3 4Ó Bolt 11 a 5 16Ó Flat Washer 8 and a 5 16Ó Nylon Locknut 3 Make sure the flat side of the closed loop is turned towards the Top Frame 34 3 8 11 86 55 56 21 12 36 Insert the 1 4Ó x 2 1 2Ó Carriage Bolt 91 into the cen ter hole in a Seat Plate 3...

Page 16: ...1 1 2Ó Square Inner Cap 32 into the Butterfly Seat Frame 36 Insert the 1 4Ó x 2Ó Carriage Bolt 38 into the center hole in a Seat Plate 37 Attach the Seat Plate to the Seat 13 with two 1 4Ó x 3 4Ó Screws 18 Insert the 1 4Ó x 2Ó Carriage Bolt 38 into the indicat ed hole in the Butterfly Seat Frame Tighten a 1 4Ó Nylon Locknut 2 with a 1 4Ó Flat Washer 10 onto the Carriage Bolt Attach the other end o...

Page 17: ...rfly Upright with a 5 16Ó x 2 3 4Ó Carriage Bolt 14 and the Seat Knob 40 40 17 33 Lubricate 35 3 29 8 3 36 32 41 40 14 A 36 42 42 Press two 3 4Ó Round Inner Caps 34 into each Pad Tube 28 Insert one Pad Tube into the Butterfly Seat Frame 36 Slide a Foam Pad 30 onto each end of the Pad Tube Insert the other Pad Tube into the Leg Lever 29 Slide a Foam Pad 30 onto each end of the Pad Tube 42 34 30 28 ...

Page 18: ...0 Make sure the Leg Press Plate 87 is oriented as shown 44 88 90 87 89 45 BUTTERFLY 45 Remove the decals from the decal sheets not shown and apply them to the home gym system in the loca tions shown in the illustration below ARM PRESS LEG PRESS LEG EXTEN SION CURL HIGH PULLEY LOW PULLEY ...

Page 19: ...y weight is used If there is any slack in the cables you will need to remove the slack by tightening the cables See TROUBLE SHOOTING AND MAINTENANCE on page 22 Cable Diagram The Cable Diagram below shows the proper routing of the Short Cable 23 the Medium Cable 86 and the Long Cable 58 The numbers show the correct route for each cable Make sure the Cables are routed cor rectly that the Pulleys mov...

Page 20: ...e weight setting Use the WEIGHT RESISTANCE CHART on page 23 to find the approxi mate amount of resistance at each weight station 25 26 Attaching and Removing the Butterfly Seat Set the bracket on the Butterfly Seat Frame 36 onto the indicated pins on the Butterfly Upright 42 Attach the Butterfly Seat Frame to the Butterfly Upright with the 5 16Ó x 2 3 4Ó Carriage Bolt 14 and the Seat Knob 40 For s...

Page 21: ... or Nylon Strap to the Low Pulley Station Attach the Lat Bar 54 to the Medium Cable 86 with a Cable Clip 53 For some exercises the Chain 52 should be attached between the Lat Bar and the Long Cable with two Cable Clips Adjust the length of the Chain between the Lat Bar and the Long Cable so the Lat Bar is in the correct starting position for the exer cise to be performed The Nylon Strap 39 can be ...

Page 22: ...20 68 6 168 48 76 83 283 83 7 195 51 87 95 334 95 8 225 60 98 107 395 107 This chart shows the approximate weight resistance at each station ÒTopÓ refers to the 6 5 lbs top weight The other numbers refer to the 12 5 lbs weight plates Note The actual resistance at each weight station may vary due to differences in individual weight plates as well as friction between the cables pulleys and weight gu...

Page 23: ...move the 3 8Ó Nylon Locknut 21 and the 3 8Ó x 2Ó Bolt 12 from the Cable Trap 66 Pulley 15 and ÒUÓ Bracket Re attach the Pulley without the Cable Trap Make sure the Cable and Pulley move smoothly Slack can also be removed by moving the 3 1 2Ó Pulley 15 to the other hole in the Long ÒUÓ Bracket 57 as shown in the lower inset drawing Remove the 3 8Ó Nylon Locknut 21 and the 3 8Ó x 2Ó Bolt 12 from the...

Page 24: ...4 Nylon Locknut 2 3 8 Nylon Jam Nut 83 5 16 x 2 1 2 Carriage Bolt 1 5 16 x 2 3 4 Carriage Bolt 14 5 16 x 5 Bolt 68 3 8 x 6 Bolt 60 5 16 x 2 3 4 Bolt 11 1 4 x 2 Carriage Bolt 38 5 16 Nylon Locknut 3 1 4 x 2 1 4 Screw 24 1 4 x 2 1 2 Carriage Bolt 91 1 4 x 3 4 Screw 18 1 Tap Screw 92 1 4 x 2 1 2 Screw 43 ...

Page 25: ...1 Round Inner Cap 49 1 Round Cover Cap 70 3 4 Round Inner Cap 34 5 16 x 2 Eyebolt 35 1 1 2 Square Inner Cap 32 1 3 4 Square Inner Cap 44 2 Square Inner Cap 27 2 Square Cover Cap 78 1 Square Inner Cap 65 ...

Page 26: ... 22 3 8 x 2 1 2 Bolt 7 3 8 x 3 3 4 Bolt 71 3 8 x 7 1 2 Bolt 59 Cable Clip 53 1 x 7 8 Plastic Bushing 75 5 16 x 2 1 4 Bolt 33 1 2 x 1 1 4 Spacer 73 3 8 x 3 1 4 Bolt 85 3 8 x 4 1 2 Bolt 79 3 8 x 4 1 4 Bolt 80 3 8 x 2 3 4 Bolt 93 3 8 x 2 3 4 Carriage Bolt 94 1 1 8 x 2 1 2 Plastic Bushing 74 ...

Page 27: ...9 83 27 23 44 3 55 61 21 60 62 3 31 31 54 52 53 39 76 63 64 25 26 3 32 29 67 15 42 4 77 10 43 2 10 27 91 18 37 13 56 48 47 36 11 8 27 3 EXPLODED DRAWINGÐModel No 831 159370 R0697A 75 59 83 17 6 22 3 46 46 31 31 44 44 12 15 21 1 11 65 66 66 94 58 10 2 12 57 21 6 3 8 86 11 86 21 61 61 60 21 84 84 71 66 15 83 9 3 8 85 79 66 15 89 90 15 66 83 21 88 87 22 3 8 8 7 11 11 21 50 82 92 73 73 83 59 49 49 3 5...

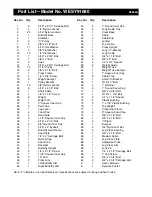
Page 28: ...right 43 5 1 4Ó x 2 1 2Ó Screw 44 7 1 3 4Ó Square Inner Cap 45 2 10Ó Pad 46 2 Press Arm 47 1 Left Butterfly Arm 48 1 Right Butterfly Arm Key No Qty Description 49 4 1Ó Round Inner Cap 50 5 Long Cable Trap 51 1 Press Base 52 1 Chain 53 3 Cable Clip 54 1 Lat Bar 55 1 Top Frame 56 1 Press Upright 57 1 Long ÒUÓ Bracket 58 1 Long Cable 59 2 3 8Ó x 7 1 2Ó Bolt 60 2 3 8Ó x 6Ó Bolt 61 4 1 2Ó x 3 4Ó Spacer...

Page 29: ... damage to a product caused by or attribut able to freight damage abuse misuse improper or abnormal usage or repairs not provided by an ICON authorized service center products used for commercial or rental purposes or products used as store display models No other warranty beyond that specifically set forth above is authorized by ICON ICON is not responsible or liable for indirect special or conse...

Reviews: