background image

4  

I


WPB900 KULLANIM KILAVUZU

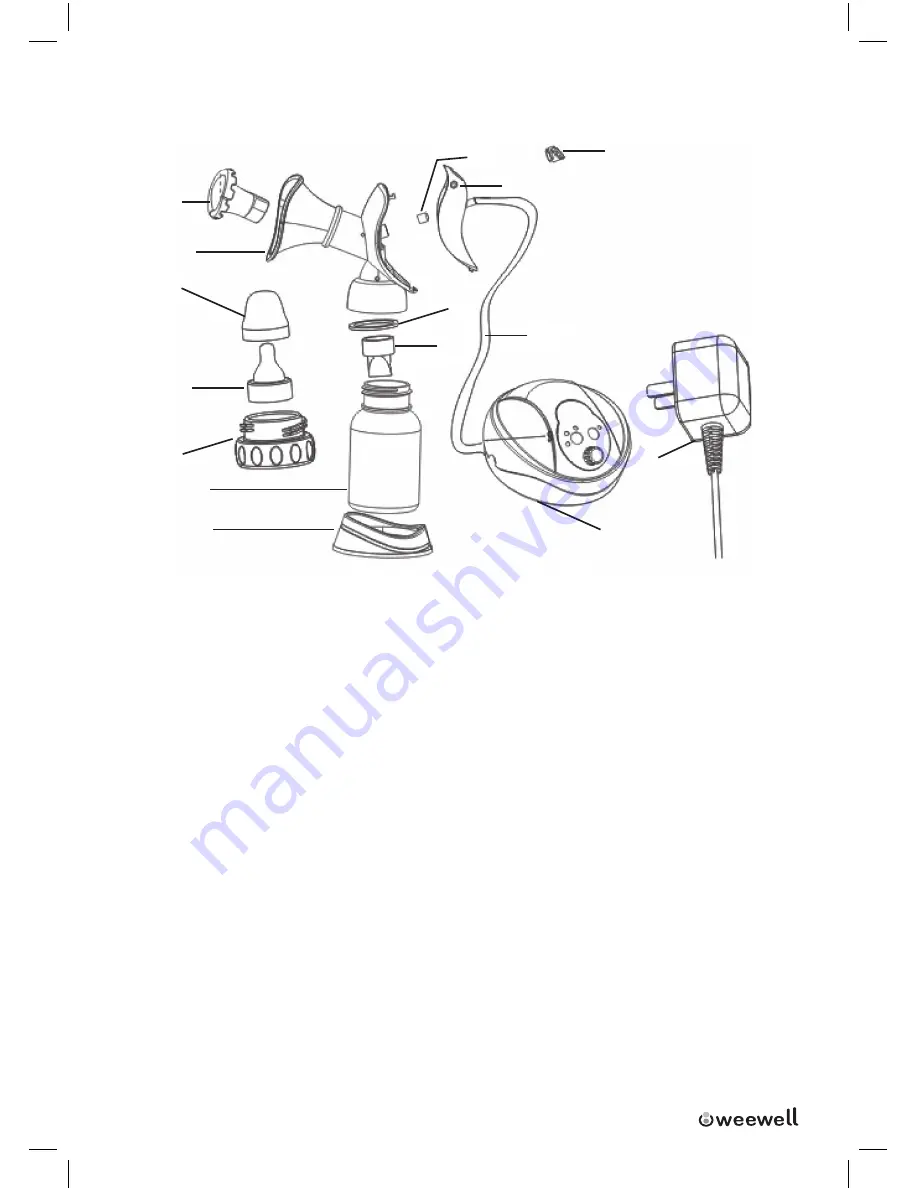
Parçalar

1

2

3

4

5

6
7

8

9

12

10

11

15

14

13

1.

Göğüs Ucu Koruyucusu

Silikon jel/ 110°C’ye dayanıklı

2.

Göğüs Kalkanı Kabı

Tritan/110°C’ye dayanıklı

3.

Biberon Kapağı

PP/110°C’ye dayanıklı

4.

Biberon Emziği

Silikon jel/110°C’ye dayanıklı

5.

Biberon Adapte Edici

PP/110°C’ye dayanıklı

6.

Biberon Şişesi

PP/110°C’ye dayanıklı

7.

Biberon Şişesi Standı

PP/110°C’ye dayanıklı

8.

Hava Geçirmez Halka

Silikon jel/110°C’ye dayanıklı

9.

Akış Hunisi

Silikon jel/110°C’ye dayanıklı

10. Hava Geçirmez Tıpa

Silikon jel/110°C’ye dayanıklı

11. Tamamlayıcı Kapak

PP/110°C’ye dayanıklı

12. Bağlantı Hortumu

Silikon jel/110°C’ye dayanıklı

13. Motor

Sterilize edilemez!

14. AC Adaptör

Sterilize edilemez!

15. Kilitleyici

ABS/110°C’ye dayanıklı

Demontaj

Pompayı ilk kullanım öncesi mutlaka demonte ederek sterilize ediniz. (Motor ve adaptor 

harici parçalar) 

Summary of Contents for WPB900

Page 1: ...USER MANUAL EN MODE D EMPLOI FR KULLANIM KILAVUZU TR WPB900 ELECTRIC BREAST PUMP TIRE LAIT ELECTRIQUE ELEKTR KL G S POMPASI...

Page 2: ...preparation 3 Names of parts 5 Dismantle directions 5 Assembly 6 Installation of exchanger locker 7 Power supply 8 Directions of breast pump using 8 Important 9 Cleaning the Pump 9 Troubleshooting 9 S...

Page 3: ...have been sterilised General information It is advisable to find a quiet comfortable place where you can pump breast milk in a rela xed atmosphere without being disturbed Don t be surprised if the mi...

Page 4: ...mammary glands Start by placing your thumb and index finger around the base of the nipple and gently massage up and down the nipple about 5 6 times for each nipple Move to the breast area and gently...

Page 5: ...gel resist 110 C 10 Seal plug silicone gel resist 110 C 11 Electric connector PP resist 110 C 12 Connect pipe silicone gel resist 110 C 13 Motor unit no sterilize 14 AC adapter no sterilize 15 Locker...

Page 6: ...teat bottle bottle adapter bottle stand Figure 1 Figure 2 Figure 3 Assembly Please ensure your hands are clean before touching the sterilised components Insert the seal ring 8 and flow funnel 9 into...

Page 7: ...figure 6 Next press lower end of the electric connector and close those two items figure 7 Turn the exchanger locker clockwise to the maximum right position figure 8 lock two parts closely Screw the b...

Page 8: ...ast into the breast shield cup figure13 with the nipple centered and sealed to the nipple protector 3 figure14 to create a vacuum Please ensure there are no air gaps between the nipple and the nipple...

Page 9: ...ng Motor unit does not work If using batteries please check the batteries are inserted correctly and are the right way around Try replacing the batteries with super heavy duty alkaline or lithium batt...

Page 10: ...workmanship At Weewell s option Weewell may repair or replace that is determined to be defective by Weewell and determined to be covered by this warranty For warranty service please return the produc...

Page 11: ...nuel d instruction 2 Attention 2 Informations g n rales 2 Massage des seins 2 Description 4 D montage 5 Montage 5 Alimentation 6 Mise en Marche 7 Attention 7 Nettoyage 7 D pannage 8 Garantie 9 Sp cifi...

Page 12: ...well Si vous allaitez un b b pr matur assurez vous de suivre les instructions de votre m decin Avant d utiliser ce tire lait assurez vous que tous ses composants soient propres et st rili s s Informat...

Page 13: ...es glandes mammaires Commencez par placer votre pouce et votre index autour de la base du mamelon et massez chaque mamelon doucement de haut en bas environ 5 6 fois D placez le massage vers le mamelon...

Page 14: ...tine en gel silicone r siste 110 5 Socle t tine en PP r siste 110 6 R cipient en PP r siste 110 7 Socle en PP r siste 110 8 Diaphragme en gel silicone r siste 110 9 Valve en gel silicone r siste 110...

Page 15: ...aintenez l entonnoir 2 avec la main gauche et le connecteur 11 avec la main droite figure 2 Et d montez ces deux pi ces figure 3 Retirez le coussin t tines 1 Retirez le joint 10 D montez le r cipient...

Page 16: ...bien plac dans l entonnoir figure 6 7 ensuite tournez le verrou dans le sens des aiguilles d une montre et accrochez bien les deux pi ces figure 8 Faites le montage de l entonnoir avec le r cipient C...

Page 17: ...ion dure 2 secondes Le t moin est bleu Appuyez de nouveau sur le bouton MODE pour passer au mode NORMAL L aspiration dure 3 secondes Le t moin est bleu et rouge Appuyez sur le bouton MODE et vous pass...

Page 18: ...e soit bien centr e dans le coussin et qu il n y ait aucune infiltra tion d air Assurez vous que le coussin masseur soit bien ajust sur l entonnoir Manque de lait Veuillez essayez tout d abord la comp...

Page 19: ...in masseur valve membrane Weewell pourra remplacer ou r parer les l ments d fectueux et couverts par cette garantie Cette garantie ne couvre pas les dommages caus s par accident ou r sultant d un ma u...

Page 20: ...2 Uyar lar 2 Genel Bilgiler 2 G s Masaj Sa ma Haz rl k 2 Par alar 4 Demontaj 4 Montaj 5 G Kayna 7 r n Kullan m 7 Dikkat 8 Pompan n Temizlenmesi 8 Problem zme 8 S t n Saklanmas 8 Uyar 9 Sorun Giderme 9...

Page 21: ...kimsenin rahats z etmeyece i bir yere ge menizi tavsiye ediyoruz lk kez kullan ma ba larken s t n gelmesi biraz uzun s rebilir Bu durum gayet normaldir V cudunuz s t retimini g nl k t ketime g re aya...

Page 22: ...aret parma n z g s n ucuna yerle tirerek yava a 5 6 kez a a yukar eklinde masaj yap n z G s 4 parma n z ve ba parma n z ekildeki gibi yerle tirerek dairesel hareketlerle nazik e masaj yap n z Herbir...

Page 23: ...i PP 110 C ye dayan kl 7 Biberon i esi Stand PP 110 C ye dayan kl 8 Hava Ge irmez Halka Silikon jel 110 C ye dayan kl 9 Ak Hunisi Silikon jel 110 C ye dayan kl 10 Hava Ge irmez T pa Silikon jel 110 C...

Page 24: ...kar n 10 Biberon par alar n da demonte edin G s ucu koruyucusu G s kalkan kab Biberon emzi i Biberon kapa Biberon Biberon adapte edici Biberon Stand n sterilize ediniz Montaj Steril par alara dokunmad...

Page 25: ...mlay c kapa G s kalkan kab arkas na yerle tirin Resim 6 Alt k sm ndan ittirerek kapa n tam yerle ti inden emin olunuz Resim 7 Kilitleyiciyi saat y n nde evirerek saga tam d nd r n Resim 8 Biberon i es...

Page 26: ...kalkan aras nda bir bo luk kalmad na emin olunuz r n mutlaka dik bir ekilde tutunuz Yat k ya da e ik kullanman z durumunda s t n motora ka ma ihtimali vard r Bu durum r n n garanti kapsam ndan kmas n...

Page 27: ...dilir Motoru sadece zerini nemli sabunlu bez ile silerek yap n z Kesinlikle suya bat rmay n z Problem zme Motor nitesi al m yor E er pil ile kullan yorsan z pillerin dolu oldu undan ve do ru yerle tir...

Page 28: ...t r Garanti Sat n alma tarihini takip eden 2 y l boyunca Weewell bu r n t m malzeme ve i ilik ha talar na kar garanti alt nda kabul eder Weewell bu garanti kapsam nda gerek g rd takdirde r n tamir ede...

Page 29: ...he following products Kind of equipments Electric Breast Pump Type designation Weewell WPB900 are in compliance with the essential requrements of 3 of the R TTED Health and safety requirements pursuan...

Page 30: ...T RKiYE A a da tip ve model numaras bulunan r nlerin R TTED Talimat Paragraf 3 maddesindeki artlara haiz oldu unu beyan ve taahh t ederiz r n n tipi Elektrikli G s Pompas Marka Model No Weewell WPB900...

Page 31: ......
Page 32: ...02124657901 WEEWELL WPB900 ELEKTR KL G S POMPASI WPB900 1 20130301 02 02 2012 109384 2124657901 2124657901...

Reviews: