Webb WER18SPES Operator'S Manual And Parts List Download Page 13


MAINTENANCE 

IMPORTANT - Regular, careful maintenance is essential for keeping the safety level and original 

performance of the machine unchanged over time.


1) Keep all nuts, bolts and screws tight to be sure the equipment is in safe working condition. Regular 

maintenance is essential for safety and performance. 

2) Never store the equipment with fuel in the tank inside a building where vapour may reach a flame, spark 

or source of extreme heat. 

3) Allow the engine to cool before storing in an enclosed space. 

4) To reduce the fire hazard, keep the engine, exhaust silencer, battery compartment and fuel storage area 

free of grass, leaves, or excessive grease. Remove grass cuttings from containers before storage. 

5) Do not use equipment with worn or damaged parts. Parts should be replaced not repaired. Only use 

genuine spare parts. Parts that are not of the same quality can damage the equipment and create safety 

hazards. 

6) If the fuel tank has to be drained, this should be done outdoors and when the engine is cool. 

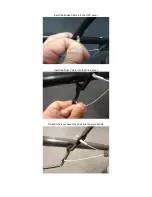
7) Wear strong work gloves when removing and reassembling the blade. 
8) Check the blade’s balance after sharpening. 

9) Check the self-closing guard and grass-catcher frequently for wear and deterioration. 

10) Whenever the machine is to be handled, transported or tilted you must: 

- Wear strong working gloves. 

- Grasp the machine at the points that offer a safe grip, clear of the blade and taking account of the weight of 

the machine and its distribution. 
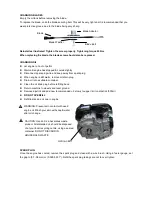
 

CLEANING


Your lawnmower has been supplied with a hose pipe connector towards the back of the deck. This enables 

you to clean the cutting area of your machine, using your garden hose.  


Clip the hose to the machine using a standard hose connector.  


Turn on your tap.  


Ensure that any trailing hose is away from the machine deck.  


Start the machine.  


The momentum of the blade rotation will force water around the deck to clean it. 


Carefully clean the machine after each cut to ensure an easy start-up next time you use the machine. Be 

sure to remove grass debris and mud accumulated inside the chassis before it dries. 


  If you need to tilt the mower while cleaning always tip it backwards towards the handles, do not tip it on 

its side as this will cause oil to enter the carburettor or exhaust.  

  The paintwork on the inside of the chassis may peel off over time due to the abrasive action of the cut 

grass; when this occurs you must touch up the paintwork using a rustproof paint as soon as possible to 

prevent the formation of rust that would lead to corrosion of the metal. 

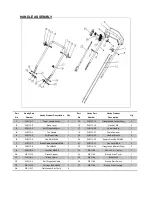
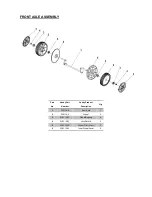
  Remove the transmission casing by removing the screws and clean around the transmission and drive 

belts with a brush or compressed air once or twice a year. 

  Once every season, the drive wheels should be cleaned internally. Remove both wheels. Clean the gear 

wheel and the wheel gear rim of grass and dirt using a brush or compressed air. 


Summary of Contents for WER18SPES

Page 1: ...Electric Start Self Propelled 18 Inch High Wheel Petrol Lawnmower Spares Support 01793 333212 www webblawnmowers co uk Before use please read understand this manual paying particular attention to the...

Page 2: ......

Page 3: ...Stop Engine 11 Maintenance 12 Trouble Shooting 15 Parts Drawing List 17 Warranty Terms Conditions 23 EC Declaration of Conformity 25 Warranty Registration 30 PRODUCT SPECIFICATION Model Number WER18S...

Page 4: ...g or making repairs always disconnect the spark plug lead CAUTION Exhaust and other engine parts become extremely hot during operation and remain hot after engine has stopped To avoid severe burns on...

Page 5: ...ng the grass catcher Mow only in daylight or good artificial light Do not operate the machine while under the influence of alcohol or drugs Never operate machine in wet grass this could cause the user...

Page 6: ...rvicing them Do not change the engine governor setting or over rev the engine Stop the engine if the lawnmower has to be tilted for transportation when crossing surfaces other than grass and when tran...

Page 7: ...e correct levels will invalidate your warranty OPERATION CABLES To avoid damage during the transport process the drive and brake cables for your machine may not be fitted to their appropriate handle b...

Page 8: ...Insert the Brake Cable into the OPC Lever Insert the Drive Cable into the Drive Lever Re seat the lever assembly back into the main handle...

Page 9: ...ntil they are secure INSTALL ATTACHMENTS The mower has three different operating modes 1 Collecting Fit the grassbox by lifting the rear flap on the mower and hook the front of the box to the shaft on...

Page 10: ...OPC Bar must be held down to the handle to start the engine with the Push Button Release the handle to stop the engine Drive Control Self Propelled Lever used to engage self propelled motion of the l...

Page 11: ...change the oil more often under dusty dirty conditions See TO CHANGE ENGINE OIL in the Maintenance section of this manual ADD PETROL Fill the fuel tank to the bottom of the tank filler neck Do not ov...

Page 12: ...be left unattended MOWING TIPS Under certain conditions such as very tall grass it may be necessary to raise the height of the cut to reduce the pushing effort and to keep from overloading the engine...

Page 13: ...at the points that offer a safe grip clear of the blade and taking account of the weight of the machine and its distribution CLEANING Your lawnmower has been supplied with a hose pipe connector towar...

Page 14: ...table container Clean the oil drain plug before refitting back Return machine to wheels and level ground Remove dipstick and add new recommended oil slowly to upper limit on dipstick 500ml DO NOT OVER...

Page 15: ...UEL TANK AND CARBURETOR Place an approved petrol container below the carburetor and use a funnel to avoid spilling fuel Remove the drain bolt and then move the fuel valve lever to the ON position Afte...

Page 16: ...k and carburetor Refuel with fresh petrol Remove and inspect spark plug Spark plug faulty fouled or improperly gapped Replace the spark plug Spark plug wet with fuel flooded engine Dry and reinstall s...

Page 17: ...recommend that the following points should be given special consideration Always use pure unleaded petrol Always use a funnel and or petrol can with a level control to avoid spillage when refilling t...

Page 18: ...ide 1 19 WE113 22 Hex Bolt M8x16 2 6 WE113 6 Cap Nut M6x8 8 1 20 WE113 23 Square Neck Bolt M8x30 2 7 WE113 7 Brake Cable Assembly Plate 1 21 WE113 12 Hex Nut M8 8 8 2 8 WE113 8 Bolt M6x30 1 22 WE113 7...

Page 19: ...5x25 2 5 WE113 28 Cable Stopper 1 18 WE113 41 Bolt M6x12 2 6 WE113 29 Left Handle Bracket 1 19 WE113 42 Lock Nut M6 8 8 2 7 WE113 30 Right Handle Bracket 1 20 WE113 47 Mulch Plug 1 8 WE113 31 Hex Bolt...

Page 20: ...EMBLY Part No Handy Part Number Handy Product Description Qty 1 WE118 8 Front Axle 1 2 WE118 9 Wheel 2 3 WE113 51 Wheel Bearing 4 4 WE113 52 Lock Nut M8 2 5 WE113 75 Wheel Trim Grey 2 6 WE113 54 Inner...

Page 21: ...E118 13 Drive Pin 2 3 WE114 7 Bush 2 13 WE118 14 Wheel 10 2 4 WE114 8 Bearing 6001RS 2 14 WE113 51 Wheel Bearing 4 5 WE115 10 Gasket 13x39 9x1 2 15 WE113 52 Lock Nut M8 2 6 WE115 11 Inner Wheel Cover...

Page 22: ...Grass Collector Top 1 3 WE113 60 Grass Collector Filter Plate 1 4 WE113 61 60L Grass Collector Bag Unbranded 1 5 WE113 62 Rear Discharge Cover 1 6 WE113 63 Rear Discharge Cover Shaft 1 7 WE113 64 Rea...

Page 23: ...WE114 18 Blade Adaptor 1 2 WE113 69 18 Double Edge Blade 1 3 WE113 70 Blade Washer 1 4 WE113 71 50mm Hex Flange Bolt 1 5 WE114 19 Chassis Bushing 2 6 WE114 20 Hex Self Tapping Screw 3 8 16x1ST 30mm 2...

Page 24: ...ate the 2nd year of the warranty g A reduced warranty period of ninety days applies to those items which are subject to normal wear and tear e g wheels tyres cutter bars cylinders bottom blades belts...

Page 25: ...y in terms of the merchantability or the fitness for a particular purpose b No person is authorised to make any warranties representations or promises expressed or implied on behalf of GJ Handy Co Ltd...

Page 26: ...nce with Directive 2006 42 EC Annex II Name of the Notified Body TUV Product Service Address Unit 707 AVIC Bldg No 10B Central Road East 3rd Ring Road Chaoyang District Beijing 100022 P R CHINA Measur...

Page 27: ...GE ES S E EL LE EC CT TR RI IC C P PE ET TR RO OL L R RO OT TA AR RY Y L LA AW WN N M MO OW WE ER RS S P PE ET TR RO OL L R RI ID DE E O ON N L LA AW WN N M MO OW WE ER R P PE ET TR RO OL L L LA AW W...

Page 28: ...__ __ __ __ __ __ __ __ __ __ __ __ __ __ __ __ __ __ __ __ __ __ __ __ __ __ __ __ __ __ __ __ __ __ __ _ _ __ __ __ __ __ __ __ __ __ __ __ __ __ __ __ __ __ __ __ __ __ __ __ __ __ __ __ __ __ __...

Page 29: ...__ __ __ __ __ __ __ __ __ __ __ __ __ __ __ __ __ __ __ __ __ __ __ __ __ __ __ __ __ __ __ __ __ __ __ _ _ __ __ __ __ __ __ __ __ __ __ __ __ __ __ __ __ __ __ __ __ __ __ __ __ __ __ __ __ __ __...

Page 30: ...__ __ __ __ __ __ __ __ __ __ __ __ __ __ __ __ __ __ __ __ __ __ __ __ __ __ __ __ __ __ __ __ __ __ __ _ _ __ __ __ __ __ __ __ __ __ __ __ __ __ __ __ __ __ __ __ __ __ __ __ __ __ __ __ __ __ __...

Page 31: ...anty Registration Form Please go to www webblawnmowers co uk and complete the registration for your machine alternatively please fill in this form and return to the address above YOUR DETAILS Owner s...

Page 32: ...Webb Lawnmowers c o Handy Distribution Dorcan Industrial Estate Swindon SN3 5HY United Kingdom...

Reviews: