


F016J10013A UK Page 9
4
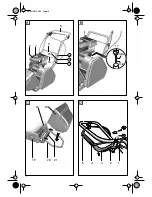
Engaging rear roller only
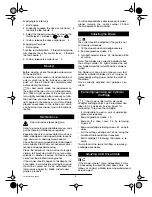
1. Start engine.
2. Gradually squeeze the drive control lever 4
towards the top handle 5.
3. Adjust the speed as required by moving the
throttle lever 1 between
and
.
4. To stop, release the drive control lever 4.
Engaging cutters only
1. Start engine.
Push the red safety latch 2 forward and gradu-
ally squeeze the cutter control lever 3 towards
the top handle 5.
2. To stop, release the cutter lever 3.
Before mowing, check the engine oil level and
fill the petrol tank.
Toward the end of season, it is advisable to put
only as much fuel in the tank as you need for
each cut, since it should be completely used
before storing the mower.
For best results, place the lawnmower on
the edge of the lawn, mow in a forward direc-
tion. Then at right angles at the end of each
turn, slightly overlapping the previously cut strip.
The next time you mow the lawn, try to work at
right angles to the previous cut as this will help
prevent unevenness in the surface soil which
can build up if you always mow in the same di-
rection.
Stop and remove spark plug cap.
Note: To ensure long and reliable service, carry
out the following maintenance regularly.
Regularly check for obvious defects such as a
loose, dislodged or damaged blade, loose fix-
ings, and worn or damaged components.
Check that covers and guards are undamaged
and correctly fitted. Carry out necessary main-
tenance or repairs before using.
Clean the exterior of the machine thoroughly
using a soft brush and cloth. Do not use water,
solvents or polishes. Remove all debris, espe-
cially from the air filter and engine fins.
If the mower should happen to fail despite the
care taken in manufacture and testing, repair
should be carried out by an authorised cus-
tomer service agent for Webb Lawnmowers
garden products.
For all correspondence and spare parts orders,
always include
the
serial
number 30 from
the nameplate of the machine!
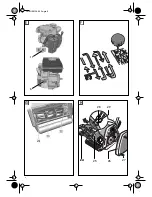
The cutter should be adjusted if the grass is not
cut cleanly and evenly.
1. Tilt the mower back and wedge securely.
2. Remove grassbox cradle 20.
3. Turn both adjuster screws 22 clockwise a little
at a time.
Note: The blades are correctly adjusted when
the cutting cylinder 23 lightly brushes the bot-
tom blade across the full width as the cylinder is
turned.
The blades act like a pair of shears, as a test,
correctly adjusted blades will cut a piece of
good quality writing paper across the width of
the blade.
Once correctly adjusted refit grassbox cra-
dle 20.
The mower is fitted with a Qc (quick
change) cartridge which can be removed and
taken to an
Approved
Service
Agent
for
sharpening. To remove the cartridge:
– It is advisable to wear a pair of gardening
gloves (not supplied).
– Remove grassbox cradle 20.
– Remove the drive cover 26 by removing
screws 27.
– Remove cartridge retaining screws 24 on both
sides.
– Pull the cutting cartridge unit 25 out using the
handle. Obtain assistance if required.
– Refit cartridge 25 following the above in re-
verse.
This method is the same for fitting or removing
cartridge accessories.
If the mower doesn’t drive adequately
it
may
be necessary to adjust the land drive cable as
follows, or contact a Webb Lawnmowers Approved
Service agent:
Mowing
Maintenance
G
Adjusting the Blade
Removing/replacing Qc Cylinder
Cartridge
Adjusting Land Drive Cable
C
G
C
H
E
H
Summary of Contents for C14L
Page 1: ...Qc PETROL CYLINDER MOWER C14L C17L OPERATING INSTRUCTIONS F016J10013A UK Page 1...
Page 2: ...2 F016J10013A UK page 2...
Page 3: ...3 STOP F016J10013A UK page 3 4 6 10 9 1 2 3 5 7 8 11 12 13 30...
Page 5: ...E F H 5 27 24 29 28 25 26 F016J10013A UK Page 5 G 6 24 11...
Page 12: ...F016J10013A 12 12 11 Notes Your nearest dealer Webb Lawnmowers Hobley Drive Swindon SN3 4NS...