


6. Fit new spring clip (2) with 2 screws (1).
7. Install drive unit (see 9.2.6.2).
8. Install control unit (see 9.2.3.2).
9. Install housing parts (see 9.2.2).
10. Install heater (see 8.7.1.2)
9.2.9 Change the combustion chamber and the heat exchanger
9.2.9.1 Removal
1. Remove heater (see 8.7.1.1).
2. Remove housing parts (see 9.2.1).
3. Remove control unit (see 9.2.3.1).
4. Remove overheat temperature sensor (see 9.2.4.1, 9.2.4.1).
5. Remove drive unit (see 9.2.6.1).
6. Remove exhaust temperature sensor (see 9.2.7 and 9.2.4.1, 9.2.8.1). Discard exhaust temperature sensor and
retaining spring.
7. Remove evaporator mount (see 9.2.8.1).
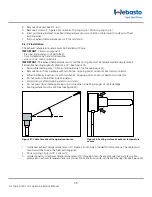
8. Remove 2 screws (1, Figure 34) and pull combustion pipe (4) out of heat exchanger (6).
9. Remove round sealing ring (5) from heat exchanger (6) and discard.
9.2.9.2 Installation
1. Fit new round sealing ring (5, Figure 34) into heat exchanger (6).
2. Secure combustion chamber (4) with 2 screws on opposite sides (1).
3. Tighten screws (1) to 4 ± 0.4 Nm.
4. Install evaporator mount (see 9.2.8.2).
5. Install exhaust temperature sensor (see 9.2.7 and 9.2.4.1, 9.2.8.2).
6. Install drive unit (see 9.2.6.2).
7. Install control unit (see 9.2.3.2).
8. Install overheat temperature sensor (see 9.2.4.2).
9. Install housing parts (see 9.2.2).
10. Install heater (see 8.7.1.2)
61
Air Top Evo 40 / Air Top Evo 55 Service Manual
Summary of Contents for Air Top Evo 40
Page 63: ...4 2015...


