


7. Remove and discard flat seal (7).
9.2.6.2 Installation
1. Make sure that sealing surfaces on drive unit (2, Figure 30) and on heat exchanger (8) are not damaged.
2. Lay new flat seal (7) on flange of drive unit (2).
3. Move drive unit (2) into assembly position and secure it with screws (3).
4. Tighten screws (3) to 6.0 ± 0.6 Nm.
5. Install control unit (see 9.2.3.2).
6. Fit heating air fan (1) (see 9.2.5.2).
7. Install housing parts (see 9.2.2).
8. Install heater (see 8.7.1.2)
9. Check CO
2
setting and adjust if necessary (see Section 6.3).
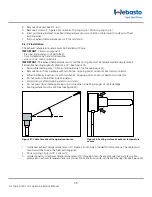
Figure 30: Replace control unit, Overheat Temperature Sensor,
heating air fan and drive unit
1.
Heating air fan
6. Blind plug
2.
Drive unit
7. Flat seal
3.
Torx screw (8 pc.)
8. Heat exchanger
4.
Control unit
9. Overheat Temperature Sensor
5.
Torx screw (2 pc.)
9.2.7 Replacing exhaust temperature sensor
9.2.7.1 Removal
1. Remove heater (see 8.7.1.1).
2. Remove housing parts (see 9.2.1).
3. Remove control unit (see 9.2.3.1).
58
Air Top Evo 40 / Air Top Evo 55 Service Manual
Summary of Contents for Air Top Evo 40
Page 63: ...4 2015...


