Web Mountain Technologies
UPB Timer (TIM-01) Version 3 2
Quick Tour
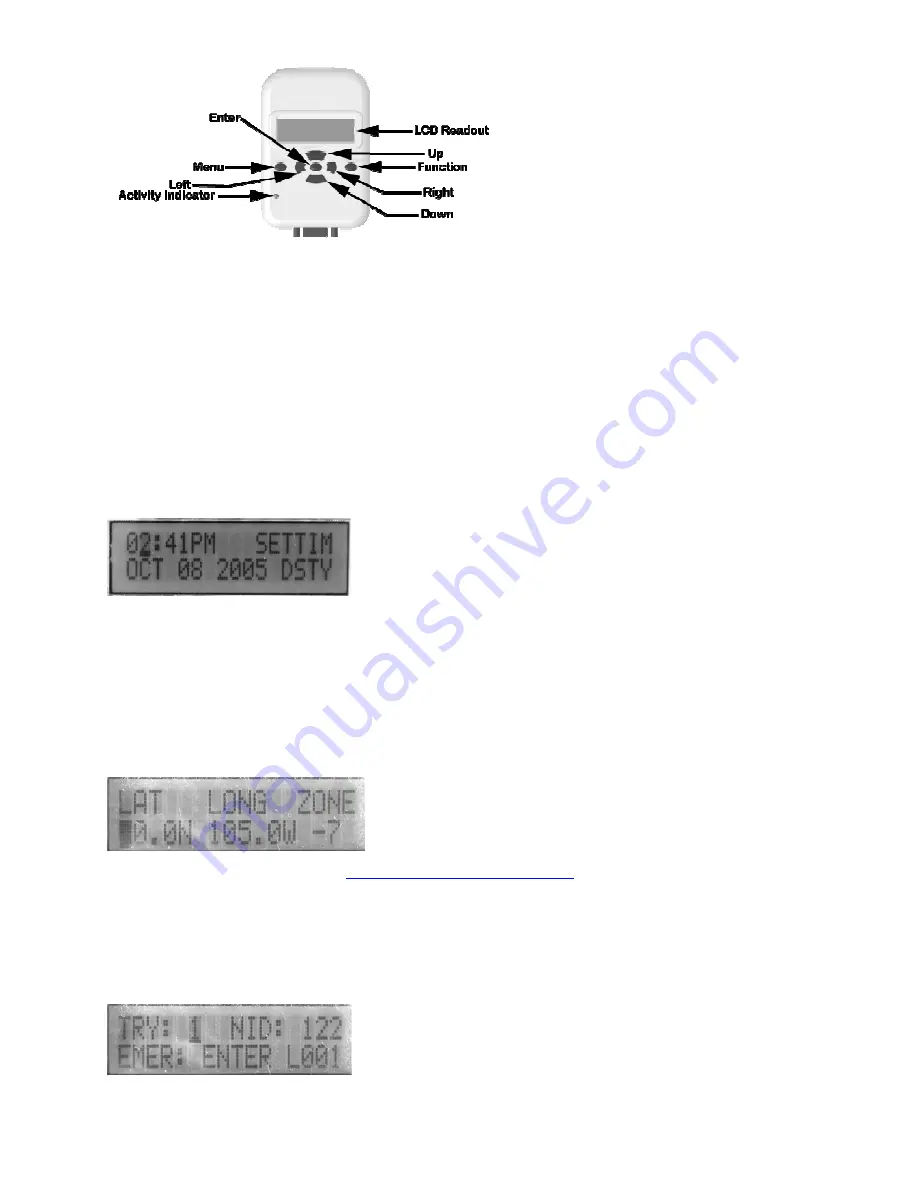
1. LCD Readout.
All output is displayed here. Normally this area will show the time of day, the date and the day of the week.
2. UP/DOWN.
These two buttons are mainly used to select different values for the various fields and attributes that can be set. These buttons can
also operate as Immediate Run buttons or as Panic buttons. See the following sections for more details about these alternative uses.
3. FUNCTION
. This button is used to select a program to run manually, to see the current day’s sunset and sunrise times, to lock out the MENU
button or to put the Timer into Vacation mode or PIM mode or Host mode. This button will also return the Timer to its normal (RUN) state from any of
the Setup screens.
4. LEFT/RIGHT.
These two buttons are mainly used to select the next or previous field to be set in any of the Setup screens. These buttons can also
operate as Immediate Run buttons or as Panic buttons. See the following sections for more details about these alternative uses.
5. ENTER.
This button is used to commit settings. Settings can be changed at any time, but the new settings will only be saved after the ENTER
button is pushed. This button can also be used as an Emergency or Panic button. See the following sections for more information about this
alternative use.
6. MENU.
This button allows you to cycle through various Setup and Information screens.
7. Activity Indicator.
This LED will blink whenever the Timer is performing a saved program or a trigger.
4
Quick Start – Scheduled Programs
If you’ve already defined a UPB Link (scene) and simply want to set up the Timer to turn it on at a certain time of the day and turn it off later in the
evening, follow these steps:
•
Set the Time and Date
o
Push the MENU button until the SETTIM screen is displayed.
o
Use the UP/DOWN buttons to select the correct hour.
o
Use the RIGHT button to go to the minute field and then use the UP/DOWN buttons to select the correct minute.
o
Move to the AM/PM field with the RIGHT button and use the UP/DOWN buttons to select AM or PM.
o
Move to the month field with the RIGHT button and use the UP/DOWN buttons to select the current month.
o
Move to the date field with the RIGHT button and use the UP/DOWN buttons to select the current date.
o
Move to the year field with the RIGHT button and use the UP/DOWN buttons to select the current year.
o
Move to the DST field with the RIGHT button and use the UP/DOWN buttons to select DSTY if you want the Timer to handle Daylight
Savings Time or DSTN if you are in an area that does not use Daylight Savings Time.
o
Review all your settings, and if they are correct, push the ENTER button to save them. The Timer will revert to the RUN screen.
•
Set Latitude, Longitude and Time Zone
o
Push the MENU button until the LAT LONG ZONE screen is displayed.
o
Determine your latitude and longitude, using
http://www.zipinfo.com/search/zipcode.htm
(or a similar site) to look up the values based on
your zip code.
o
Use the UP/DOWN buttons to set the correct value for LAT.
o
Move to the LONG field with the RIGHT button and use the UP/DOWN buttons to set the correct LONG.
o
Move to the ZONE field with the RIGHT button and use the UP/DOWN buttons to select your time zone. Use -5 for Eastern, -6 for Central, -
7 for Mountain and -8 for Pacific.
o
Review your settings, and if they are correct, push the ENTER button to save them. The Timer will revert to the RUN screen.
•
Set the UPB Network ID
o
Push the MENU button until the TRY/NID screen is displayed.
o
Move to the NID field with the RIGHT button and use the UP/DOWN buttons to set the NID to be the same as the UPB Network ID used for
all the other UPB devices installed in this home.
o
Review your settings, and if they are correct, push the ENTER button to save them. The Timer will revert to the RUN screen.


