

Setting the Clock
Listening to the AM/FM Radio
Setting the Alarm
Listening to the Weatherband Radio
Connecting a Cell Phone to the Unit
Weather Alert
Step 1:
Adjust the
On, Batt, Off/Charge Switch
to the
Off/Charge
position.
Step 2:
Press and hold the
Time Set Button
.
Step 3:
While holding the
Time Set Button
, press the
Hour
and
Minute Buttons
to adjust
the hour and minute on the clock.
Step 4:
Release the
Time Set Button
to set the adjusted time.
Step 1:
Adjust the
Function Switch (
Weather Alert, WB, FM, AM
)
to the
AM
or
FM
positions.
Step 2:
Adjust the
On, Batt, Off/Charge Switch
to the
On
position.
Step 3:
Turn the
Tuning Dial
to adjust the AM or FM radio station.
Step 1:
Adjust the
On, Batt, Off/Charge Switch
to the
Off/Charge
position.
Step 2:
Press and hold the
Alarm Set Button
.
Step 3:
While holding the
Alarm Set Button
, press the
Hour
and
Minute Buttons
to adjust
the hour and minute on the alarm time.
Step 4:
Release the
Alarm Set Button
to set the adjusted alarm time.
Step 5:
Adjust the
Function Switch (
Weather Alert, WB, FM, AM
)
to the desired mode for
the alarm to sound to. Turn the
Volume Dial
all the way towards “
Buzzer”
to set the
alarm to sound using the buzzer.
Step 6:
Press the
Alarm Button
to activate or deactivate the set alarm.
Step 1:
Adjust the
Function Switch (
Weather Alert, WB, FM, AM
)
to the
WB
position.
Step 2:
Adjust the
On, Batt, Off/Charge Switch
to the
On
position.
Step 3:
Adjust the
Weatherband Switch
, located on the back of the unit, to the channel
received in your current area.
• For a list of which areas receive which frequency, visit: http://www.weather.
gov/nwr/nwrbro.htm on the internet.
Step 1:
Any Nokia Cell Phone, Samsung Cell Phone, or Cell Phone with a Mini-USB port
can be connected to the unit for charging.
Step 2:
Find the adapter that fits the phone to be connected, and plug it into the phone and
the
Cell Phone Charger Connection.
Step 3:
The connected phone can now be charged by the unit’s Dynamo Hand Crank.
Step 1:
Adjust the
Weatherband Switch
, located on the back of the unit, to the channel
received in your current area.
• For a list of which areas receive which frequency, visit: http://www.weather.
gov/nwr/nwrbro.htm on the internet.
Step 2:
Adjust the
Function Switch (
Weather Alert, WB, FM, AM
)
to the
Weather Alert
position to receive emergency weather information for your region.
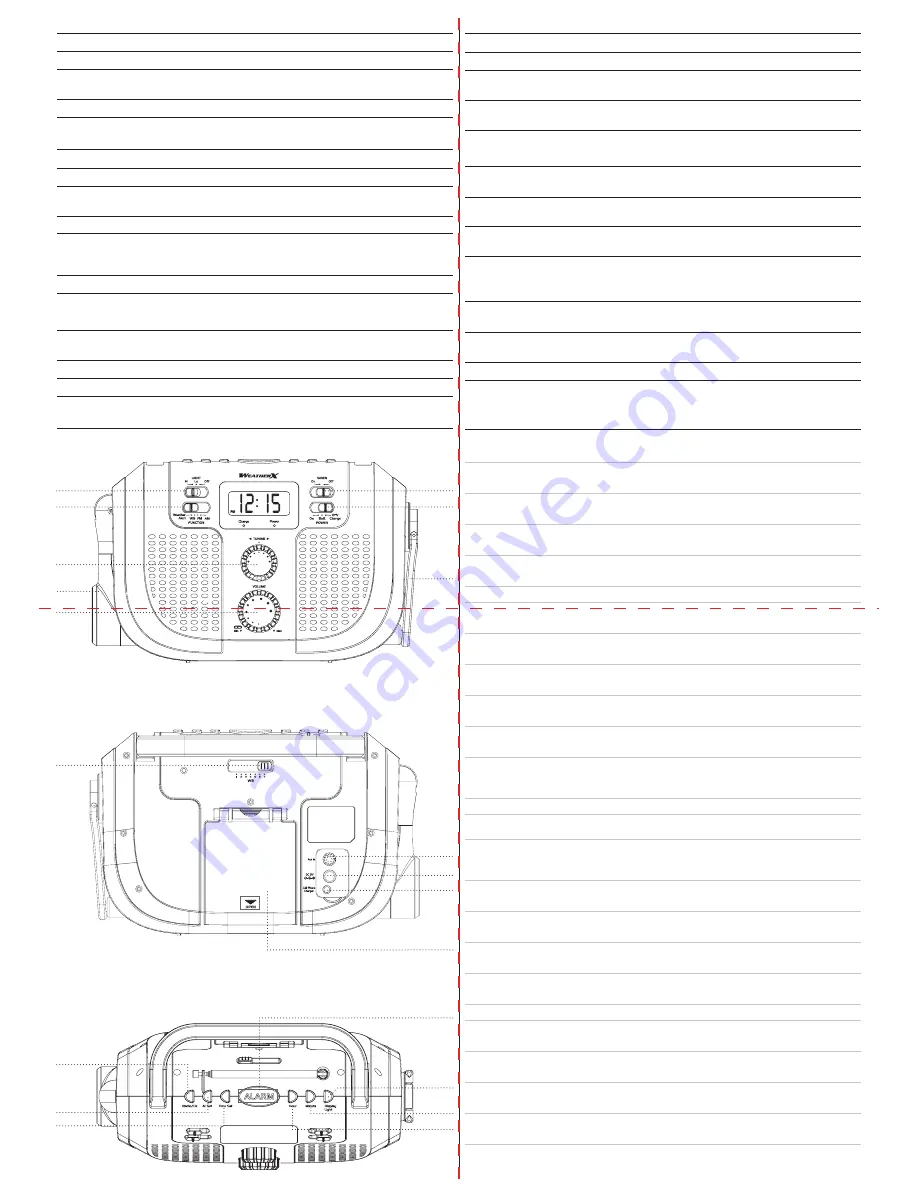
Locations of Controls
Control Definitions
1.
Light Switch (Torch-Hi/Lo/Off)
Use the Light Switch (Torch-Hi/Lo/Off) to adjust the brightness of the articulating light attached to the unit.
2.
Function Switch
(Weather Alert, WB, FM,
AM)
Adjust the Function Switch to switch between
Weather Alert, Weatherband, FM,
and
AM Modes.
3.
Tuning Dial
Turn the Tuning Dial to adjust the frequency of the AM or FM radio.
4.
Torch
The Torch is an articulating light controlled by the Light Switch (Torch-Hi/Lo/Off).
5.
Volume Dial
Turn the Volume Dial to adjust the volume of audio output from the unit.
Turn the Volume Dial to “
Buzzer
” to set the alarm source to
Buzzer Mode
.
6.
Weatherband Switch
Adjust the Weatherband Switch to select the Weatherband Radio station that is available in your current area.
7.
Radio/Clock Button
Press and hold Radio/Clock Button to view the time when in
AM
or
FM radio modes
.
8.
Alarm Set Button
Press and hold the Alarm Set Button to set the unit’s alarm.
9.
Time Set Button
Press and hold the Time Set Button to set the unit’s clock.
10.
Siren Switch
Adjust the Siren Switch to turn the siren on and off.
11.
Power Switch
Adjust the Power Switch to the
On
position to power the unit using the included AC/DC adapter or the internal
lithium ion battery.
Adjust the Power Switch to the
Batt
. position to power the unit using AA batteries, not included.
Adjust the Power Switch to the Off/Charge position to power the unit off and charge it when connected to an AC
power source.
12.
Dynamo Hand Crank
Use the Dynamo Hand Crank to power the unit when there are no other power sources available, and to charge the
internal lithium ion battery.
13.
Auxiliary Input
Use the Auxiliary Input to connect an MP3 player or other audio source to the unit.
14.
DC Power Input
Use the DC Power Input to connect the unit to a DC or AC power source.
15.
Cell Phone Charger Connection
Use the Cell Phone Charger to connect a cell phone to the unit to be charged.
16.
Battery Compartment
Contains the internal lithium ion battery.
Takes 3 AA batteries, not included.
17.
Alarm Button
Press the Alarm Button to activate the set alarm.
18.
Display Light Button
Press the Display Light Button to turn on the amber light for the LCD display.
19.
Minute Button
Press the Minute Button to adjust the minute when setting the clock or alarm.
20.
Hour Button
Press the Hour Button to adjust the hour when setting the clock or alarm.
1
10
2
11
12
4
3
5
6
13
14
15
16
7
8
9
18
19
20
17


