background image

7

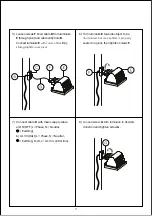
5)  Loosen screws F. Feed cable D from luminaire 

E through pivot and cable entry hole B

      Connect luminaire E

ZLWKFROXPQĥWWHU

C by 

VOLGLQJVOLSĥWWHURYHUSLYRW

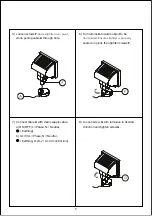
8) Loosen screw G. Aim luminaire in desired  

direction and tighten screw G.  


6)  Turn luminaire E towards object to be  

LOOXPLQDWHG(QVXUHVOLSĥWWHULVSURSHUO\

seated on pivot, then tighten screws F.

7) Connect cable D with mains supply cable. 

a) ON/OFF (L = Phase, N = Neutral,  

 = Earthing) 

b) 0-10 V/DALI (L = Phase, N = Neutral,  

 = Earthing, D–/D+ = 0-10 V control line).

Summary of Contents for FLB141 1 LED

Page 1: ...rimary Type 1 and secondary Type 2 surge arrestors in compliance with EN61643 11 IEC61643 1 Warning Ensure that all required surge protection measures are in place and activated prior to luminaire ins...

Page 2: ...IK08 Class I ta 40 C Weight lb for FLB141 1 LED 6 83 Windage area ft for FLB141 1 LED 0 409 Orientation all directions Mounting Accessories ODW VXUIDFH WWHU SF FLD1 for FLB141 1 145 9535 ROXPQ WWHU CF...

Page 3: ...ecial maintenance work is required Do not use high pressure cleaners In case of component failure due to abnormal circumstances or at end of life replacement must be carried RXW E D VXLWDEO TXDOL HG D...

Page 4: ...DOOLQJ DQG FRQQHFWLQJ WKH OXPLQDLUH Notice I WKH OXPLQDLUH LV PRGL HG E DQ ERG RWKHU WKDQ WKH RULJLQDO PDQXIDFWXUHU WKHQ WKH ZDUUDQW ZLOO no longer be valid and shall become the full responsibility of...

Page 5: ...QH SRVLWLRQV IRU LQJ VFUHZV D Drill relevant holes E and insert nylon plugs Insert and tighten screws D Warning Ensure not to damage any electrical cable water pipe or other items drilling holes 2 Che...

Page 6: ...uminaire in desired direction and tighten screw G 6 Turn luminaire towards object to be LOOXPLQDWHG QVXUH VOLS WWHU LV SURSHUO seated on pivot then tighten screws F 7 Connect cable A with mains supply...

Page 7: ...PRXQWLQJ SRVL tion 3 Drill screw holes A and cable entry hole B on column Ensure cable entry hole B KDV VX FLHQW diameter to feed cable from luminaire 6HW DQG FROXPQ WWHU C in position Insert and tigh...

Page 8: ...U RYHU SLYRW 8 Loosen screw G Aim luminaire in desired direction and tighten screw G 6 Turn luminaire E towards object to be LOOXPLQDWHG QVXUH VOLS WWHU LV SURSHUO seated on pivot then tighten screws...

Page 9: ...www we ef com WE EF LIGHTING United States of America Tel 1 724 742 0030 Fax 1 724 742 0035 info usa we ef com TO9250W0522 WE EF 2022 Technical specifications are subject to change...

Reviews: