WDT GRANUDOS 10-V61 Operating Instructions Manual Download Page 9

WDT                         Operating instructions GRANUDOS 10  (V61-08/05)               page 9 of 20 
____________________________________________________________________________ 
2.2


Electrical connection 

The electrical supply of the GRANUDOS has to be controlled by the electrical supply of the 
circulation pumps that dosing can only be with water circulation and accordingly water supply to 
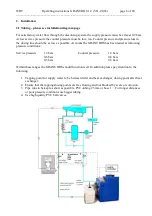
GRANUDOS. The GRANUDOS has to be stopped and isolated  at back washing, too! See wiring 
diagram  
To connect external systems to the GRANUDOS please use only flexible cable type. 
 
Electrical works are only to be executed by authorised people. 
 
3


Start 

 
After having executed points 2.1 and 2.2 open the ball valves at the tapping points and at 
GRANUDOS. Press floater of floating valve inside the tank down to let water flow into the flushing 
tank. When the flushing tank is half full switch on the GRANUDOS mains as the booster pump of 
GRANUDOS should not run dry.  
 
To ensure correct dosing of the chemicals water flow through the flushing tank must run in the correct 
way as described below. 
 
3.1


Check of  pump  

Check by means of a screw driver at back shaft of the pump whether the shaft is turning easily. If not 
the slide ring seal is blocked. Try to loosen it by rapid moving of the shaft right and left. If no success, 
the pump must be dismantled completely and the slide ring loosened. If this is not done, the pump will 
leak in short time as the O-ring on the shaft will be worn. 
 
3.2


Deaeration of the water supply tubing  

At switching on the GRANUDOS take care to deaerate the supply water tubing completely. For this 
please observe the water level inside the pre-filter. If he get’s empty switch off the pump/machine and 
wait till the filter is full again, then switch on again. On operation the filter must be and stay full of 
water; a little air at top staying steadily does not matter. The deaeration procedure can take some 
minutes depending on the length of  the supply tubing. 
 
Attention! If electric valves are installed to isolate the machine the supply valve must be opened 
manually as otherwise the pump can not be deaerated and the pressure switch would not allow 
the pump to run.


3.3


Water level in the flushing tank 

Water level in the tank should be maintained at half full. To obtain a higher level unscrew float rod, 
for a lower level screw in the float rod. One turn gives about 1 cm in height. 
 
3.4


 Water flow/Suction performance of the venturi 

At stable water level the switch bobbin of the flow switch inside the suction tube (10) should definitely have 
risen up to the top, the control lamp of the switch may not burn. 
To adjust the water flow to the pressure conditions of the filter system a nozzle is inserted in the union (13c) 
behind the venturi. If water level in the tank tends to run low or if switch bobbin is at top without pump running 
(too high suction at the venturi – high pressure difference between tapping points ) fit the nozzle with the 5,5 
mm diameter hole you find in the spare parts kit. If the water level tends to run high and/or suction is too low – 
switch bobbin does not rise (too high counter pressure?) put in the 7 mm nozzle or use without nozzle. 
 

3.5


Adjusting the pressure switch 

The pressure switch is fitted pressure side of the booster pump, so monitoring the real pressure. If air is  
sucked by the pump or at pressure drops the pump is switched off to avoid: 
  

-


overdosing if circulation is disturbed 

-


the booster pump is not destroyed by cavitation or running dry 


Summary of Contents for GRANUDOS 10-V61

Page 1: ...id may not be mixed together or with other chemicals Pay attention to the safety devices on chemical Containers 2 Close hopper immediately after filling 3 If an adapter to a chemical container is used...

Page 2: ...al Connection 9 3 Start up operation 9 3 1 Deaeration of water supply tubing 9 3 2 Water level in flushing tank 9 3 3 Water flow Suction performance of injector 9 3 4 Filling of Chlorine into hopper 9...

Page 3: ...ystem Measures base 60 x 50 cm height 80 cm weight 30 kg Material PE polyethylene Booster Pump centrifugal pump SS 0 3 kW 230 Volt supply pressure 0 2 1 2 bar counter pressure 0 1 2 bar depending on s...

Page 4: ...ing hopper The required dosing rate is adjusted at the control board by means of a dosing cycle and dosing time see para 1 5 5a dosing hopper 5b hopper cover 6a dosing motor 6b motor holder 6c dosing...

Page 5: ...intervals para 3 7 Adjusting dosing performance power supply for chlorine and acid dosing motors are connected by a relay system so that only one or none of them can get power 24VDC and dose chemical...

Page 6: ...s switched off Chemicals on reserve is only indicated All faults normally activate the fault remote control The control system is enclosed within a dust proof and splash proof housing IP 65 External s...

Page 7: ...d pH If control time exceeds 50 there must be an interruption in the system too high bathing load interruption at the dosing appliance blocked screw broken hose faulty motor etc interruption at the au...

Page 8: ...sible At works the GRANUDOS has been tested at following pressure conditions Service pressure 1 2 bars Counter pressure 1 2 bars 0 6 bars 0 8 bars 0 3 bars 0 5 bars Within these ranges the GRANUDOS sh...

Page 9: ...f he get s empty switch off the pump machine and wait till the filter is full again then switch on again On operation the filter must be and stay full of water a little air at top staying steadily doe...

Page 10: ...t side of the housing is delivered with loose dosing hose to prevent deformation on stock time Push the hose back into the yellow housing and turn the roller clockwise some times so that the hose is s...

Page 11: ...rolled by Auto Controller If an auto controller is used set an E Programme see above and use app 3 5 times higher dosing rate as calculated above It is to adjust both cycle and dosing time If CO2 is u...

Page 12: ...439 6 0 5 3 0 5 6 2 411 8 1 6 1 13 3 342 9 1 5 9 1 5 19 4 285 11 2 13 2 25 5 238 13 2 5 16 2 5 31 6 198 16 3 19 3 38 7 165 19 3 5 22 3 5 44 8 138 23 4 25 4 50 9 115 28 5 31 4 5 56 10 95 34 6 38 5 63 1...

Page 13: ...front fascia switch Glimmering indicates filling of buffer tank with programme PB Red LED shows function of dosing and interruptions indicated by the different Sensors At any interruption dosing stop...

Page 14: ...m of tube By pressing the connecting hose to the suction tube the bobbin does not move switch LED burns Possibilities at installation service pressure too low counter pressure too high tubing faulty o...

Page 15: ...e whether an air bubble is sucked to pump if not examine the pump roller and pump hose If all is OK increase dosing rate and choose lower set point for pH 3 Continuous dosing of chlorine or acid on pr...

Page 16: ...if so contact your supplier check monthly for the acid pump whether the springs are o k If corrosion can be seen change the dosing hose In any case change it once per year monthly or with each new dr...

Page 17: ...315 m amp slow Transformers Tr1 transformer for power outputs 18 volt 16 va Tr2 transformer for control system 6 volt 1 5 va Relays SSR 1 solenoid knocker 240 v solid state relay Rel 2 booster pump 24...

Page 18: ...lled outputs 24 VDC switch of dissolving unit normal open 1 2 heater dosing nozzle 1 level W max blue 3 chlorine dos 24 VDC 2 level W min brown 4 chlorine dos 24 VDC 3 mass level switches black 5 acid...

Page 19: ...MCU 1c 11505 Power plate NRGRD 6 11517 Power transformer 240 18 volt 16VA 11665 Control transformer 240 6V 2VA 10929 main switch 11338 fuse holder GR 12324 Knob 4mm 11757 Cover control box GR10 10796...

Page 20: ...tank flow switch holder change connecting hose if brittle 1 8 check pump end plate at Calpeda pump only change pump end plate 1 9 check tightness of pump OK new slide ring seal 1 10 check ball bearing...

Reviews: