W
W
a
a
y
y
2
2
c
c
a
a
l
l
l
l
H
H
a
a
r
r
d
d
w
w
a
a
r
r
e
e
S
S
e
e
t
t
u
u
p
p
G
G
u
u
i
i
d
d
e
e
f
f
o
o
r
r
t
t
h
h
e
e
H
H
i
i
-
-
P
P
h
h
o
o
n
n
e
e
D
D
e
e
s
s
k
k
t
t
o
o
p
p
Document Version 1.0
http:// www.way2call.com
Section B
1.
Close all applications and then turn off the computer.
2.
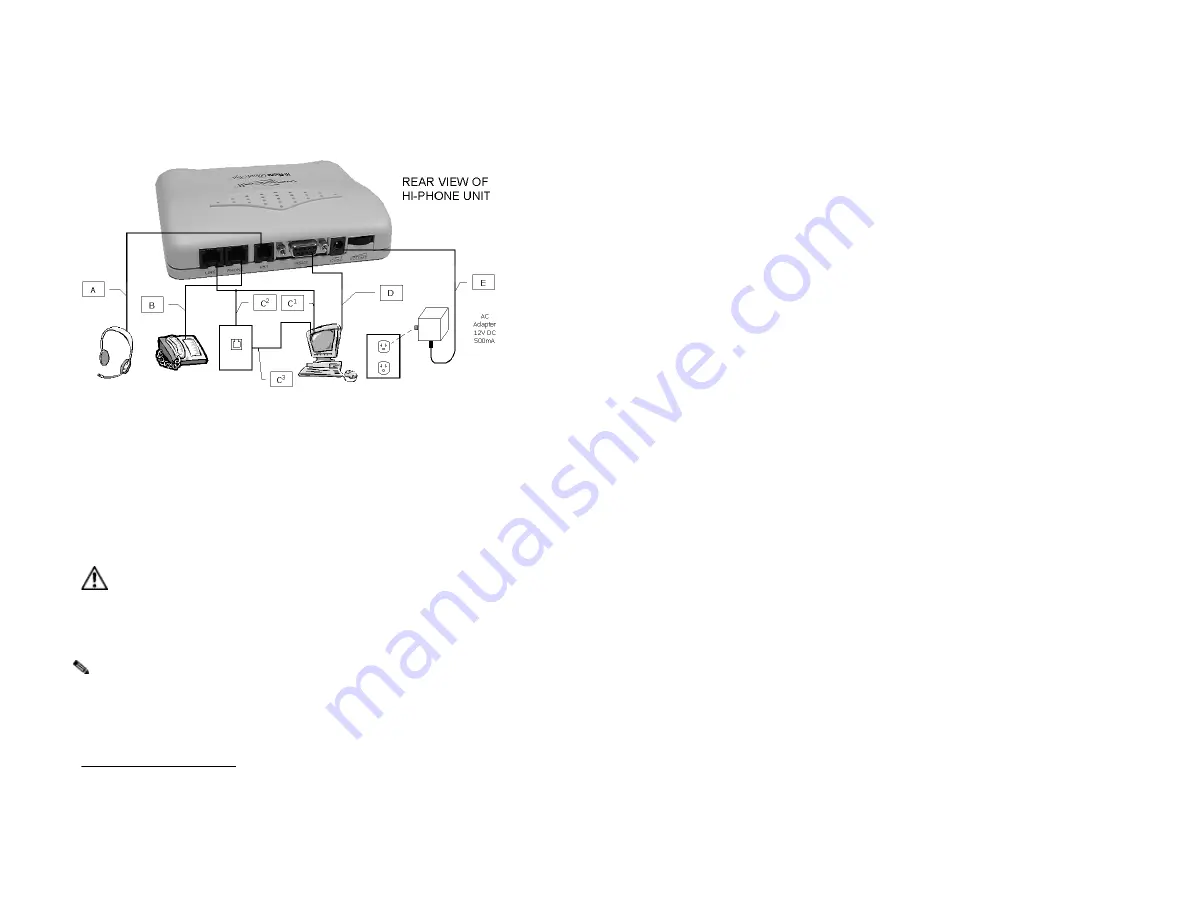
Connect the Hi-Phone Desktop to an available COM-Port (located at the rear
of the computer) using the supplied RS-232 cable (See Item D in figure). If
the COM-Port has a 25-pin connector, a 9 to 25-pin adapter will be required.
3.
Plug the cord attached to the telephone into the Hi-Phone port marked
PHONE at the rear of the unit (See Item B in figure).
4.
Use the telephone cord supplied to connect the rear of the Hi-Phone Desktop
port marked LINE to the telephone wall jack (See Item C
2
in figure). Lift
telephone handset to check for normal dial tone.
Important: Connect the AC Adapter unit to the Hi-Phone
Desktop BEFORE plugging it into the wall socket.
5.
Connect the AC Adapter 12VDC / 500mA Power supply unit to the port
marked 12VDC at the rear of the Hi-Phone Desktop (See Item E in figure)
and then plug it into the AC socket.
Note:
The LED on the far left of the Hi-Phone Desktop indicates a
connection to the power source. If the LED is not on, check the DC
polarity of the connector.
6.
Connect the Head Set (Optional) to the port at the rear of the Hi-Phone
Desktop marked HEADSET (See Item A in figure).
7.
Proceed to Software installation.
1996 - 2000, Way2call Communications LTD. All rights reserved. Way2call, the
Way2call logo is registered trademarks of Way2call Communications LTD. Other product
names may be trademarks or registered trademarks of their respective owners.


