background image

EN

12

13

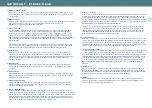
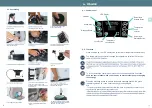
5.3. Drainage and storage
Drainage

 Check the stopper on the bottom of the pool and the drain cap.

2
3

 Remove the stopper on the bottom of the pool. Completely drain all water from the 

spa pool.

Storage

5

6
7
8

It is recommended that you store the SPA in its original package in a warm dry place.  

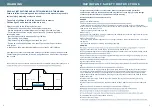
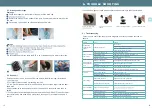
5.4. Repair kit

Small punctures or holes in the pool liner can be repaired with the repair kit included.

2. Thoroughly clean the area surrounding the leak.

3. Cut a piece of repair material in round shape, which should be larger than the dam-

aged area.

4. Apply adhesive to the underneath side of the patch and around the area to be re-

paired.

to dry. After patch has dried, apply glue around the edges for a complete seal (dry 4 

hours).

1

5

2

6

3

7

8

Here are some useful tips to help you to diagnose and rectify common sources of 

trouble.

Problem

Cause

Solution

Control panel 

screen does not 

operate

Check power source

Power failure

Call for service if it does not reset

SPA pump does not 

heat properly

Temperature set is too low

Set to a higher temperature
Clean or Replace the cartridge (see chapter 5.2)

Too low water level
Heating element defective

Call for service

Bubble massage 

system does not 

work

Pump is overheating

Cut off the power and wait until the pump has cooled.

activated

Press the bubble button to reactivate

Malfunction of the pump unit

Call for service if it does not reset

not work

Clean or Replace the cartridge (see chapter 5.2)

Inlet and outlet blocked

Clean the inlet and outlet

Air inside the pump

Malfunction of the pump unit

Call for service if it does not reset

Pump leakage

Adaptor seal improperly

Replace the seal in the right position

Water leakage from pump body

Check the pump body, call for service

Spa pool leakage

Spa pool is torn or punctured

Water is not clean

Clean or Replace the cartridge (see chapter 5.2)
Change the pool water completely

Improper water treatment

Refer to the chemical manufacturer’s instructions

6. TROUBLE SHOOTING

6.1. Troubleshooting

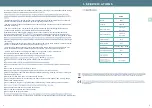
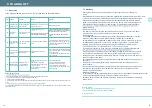
If air valve damages or leaks, please replace valve according to the steps followed.

Directly press down spring 

spindle.

Replace a new air valve spindle.

Tighten the air valve by tools.

dry for 24 hours

4

Once empty, the pool can be cleaned with soap and water.

Summary of Contents for ROME

Page 1: ...INSTALLATION AND USER MANUAL R O M E www wavespas com READ CAREFULLY AND KEEP IT FOR LATER REFERENCE Visit wavedirect co uk to register your free Warranty package WARRANTY ...

Page 2: ...y to fill your spa with hot warm water this will mean your spa will heat up quicker and be more energy efficient If you are planning to fill your spa with hot water please begin using cold water and once you the water has risen above the filter hot water can then be used 9 Heat your spa water Now to heat your spa To do this you should press the heater button on the left side of your external unit ...

Page 3: ... when it is raining thundering or lightning WARNING plugs to connect the unit to electric supply provide a properly located outlet The spa electrical appliance should be supplied through a residual current device RCD having a rated be inaccessible to occupants in the spa that they cannot fall into the spa spa This appliance can be used by children aged from 8 years and above and persons with reduc...

Page 4: ...poor health or under medical care People with infectious disease should not use a spa or hot tub Never use a spa or hot tub alone or allow others to use the spa alone pool Do not turn on the spa when the water is frozen Always unplug this product from the electrical outlet before removing cleaning servicing or making any adjustment to the product Never jump or dive into a spa or any shallow body o...

Page 5: ...ns A level place in order to avoid any defect hernia or leakage Wide enough to support the pool and its pump unit Sheltered from the sun and bad weather Clean and free from sharp objects Devoid of aggressive vegetation on the ground 3 INSTALLATION WARNING The RCD plug must be tested before each use Do not use if RCD test fails and see chapter 6 1 Grounding section WARNING Spa installed on inadequa...

Page 6: ...inutes of operation Re activate the mas sage function by pressing the massage button again 4 USAGE 4 1 Control panel 4 2 Functions Temperature Decrease Button Temperature Increase Button LED Display Massage Button Lock Button Temperature units indicator Temperature units selector Heat Button base protector connecting tube into SPA pool by tools 14 Ensure that the drain caps are the spa 15 Smooth w...

Page 7: ...pool 5 1 Water maintenance WARNING A bad pool water quality can harm your health Depending on the frequency and conditions of use least once a week caution and it is imperative to refer to instructions before use Improper use may result in damage to the equipment Damage resulting from improper use of treatment products is not covered by warranty overdose shock treatment 1 Water balance The water b...

Page 8: ...low Set to a higher temperature Clean or Replace the cartridge see chapter 5 2 Too low water level Heating element defective Call for service Bubble massage system does not work Pump is overheating Cut off the power and wait until the pump has cooled activated Press the bubble button to reactivate Malfunction of the pump unit Call for service if it does not reset not work Clean or Replace the cart...

Page 9: ...ormation the warranty will be invalid 7 WARRANTY 7 2 Warranty If the screen displays an error code Ex please refer to the table below E3 E4 E5 E6 error code If error code is still displayed on the control Box please do the following instructions 1 Check that the water line is between the high and low limits 3 Unscrew and clean the 2 nozzles Entry and exit of water inside the spa and remove wastes ...

Reviews: