


EN
-
-
IMPORTANT - PLEASE READ
1. Watch our WAVE videos
We know you can’t wait to jump into your new Wave hot tub and get started, however before you do
that, please check out our set-up videos for an easy step by step guide as to how to get started with
your tub safely.
2. Read the manual
Next up, please read the manual! This will save you a lot of time and hassle by explaining the process
every step of the way. There is a lot of crucial information in here that will help avoid damage to your
spa when setting up and taking down.
3. Choose your site
Get your location right! First off make sure you are setting up your tub in an area where you have
enough space surrounding the spa for you to comfortably perform your daily maintenance tasks.
Secondly, ensure there is a power outlet nearby as extension cables should NOT be used. Thirdly,
choose a site where you can drain the water easily! The site should be flat and completely free from
sharp objects. The site where you choose to set up should also be strong enough to take the weight
of your spa when it is fully filled and in use. The water capacity for 2-4-person spa is 800L and 4-6
person is 1000L.
The location in which you assemble and fill your spa must be the location you intend to use it, once
the spa is full it is strongly advised against that you attempt to move it to another location. Doing so
could cause injury to yourself or damage to your tub, which may result in voided warranty.
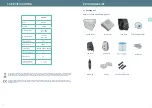
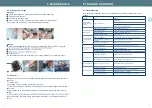
4. Open the box
Once you have opened the box that contains your new spa you should remove its contents and
spread the protective ground sheet on the site where your tub will be assembled. You should then
assemble the heater unit and the rest of the tub. Once you are done with the packaging and box you
should remove all debris and packaging parts from the tub area to ensure nothing falls in and
damages the liner.
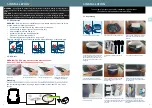
5.Assemble the spa
Next step will be to assemble your spa! Once your foam spa walls have been assembled and covered
with the liner you can connect the motor and heater system. Then your tub is ready to fill with water!
6. Clean your spa
After assembling your spa, use a wet sponge or soft cloth to gently wipe the internal surface of your
spa liner. Even though your spa is brand new, this is to ensure that any debris or dust that could
contaminate the water is fully removed.
7. Filter and filter housing
After gently cleaning the internal liner of your new spa you should ensure that the filter and filter
housing are fitted in the correct location (the lower port). Also ensure that the cap is not fitted on
the upper port before filling with water.
8. Fill your spa with water
Now you can fill your spa with water! When filling your spa, try to avoid using an old hose as these
carry a lot of old bacteria that could contaminate the water. If you are filling your tub using cold water,
you should carry on filling until you are mid-way between the min and max filling lines. If you have the
ability to fill your spa with hot/warm water this will mean your spa will heat up quicker and be more
energy efficient. If you are planning to fill your spa with hot water, please begin using cold water and
once you the water has risen above the filter, hot water can then be used.
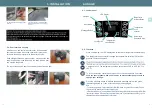
9. Heat your spa water
Now to heat your spa! To do this you should press the heater button on the left side of your external
unit (the sun symbol). A light will then be displayed and remain lit until the water has reached your
selected temperature (38°C is the default temperature). Once the desired temperature is reached,
the light will flash. Once the LCD display has flashed you will be able to adjust the water temperature
using the up and down arrows to increase or decrease the temperature. It is possible for the water to
be approximately 1-3°C different to the temperature selected.
The water in your spa heats up approximately 1°C per hour whilst the heater unit is switched on.
The indicator on the screen corresponds to the current water temperature. For health and safety
reasons the maximum temperature setting on the heater unit is 40°C. You should make sure you
have turned on the filtration system before you start heating the water. Put your hot tub cover on to
help the water heat up faster and retain heat for longer.
10. Chemical shock
Before you jump into your spa, you should first perform your spa chemical shock. When you set up
your hot tub for the first time its always important to add your start up chemicals. You need to perform
a hot tub shock to keep the water healthy and prevent foaming or cloudiness. Treating your water
prolongs its life such that you will not need to keep draining and cleaning your hot tub after each use.
Our Wave starter kit contains everything you need to get your spa up and running!
11. Guide on chemical shock
To chemical shock you should use either warm or cold water and when the water is higher than 25°C
mix your chlorine (granules are better for shocking) in a jug with warm water. Put 5 teaspoons of
granules into the jug of warm water and add this to the spa after mixing well. Activating the bubble
settings whilst doing this will help to disperse the chlorine around the water quicker. After you have
chlorinated your spa water, please leave the spa to sit for 24 hours before use. Remember to use
your test strips before jumping into the spa as some levels may still need adjusting before use. Make
sure alkalinity levels are right after checking the chlorine. pH can be altered as and when required.
12. Maintenance
Regular maintenance of your tub is essential, especially keeping the correct pH levels! The most
ideal pH level is between 7.2 to 7.6 and the level should be tested two times a week whilst the tub is
filled, and always before use. A heaped teaspoon holds approximately 8g of granules and adding a
teaspoon of chlorine everyday will keep your spa water clean and healthy.
13. FINISH
Now all that is left is for you to enjoy your new spa! For any further questions please check the FAQ’s
on our website or contact a dedicated member of our customer service department using the live chat
on our website www.wavespas.com.


