2/2012
15019
r3
Please
Recycle
2800 De La Cruz Blvd.
Santa Clara, CA 95050
Phone: 800.879.8585
www.wattstopper.com
Sensor Parameters
Time Delay
20 minutes
Passive Infrared
Sensitivty
90%
Walk Through
OFF
TROUBLESHOOTING
Loads do not operate as expected.
LEDs don’t light, display is off
1. Check to see that the sensor is connected to the DLM local Network.
2. Check for 24VDC input to the sensor: Plug in a different DLM device at the sensor location. If the device does
not power up, 24VDC is not present.
• Check the high voltage connections to the room controller.
• If high voltage connections are good and high voltage is present, recheck DLM local Network connections
between the sensor and the room controller.
The wrong lights are controlled
1. Configure the sensor to control the desired lights using the Push n’ Learn adjustment procedure.
LEDs turn ON and OFF but load
doesn’t switch
1. Make sure device is not in PnL.
2. Check load connections to room controller.
WARNING:
TO CONNECT A COMPUTER TO THE DLM LOCAL NETWORK USE THE
LMCI-100.
NEVER CONNECT THE DLM LOCAL NETWORK TO AN ETHERNET PORT
– DOING SO MAY DAMAGE COMPUTERS AND OTHER CONNECTED EQUIPMENT.
Mounting plate
back view
European
3.5”
Octagon
4” Octagon
4” Square
2 Gang
2 Gang
1 Gang
European
3.5”
Octagon
4” Octagon
4” Square
2 Gang
2 Gang
1 Gang
Using a screwdriver, punch out the
holes for the corresponding junction box.
J-box
Wall
Mounting plate
and base
LMRJ-C8 coupler
(included, LMRJ-S8 splitter optional)
Occupancy
Sensor
Snug
Ring
Wall
Snug
Ring
Secure
Snug
Ring
Loose
Screw
PLUG n’ GO OPERATION (PnG)
Each load is automatically assigned to a switch button.
•
If there is only one load it will default to Manual ON/Auto OFF. If there is more than one load then the first load
will default to Auto ON/Auto OFF and the rest of the loads will default to Manual ON/Auto OFF.
•
If there are
more buttons
than there are loads, the extra button(s) do nothing and blink when pressed.
• If there are
fewer buttons
than there are loads, the last button controls all remaining loads.
UNIT ADJUSTMENT - PUSH n’ LEARN (PnL)
Load Selection Procedure
A configuration button allows access to our patented Push n’ Learn™ technology to change the binding relationship between buttons and loads.
Step 1: Enter Push n’ Learn
Using a pointed tool, press and hold the configuration button for 3 seconds, until the Red LED on the switch begins to blink.
When you release the configuration button, the red LED on other communicating DLM Local Network devices begins to blink.
The DLM Local Network is now in PnL mode. The Red LEDs continue to blink until you exit PnL mode.
All loads in the room turn OFF after entering PnL. After one second, one load turns ON. This is Load #1, which is bound to button #1 as part of the
Plug n’ Go factory default setting.
The Blue LED will be ON for all buttons and sensors that are bound to this load.
Step 2: Load selection
Press and release the configuration button to step through the loads connected to the DLM Local Network. As each load turns ON note which
buttons and sensors are showing the blue LED. These devices are currently bound to the load that is ON.
To
unbind
a button from a load, press the button while its blue LED is ON. The blue LED turns OFF to indicate the button no longer controls the load
that is currently ON. Use the up and down arrow to bind and unbind the sensor.
Pressing the button again while the load is ON
rebinds
the load to the button and the blue LED illuminates.
Step 3: Exit Push n’ Learn
Press and hold the configuration button until the red LED turns off, approximately 3 seconds.
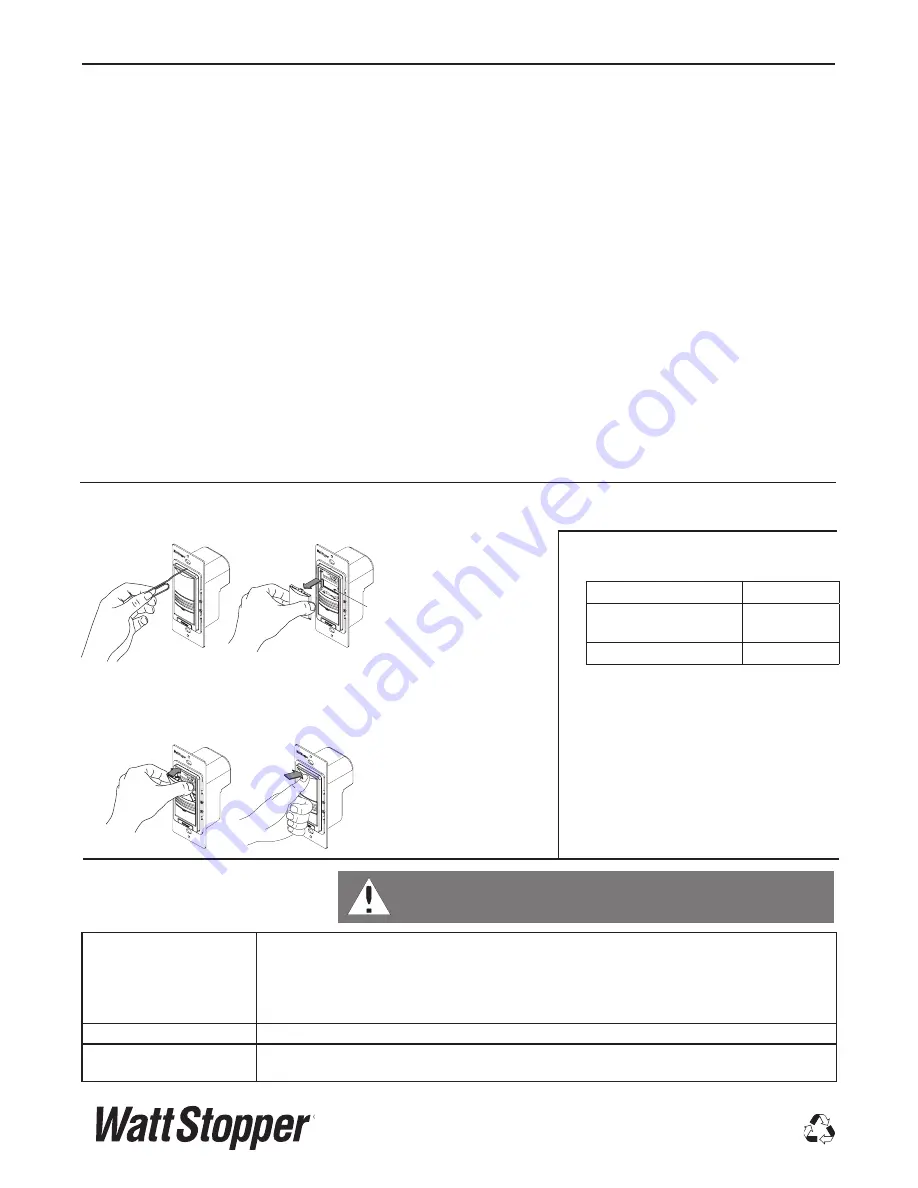
RELEASING LENS
Insert a small paper clip into the small hole at the top of the trim ring. Press in firmly until the lens is released and springs forward. Grab the lens and
remove it completely to expose the screen.
LCD
Screen
REINSERTING LENS
Reinsert the lens in the proper orientation: place the two posts at the bottom at a 30 degree
angle with the chamfered edge facing up. Gently press the top of the lens until it locks in
place.


