

11/2013
16864
r1
Please
Recycle
2800 De La Cruz Blvd.
Santa Clara, CA 95050
Phone: 800.879.8585
www.wattstopper.com
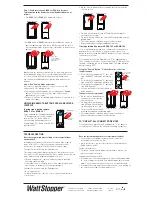
Step 3: Pair Remote Switch (EORS or EOHR) to Receiver
Tap the button on the Remote Switch or Handheld Remote as
follows:
•
For
EORS-101
or
EOHR-101
tap button 3 times
EORS-101 Series
EOHR-101 Series
•
For
EORS-102
or
EOHR-102
tap the desired button 3 times to
pair that button to the load that is ON. Once paired the switch
will exit pairing mode. Repeat steps 1 through 3 to pair the next
button.
EORS-102 Series
EOHR-102 Series
Tap 3 times
on each button
to pair the entire
transmitter
Note
: If only one button is to be paired to 1 load, only press the
desired button 3 times.
The selected load(s) status LED on the
receiver will flash OFF/ON for visual pairing confirmation
You can have a load bound to one button, both buttons or no
buttons.
Step 4: Exit “Pairing” Mode on Receiver
Once a device is paired with the receiver the receiver will
automatically exit “pairing” mode.
•
To manually exit pairing mode, press and hold the “
Pairing”
button “P” on the receiver until the blue LED turns off,
approximately 3 seconds.
• The device will also exit pairing mode if no device is paired to it
within 30 seconds.
UNPAIRING REMOTE BUTTONS FROM A RECEIVER
(SWITCH)
If using single button remote
EORS-101 or EOHR-101
Press and hold the Paring Mode button
“P” for approximately three seconds
then release. The Green LED will
start flashing confirming you are in
Pairing mode. The load will turn ON if
previously OFF.
•
Tap the remote button 3 times to unpair the remote from the
reciever switch.
•
The load will temporarily turn OFF and ON confirming the
message was received.
• The green Pairing LED on the switch will stop flashing and exit
pairing mode.
•
The remote button should no longer control the load.
•
Repeat steps above to unpair additional remotes.
If using a two button remote EORS-102 or EOHR-102
* It is recommended that you first confirm how the buttons are
paired to the receiver switch. Using the remote, press each
button to turn the loads ON and OFF in order to see which button
is paired to each load. *
Press and hold the Paring Mode Button “P” for approximately
three seconds then release. The Green pairing “P” LED will start
flashing confirming you are in Pairing mode. The loads will turn
ON if previously OFF.
Using the “Pairing” Button “P” on the Receiver, select the
load(s) to unpair
•
Pressing the Pairing button “P” once will
turn Load 2 OFF and Load 1 will remain
ON.
•
Pressing the Pairing button “P” again will
turn Load 1 OFF and Load 2 will turn ON.
•
Pressing the Pairing button “P” again will
turn both loads ON.
•
Use this method to select which load or
loads to unpair.
To unpair the selected load(s)
•
Tap the remote button 3 times
to unpair the remote button
from the switch.
•
The load(s) will temporarily
turn OFF and ON confirming
the message was received.
• The green LED on the switch
will stop flashing and exit pairing mode.
•
The remote button should no longer control the load(s).
•
Repeat steps above to unpair another button.
TO “UNPAIR” ALL CONNECTED DEVICES
Press and hold the Wall Switch Pairing button “P”
for about 10
seconds, until all LEDs on the units start flashing all together.
TROUBLESHOOTING
Does the system work more reliably at close range (without
obstructions)?
In an indoor environment, the wireless controls have a typical
range of 30-150 feet. If there are obstructions and/or noise
interference the range will be less than the typical range.
Consider Factors Affecting the Environment:
The range can be reduced by metal objects (metal decreases the
effectiveness of RF transmission). Switches also go into a reduced
range mode when in programming (under 15 feet)
• Identify nearby metal, concrete and other objects possibly
affecting signal strength
• If possible, try relocating the device (even slightly) away from
obstructions to improve the system performance.
Consider Factors Affecting the Environment:
• Device placement
• Obstructions (metal, concrete, other construction materials)
• Interference
Does the system work better at certain times of the day?
• Look for pieces of equipment that may affect wireless
performance when they are ON
• Noise interference can be either line noise (from motors) or
Radio Frequency (RF)
Product performance:
• To isolate any variation in product performance replace one
piece of hardware at a time
Load does not turn ON or OFF:
• If load does not shut off automatically, enter configuration mode
to check settings for the load (if in manual mode switch to auto
mode). If you cannot switch then sensor is not paired to load.
• If load does not turn on/off from remote switch, check pairing of
the switch to the load. (See pairing devices.)
“Load Status”
Blue LED
Pairing
Button
EOSW-101
EORS-101 Series
EOHR-101 Series
EOSW-102
“Load 1 Status”
Blue LED ON
Pairing
Button
EORS-102 Series
EOHR-102 Series


