Wattsaving E22 User Manual Download Page 8

8

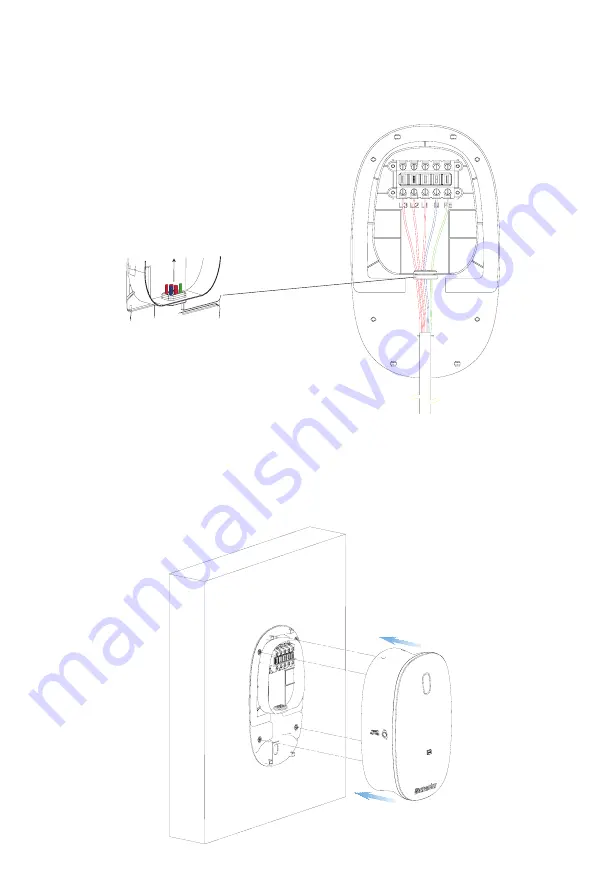
4.1.5  Three-Phase Hardwired

4.1.6  Align the charging station with the wall-dock back panel, gently 

insert and assemble.

① The input cables pass through the waterproof holes.

② Connect the wires (L1, L2, L3, N, and PE) per the diagram and tighten 

each screw.

Summary of Contents for E22

Page 1: ...Congratulation on your new EV charger Read this manual carefully before use and keep it for future reference 22kW AC EV Charger User Manual Model E22...

Page 2: ...oduct Overview 5 4 Installation 6 4 1 Charging Station Installation 6 4 2 Connector Holster Installation 9 5 Charging Operation 10 5 1 Plug and Charge Mode Default 10 5 2 RFID Mode 10 6 LED Indicator...

Page 3: ...rotection Overvoltage Protection Undervoltage Protection Overcurrent Protection Overtemperature Protection Ground Fault Detection Built in type A RCD residual current device Warranty 2 years Standards...

Page 4: ...Station with Connector Connector Holster Wall Anchor 7 pcs Type C Screw M4 x 30 mm 7 pcs Type B Screw M4 x 10 mm 4 pcs Screw Terminal Strip Wall dock Back Panel RFID Card 2 pcs Product Quick Guide Typ...

Page 5: ...5 3 Product Overview Led Indicator RESET BUTTON Input Cable Entry Connector Holster RFID Reader Interrogator Screw Terminal Strip Wall dock Back Panel Connector Plug...

Page 6: ...en the screw terminal strip into the wall dock back panel using 4 type B M4 x 10 mm screws 4 1 2 Find the wall stud nearest to the power supply wiring place the wall dock back panel to the wall stud a...

Page 7: ...7 4 1 3 Drill 4 holes M4 and insert 4 wall anchors into the mounting holes 4 1 4 Place the back panel then screw and tighten 4 Type C M4 x 30 mm screws into the mounting holes...

Page 8: ...dwired 4 1 6 Align the charging station with the wall dock back panel gently insert and assemble The input cables pass through the waterproof holes Connect the wires L1 L2 L3 N and PE per the diagram...

Page 9: ...ll and keep it level and mark the 3 mounting holes M4 then remove the holster wall dock 4 1 7 Screw and tighten the charging station into the wall dock back panel using 4 Type A M4 x 12 mm screws wall...

Page 10: ...ging station is on standby plug in the connector to your EV and the LED will turn blue from purple The LED will be flashing green while charging When your EV is fully charged the LED will be solid gre...

Page 11: ...ation 2 Once you enable the RFID mode the plug and charge mode will be disabled if you want to use the plug and charge mode please contact us for tech support When the charging station is on standby p...

Page 12: ...wer on the device again If the fault persists contact us The red light flashes slowly twice and quickly twice alternately cycle Output Overcur rent 1 Immediately turn off the leakage over current prot...

Page 13: ...the leakage over current protection switches in the power distribution box 2 Check whether the charger output line is damaged or has low impedance to the ground or short circuit 3 After the fault is...

Page 14: ...e materials chemicals or vapors Please do not use the product if the enclosure or the EV connector is frayed broken otherwise damaged or fails to operate Please do not operate this product at a temper...

Page 15: ...l either 1 replace the product or 2 exchange the product with a product that is of equal value A replacement product assumes the remaining warranty of the original product or 180 days from the date of...

Page 16: ...support wattsaving com www wattsaving com SHENZHEN WATTSAVING ELECTRICAL TECHNOLOGY CO LTD Made in China...

Reviews: