background image

10 of 16

© 2019 tekmar  564_Q - 10/19

Restore power to the connected equipment. Once energized, the Invita WiFi Thermostat will 
display the home screen. 

Startup

To prevent the risk of personal injury and/or death, make sure power is not applied to the 
thermostat or HVAC Interface Module until they are fully installed and ready for configuration. 
All work must be done with power to the circuit being worked on turned off.

Use the touch screen display to configure the 
Invita WiFi Thermostat settings. Some display 
items such as the time and temperature offer 
adjustment access from the home screen. Other 
settings are accessed through the Settings 
button on the lower right of the home screen.

Select the appropriate settings in the setup 
menu to match your equipment configuration. 
Some items are grayed out until a related 
setting is changed.

Step-by-step instructions for connecting to 
WiFi, downloading the app and adjusting 
other common settings are included in the 
User Brochure.

For detailed information on thermostat oper-
ation, refer to the operation manual available 
from the Invita WiFi Thermostat 564 product 
page: tekmarControls.com/Invita.
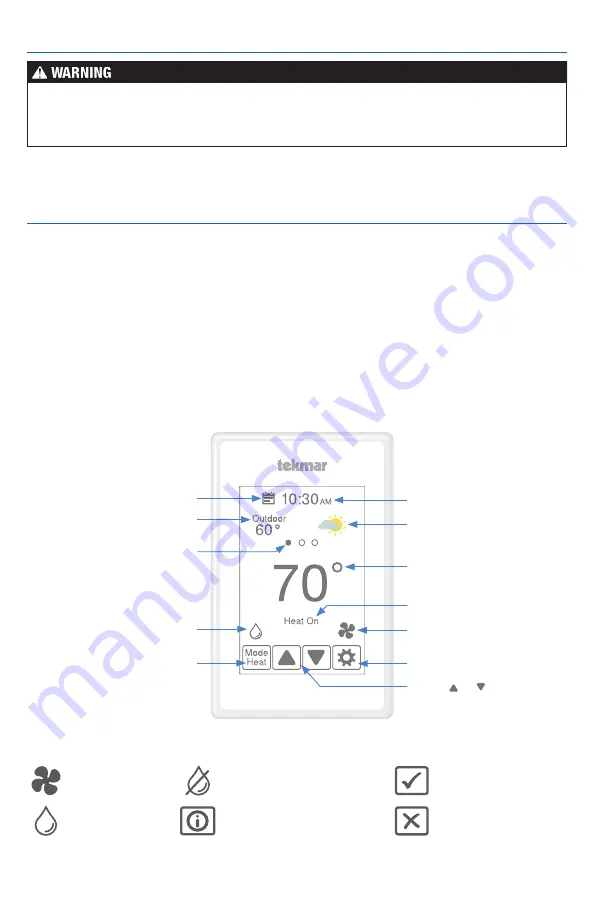
Thermostat Settings

Invita WiFi 
Thermostat Display

Touch   or   to 
adjust temperatures

Swipe to view:

Weather, Outdoor or Floor 

temperature, Heat To 

setting, Cool To setting, 

Relative Humidity

Current time

Touch to edit schedule

Weather display

Current floor or air 
temperature

Outdoor, secondary or 

setpoint temperature

Touch to adjust relative 

humidity settings

Touch to change mode 

of operation between 

Heat, Cool, Auto, Off

Settings Menu

Touch to adjust fan settings

Operational status

Symbols

The info button provides a 
description of the setting

Ok setting change

Cancel setting 
change

The fan is on

The humidifier 
is on

The dehumidifier 
is on

Summary of Contents for Tekmar Invita 564

Page 1: ...umidifier dehumidifier HRV ERV ventilator Need more information Refer to the User Brochure for information on using the thermostat and app Refer to the Voice Control Manual for details on voice control features Refer to the Operation Manual for in depth installation and operation details Scan to open Invita webpage All literature is available from tekmarControls com Invita Invita WiFi Thermostat 5...

Page 2: ... failure to act which could result in property damage or damage to the equipment This is a safety alert symbol The safety alert symbol is shown alone or used with a signal word DANGER WARNING or CAUTION a pictorial and or a safety message to identify hazards When you see this symbol alone or with a signal word on your equipment or in this Manual be alert to the potential for death or serious perso...

Page 3: ...ately 5 feet 1 5 m off the finished floor The maximum length of wire is 500 feet 150 m Installation Please be aware local codes may require this thermostat to be installed or connected by an electrician Ensure power to connecting equipment is off To prevent the risk of personal injury and or death make sure power is not applied to the ther mostat or HVAC Interface Module until they are fully insta...

Page 4: ...rmostat Align the 2 notches at the top of the base plate with the holes on the top of the thermostat then rotate on the hinge point down to close 4 Attach the thermostat to back plate Locate the HVAC Interface Module so that it can connect to the other end of the existing wire from the thermostat After removing the cover secure the HVAC Interface Module to the wall the HVAC equipment chassis or HV...

Page 5: ...tage heating 2 stage cooling fan and 2 accessories Heat pump dual fuel systems Up to 4 stage heating 2 stage cooling fan reversing valve and 1 accessory Accessory options Humidifier dehumidifier HRV ERV ventilator W Air Conditioner or Heat Pump HVAC Interface Module Hot Water Tank Watts FloodSafe Water Detector Shutoff HRV ERV Ventilator Optional Outdoor Sensor Invita WiFi Thermostat Furnace Humid...

Page 6: ...art 15B Jumpers Set J1 to on to power Rc Set J2 to on to power Rh2 Set J3 to on to power Rh1 Y1 Y2 G ACC1 ACC2 O B AWAY WATER LEAK DETECTED Rh1 W1 Rh2 W2 Rc Y1 Y2 G S1 S2 SEN COM S3 RH 3V3 WATER LEAK DETECTOR R J2 R J1 R ON J1J2J3 OFF Designed and assembled in Canada tekmarControls com Power 21 30 V ac dc 5 VA Class 2 Relay 30V ac dc 2A Class 2 Circuts Meets Class B ICES 003 FCC Part 15B Jumpers S...

Page 7: ...ng Unit The thermostat operates the heat pump when the outdoor air temperature is above the balance point setting and switches to the furnace when below Up to 2 Stage Heat Pump with 2 Stage Dual Fuel HVAC Interface Module 564 Rh1 C R W1 Acc1 Acc1 Rh2 W2 Rc Y1 G Y2 To T Stat AWAY S1 S3 S2 Water Detect RH 3V3 SEN COM Acc2 O B Acc2 O B W1 C W2 R Y1 G Y2 O B 70 Air Handling Unit Essential Settings Hea...

Page 8: ...air quality and recovers heat from exhaust air Essential Settings Accessory Relay 1 Ventilation HRV ERV Ventilator External Jumper Wires R to Acc1 R to O B HVAC Interface Module 564 Rh1 C R W1 Acc1 Acc1 Rh2 W2 Rc Y1 G Y2 HUM HUM To T Stat AWAY S1 S3 S2 Water Detect RH 3V3 SEN COM Acc2 O B Acc2 O B Humidifier The thermostat operates a humidifier to increase relative humidity Humidifier Essential Se...

Page 9: ...r instead Room Sensor To T Stat AWAY S1 S3 S2 Water Detect RH 3V3 SEN COM V Com Rh Sen tekmar Humidity Temperature Sensor 086 The Watts FloodSafe Water Detector Shutoff LFWDS prevents catastrophic water damage in the event of a water heater leak The thermostat provides an email notification in the event that the FloodSafe Water Detector Shutoff LFWDS detects a water and shuts off the supply line t...

Page 10: ...grayed out until a related setting is changed Step by step instructions for connecting to WiFi downloading the app and adjusting other common settings are included in the User Brochure For detailed information on thermostat oper ation refer to the operation manual available from the Invita WiFi Thermostat 564 product page tekmarControls com Invita Thermostat Settings Invita WiFi Thermostat Display...

Page 11: ...ew energy use MENU SELECTION AWAY SCHEDULE DISPLAY TIME WIFI SETUP FAN WIFI Connected Press the button to enter the settings menu Settings menu Back to Settings menu Set min and max temperatures Set the humidifier and dehumidifier settings requires a humidifier or dehumidifier to be installed Set the ventilator run time requires an HRV or ERV Setup temperature and humidity high and low alert notif...

Page 12: ...e system fan options 20 23 Select humidifier and dehumidifier options 21 22 Select window frost protection options This prevents moisture and frost on windows in the winter 24 Select the time to switch between heating to cooling and vice versa RELAYS 2 Heat 3 Time Delay 1 min Heat 4 Differential 3 0 F Cool 2 Differential 2 0 F Cool 2 Time Delay 1 min Y Min Run Time 2 00 min Heat 4 Time Delay 1 min...

Page 13: ...ntial Select differential Heat 3 Time Delay Select time Heat 4 Differential Select differential Heat 4 Time Delay Select time Cool 2 Differential Select differential Cool 2 Time Delay Select time Y Min Run Time Select time Y Min Off Time Select time Dual Fuel Off On Accessory Relay 1 Off Humidifier Dehumidifier Ventilation HP Loop Valve Accessory Relay 2 Off Humidifier Dehumidifier HP Reversing Va...

Page 14: ...s Display Indoor use only 4 to 122 F 20 to 50 C RH 90 non condensing HVAC Interface Module 40 to 122 F 40 to 50 C RH 90 non condensing outdoor use requires mounting in a NEMA 3 enclosure Environmental Do not use in presence of ammonia animal barns Power supply 21 30 V ac 6 VA Class 2 Relays 30 V ac 2 A Class 2 Circuits Humidity sensor 0 to 90 4 RH RH Output 3 3 V dc humidity sensor power 3 0 mA ma...

Page 15: ...the Internet and be registered to a mobile app account For details on setting up and using the voice control features of you Invita WiFi Thermostat refer to the Voice Control Manual available from tekmarControls com Voice Controls Amazon Alexa and all related logos are trademarks of Amazon com Inc or its affiliates Google Google Home Android Google Play and other related marks and logos are tradem...

Page 16: ...ser to its customers which are differ ent from or in excess of the tekmar Limited Warranty are the Purchaser s sole responsibility and obligation Purchaser shall indemnify and hold tekmar harmless from and against any and all claims liabilities and damages of any kind or nature which arise out of or are related to any such representations or warranties by Purchaser to its customers The pass throug...

Reviews: