background image

Verify the Connections 

NOTICE


A cellular network signal is required for successful installation. 

Upon initialization, the Cellular Gateway begins the start 

sequence automatically. The process may take up to 10 

minutes to reach steady state. Check the status of the LED 

indicators to confirm connectivity. 

To validate the connections, press the TEST button on 

the Cellular Gateway to send a test message through the 

Syncta app. 
To restore the factory state of the Cellular Gateway and 

restart the startup sequence, press the RESET button. This 

causes all ongoing operations to cease. 

Call customer service if you need assistance with technical details. 

LED 

INDICATOR 

STATUS 

POWER 

Steady green 

Unit is powered 

CELL 

Steady blue 

Connection to cellular network is good 

Blinking blue 

Searching for cellular network connection 

Blinking blue with short OFF pulses

Connection to cellular network is poor 

loT 

Steady blue

Internet connection is established 

Blinking blue 

Internet connection is lost or not established 
(The gateway attempts an internet connection indefinitely.) 

FLOOD/INPUT1 

Unlit 

No relief water discharge is occurring 

Steady orange 

Relief water discharge is occurring 
(This state remains for the duration of the discharge.) 

INPUT2 

Unlit 

No relief water discharge is occurring 

Steady orange 

Relief water discharge is occurring 
(This state remains for the duration of the discharge.) 

Configure the Syncta App 

NOTICE


These instructions cover the minimum user input needed to 

install and configure the Syncta app for use with the flood 

sensor. An internet connection is required for laptop or 

mobile device. Information on the Cellular Gateway ID label is 

needed to configure the Syncta app for sending flood alerts 

by email, phone, or text. Do not remove the label. 

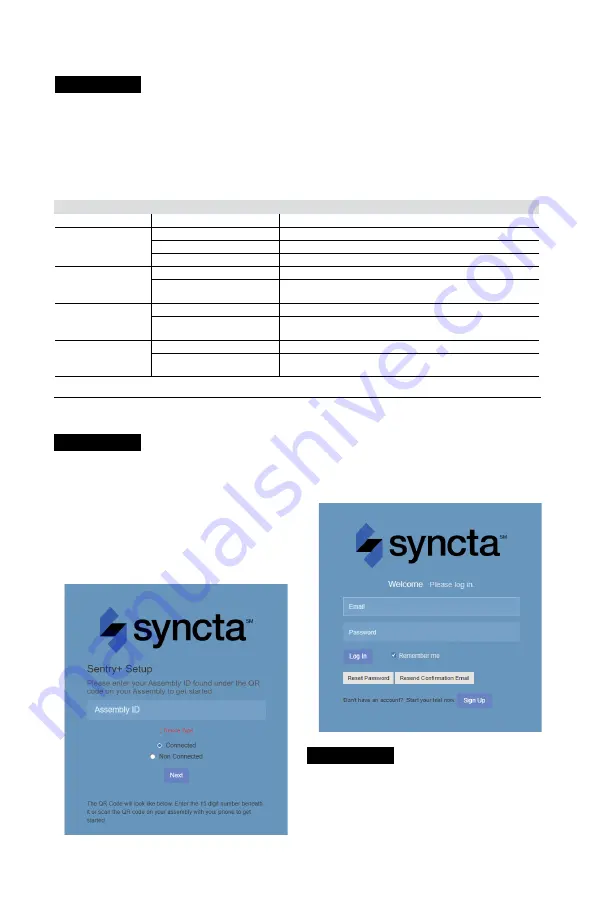
To log in or create an account 

1. Scan the QR code on the ID label or open a web browser 

and go to https://connected.syncta.com. 

2. Enter the device ID, make sure Connected is selected, 

and tap Next. Syncta checks for the installation of a valid 

device. (Connected applies to devices requiring internet 

access; Nonconnected, to manual devices.) 

3. Tap login to access an existing account. 

NOTICE


For first-time users, create an account before attempting to 

sign in. Tap Sign Up and complete all fields. Tap the check 

box to agree to the Terms & Conditions. After your review, 

select both check boxes at the bottom of the window then 

select Close. Follow through with the remaining screen 

prompts to complete the setup of your account, profile, and 

first assembly. 

Summary of Contents for FEBCO 825Y Series

Page 1: ...es and regulations related to the installation operation and maintenance of the backflow preventer to which it is attached including the need to provide proper drainage in the event of a discharge Wat...

Page 2: ...nd screws C 24V Power adapter D Small sensor for valve sizes 3 4 to 1 large sensor valve sizes 1 to 2 NOTICE When installing an air gap attach the air gap brackets directly onto the flood sensor Requi...

Page 3: ...fferent wet threshold and time delay Scan the QR code for more information 1 Set the assembly for attachment of the flood sensor to the rim of the relief valve body beneath the relief valve outlet 2 T...

Page 4: ...eway and mounting materials power adapter and Phillips screwdriver and wire stripper for this segment of the installation To connect the module cable to the device 1 Remove the transparent cover from...

Page 5: ...charge is occurring This state remains for the duration of the discharge INPUT2 Unlit No relief water discharge is occurring Steady orange Relief water discharge is occurring This state remains for th...

Page 6: ...ipment and the function to activate an assembly Device Map View the location of assemblies in an area Company Profile Enter or update basic user infor mation about the user and organization maintainin...

Page 7: ...cted to manual devices 3 Choose notification type from the Method drop down list Email Message SMS Text Message or Voice Call 4 Depending on the notification method selected enter a phone number or an...

Page 8: ...ve Changes 9 Return to the dashboard locate the device and select TEST to verify the connections 10 Check for the test notification in your email inbox or mobile device depending on the configuration...

Page 9: ...Assembly Alert History to view the message log or Back to return to the dashboard To update the profile 1 Start with the User Profile link or Company Profile on the dashboard 2 Update the profile sett...

Page 10: ...fication settings on the Update Assembly Information page To view alert history Open the Alert History page from the navigation menu or the Edit Assembly Details page Each entry in the Alert History l...

Page 11: ..._ _ _ _ _ _ _ _ _ _ _ _ _ _ _ _ _ _ _ _ _ _ _ _ _ _ _ _ _ _ _ _ _ _ _ _ _ _ _ _ _ _ _ _ _ _ _ _ _ _ _ _ _ _ _ _ _ _ _ _ _ _ _ _ _ _ _ _ _ _ _ _ _ _ _ _ _ _ _ _ _ _ _ _ _ _ _ _ _ _ _ _ _ _ _ _ _ _ _ _...

Page 12: ...f this product does not work properly other costs resulting from labor charges delays vandalism negligence fouling caused by foreign material damage from adverse water conditions chemical or any other...

Page 13: ...ents requis li s l installation au fonctionnement et l entretien de l appareil antirefoulement auquel il est fix y compris la n cessit de fournir un drainage ad quat en cas de d charge Watts n est pas...

Page 14: ...ensions de robinet de 3 4 pouce 1 9 cm 1 pouce 2 5 cm grand capteur dimensions de robinet de 1 pouce 3 2 cm 2 pouces 5 1 cm AVIS Lors d une installation avec passage d air fixez les supports de passag...

Page 15: ...sation diff rents Balayez le code QR pour plus d informations 1 R glez l assemblage pour la fixation du capteur d inondation sur le rebord du corps de la soupape de d charge sous la sortie de la soupa...

Page 16: ...at riaux de montage l adaptateur d alimentation et le tournevis cruciforme ainsi que le d nudeur de fils pour ce segment de l installation Pour connecter le c ble du module l appareil 1 Retirez le cou...

Page 17: ...ne d charge d eau d vacuation ne se produit Orange fixe Une d charge d eau d vacuation se produit cet tat est maintenu pendant la dur e de la d charge Configurer l application Syncta AVIS Ces instruct...

Page 18: ...emplace ment des ensembles dans une zone Company Profile Profil de l entreprise Entrez ou mettez jour les informations de base de l utilisateur et de l organisation concernant l ensemble Vous pouvez...

Page 19: ...ls manuels 3 Choisissez le type de notification sur la liste d roulante Method M thode message par courriel message texte ou appel vocal 4 Selon la m thode de notification s lectionn e entrez un num r...

Page 20: ...ez au tableau de bord localisez l appareil et s lectionnez TEST pour v rifier les connexions 10 V rifiez la notification d essai dans votre bo te de r ception de courriels ou votre appareil mobile sel...

Page 21: ...l des messages ou sur Back Retour pour revenir au tableau de bord Pour mettre jour le profil 1 Commencez par le lien User Profile Profil d utilisateur ou Company Profile Profil d entreprise sur le tab...

Page 22: ...ettre jour les informations de l ensemble Pour afficher l historique des alertes Ouvrez la page Alert History Historique des alertes partir du menu de navigation ou de la page Edit Assembly Details Mo...

Page 23: ..._____________________ _______________________________________________________________________ _______________________________________________________________________ __________________________________...

Page 24: ...correctement autres co ts aff rents aux frais de main d uvre de retards de vandalisme de n gligence d engorgement caus s par des corps trangers de dommages caus s par des propri t s de l eau d favora...

Page 25: ...positivo de prevenci n de contraflujo al que est conectado incluida la necesidad de proporcionar un drenaje adecuado en caso de una descarga Watts no asume responsabilidad por fallas de las alertas de...

Page 26: ...r peque o para tama os de v lvula de 3 4 in a 1 in 1 9 cm a 2 5 cm sensor grande tama os de v lvula de 1 in a 2 in 3 17 cm a 5 08 cm AVISO Cuando instale un espacio de aire fije los soportes del espac...

Page 27: ...n retardo de tiempo diferentes Escanee el c digo QR para obtener m s informaci n 1 Ajuste el ensamblaje para conectar el sensor de inundaci n al borde del cuerpo de la v lvula de alivio debajo de la s...

Page 28: ...aci n el adaptador de alimentaci n el desarmador Phillips y el pelacables para este segmento de la instalaci n Para conectar el cable del m dulo al dispositivo 1 Retire la cubierta transparente del di...

Page 29: ...minada No ocurre ninguna descarga de agua de alivio Naranja fijo Ocurre una descarga de agua de alivio Este estado permanece durante la descarga Configuraci n de la aplicaci n Syncta AVISO Estas instr...

Page 30: ...ver la ubicaci n de los conjuntos en un rea Company Profile Perfil de la compa a ingrese o actualice la informaci n b sica sobre el usuario y la orga nizaci n que mantienen el conjunto Tambi n se acce...

Page 31: ...tipo de notificaci n en la lista desplegable Method M todo Email message Mensaje de correo electr nico SMS Text message mensaje de texto SMS o Voice Call Llamada de voz 4 Seg n el m todo de notificaci...

Page 32: ...s Guardar cambios 9 Vuelva al panel de control encuentre el dispositivo y seleccione TEST PRUEBA para verificar las conexiones 10 Verifique que la notificaci n de prueba est en su bandeja de entrada d...

Page 33: ...o Atr s para volver al tablero Para actualizar el perfil 1 Comience con el enlace del User Profile Perfil de usuario o del Company Profile Perfil de la compa a en el panel 2 Actualice la configuraci...

Page 34: ...information Actualizar informaci n del conjunto Para visualizar el historial de alertas Abra la p gina Alert History Historial de alertas en el men de navegaci n o en la p gina Edit Assembly Details E...

Page 35: ..._______________________ _______________________________________________________________________ _______________________________________________________________________ ________________________________...

Page 36: ...rectamente otros costos resultantes de cargos laborales retrasos vandalismo negligencia contaminaci n causada por materiales extra os da os por condiciones adversas del agua productos qu micos o cualq...

Reviews: