background image

5

Rack Ear Mounting Options

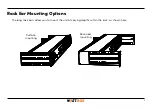
The long rack ears allow you to mount the unit at varying depths within the rack, as shown here. 

Surface  

mounting

Recessed 

mounting

Summary of Contents for WB-800I-IPVM-6

Page 1: ...WB 800I IPVM 6 Quick Start Guide 50 60 Hz 10A 220 240V WB 800I IPVM 6 ...

Page 2: ...ctive earthing connection of the socket outlet is verified by a skilled person Suitable for installation in Information Technology Rooms in accordance with Article 645 of the National Electrical Code and NFPA 75 Only use brackets attachments accessories specified by the manufacturer Do not place the device in an unstable position where it might fail and cause injuries This equipment is not suitabl...

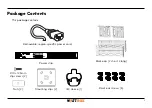
Page 3: ...ge Contents This package contains 10 12 5mm clip screws 2 Power strip Mounting clips 2 Rack ears 2 short 2 long Nuts 2 Removable region specific power cord IEC sleeve 1 Rack ear screws 8 50 60 Hz 10A 220 240V ...

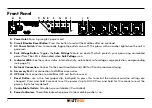
Page 4: ...boot safe voltage surge protection and grounding see page 11 F Network Connection Connect to the Local Area Network LAN for IP control and monitoring G Accessory Port For connection to WattBox accessories H UPS Link For connection to a WattBox UPS unit for future use I Reset Button Use a thin tool paper clip toothpick to press this to restart the network card no settings are changed Press and hold...

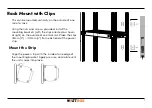
Page 5: ...5 Rack Ear Mounting Options The long rack ears allow you to mount the unit at varying depths within the rack as shown here Surface mounting Recessed mounting ...

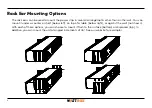
Page 6: ... on the rack You can mount it under a counter or shelf below left on top of a table below right or against the wall not shown With each of these options you can choose to mount it flush to the surface bottom or displaced top In addition you can mount the unit at angled increments of 45 See our website for examples ...

Page 7: ...mounting brackets with the clips oriented as shown at right on the outside of one rack rail Place the clips 76mm 3 102mm 4 from each end of the power strip Mount the Strip Align the power strip with the inside of one edge of the mounting bracket Apply pressure and rotate until the units snaps into place 50 60 Hz 10A 220 240V WB 800I IPVM 6 ...

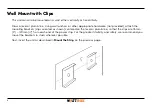
Page 8: ...riate hardware not provided attach the mounting brackets clips oriented as shown centered on the level or plumb line so that the clips are 76mm 3 120mm 4 from each end of the power strip For the greatest stability and safety we recommend you mount the brackets to studs wherever possible Next insert the unit as described in Mount the Strip on the previous page ...

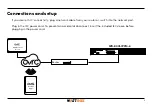
Page 9: ...ork cable from your router or switch into the network port Plug in the IEC power cord To prevent an accidental disconnect insert the included IEC sleeve before plugging in the power cord Mobile Apps Web Browser Access WAN LAN Router WB 800I IPVM 6 50 60 Hz 10A 220 240V ...

Page 10: ...rC visit snp1 co ovrc to learn more Finishing Setup with OvrC 1 Ensure the WB 800I is connected to the internet via your router or network switch 2 Log in to your OvrC account 3 Add the WB 800I by entering its MAC address and service tag ST number You can now complete setup through OvrC Ensure your firmware is up to date schedule automatic reboots set up power on delays etc ...

Page 11: ...reboot is enabled WattBox will power cycle outlets that are ON when communication with the assigned Website IP Address is lost Note Outlets that are OFF will not power cycle Off Auto Reboot is disabled No power cycle will occur when communication with the assigned Website IP Address is lost Safe Voltage Green Safe voltage is enabled The current incoming AC voltage is safe for operation Red Safe vo...

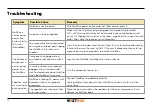
Page 12: ...ttempting to reset otherwise the reset will fail If the circuit breaker continues to trip move one or more components to another WattBox The attached component is not receiving power from the WattBox Component is plugged into a controlled outlet and the outlet is off Log in to the WattBox interface to turn the outlet on In some instances a component plugged into a switched outlet won t automatical...

Page 13: ...50 60Hz AC Input Connection IEC 60320 C14 Fuse Rating 10A 250VAC Power Rating 2400W Voltage Protection Rating L N 1 1kV L E 2 1kV N E 1 8kV Joule Rating 1260J Surge Component Metal Oxide Varistor MOV Protection Modes L N L E N E Peak Impulse Current 45kA Disconnect Circuitry Yes Thermal Fuse Yes EMI RFI Noise Filtration n a ...

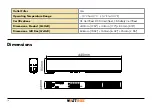
Page 14: ...0 C to 40 C 14 F to 104 F Certifications CE Certified RCM Certified CB Safety Certified Dimensions Product WxHxD 440mm 17 32 44mm 1 73 80mm 3 15 Dimensions Gift Box WxHxD 506mm 19 92 153mm 6 02 75mm 2 95 Dimensions 440mm 44mm 80mm 50 60 Hz 10A 220 240V ...

Page 15: ... the username and password to access the web interface The default entries are below be sure to change these to maintain proper security and log them below Default Custom Username wattbox Password wattbox Note The new password cannot exceed 15 characters ...

Page 16: ...erved Snap One its respective logos are registered trademarks or trademarks of Snap One LLC formerly known as Wirepath Home Systems LLC in the United States and or other countries 4Store 4Sight Control4 Control4 My Home SnapAV and WattBox are also registered trademarks or trademarks of Snap One LLC Other names and brands may be claimed as the property of their respective owners Snap One makes no c...

Reviews: