2 8
Watlow Series 935A User’s Manual
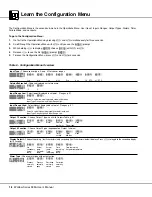
Configuration Menu
[``In]
Input Type
[`C_F]
Celsius/Fahrenheit
[``rL]
Input Range Low
[``rH]
Input Range High
[`Ot1]
Output 1 Function
[`Ot2]
✓
Output 2 Function
[dISP]
✓
Display Default
[ALtY]
Alarm Type
[AhYS]
Alarm Hysteresis
•
•
•
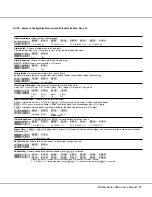
[tIM]
✓
Timer Function
[Strt]
✓
Start Timer
[`rdY]
✓
Timer Ready Band
[``St]
✓
Signal Time
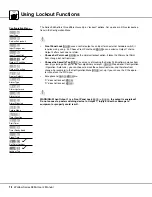
Operations
Menu
[`Aut]
Auto-tune
[tMr]
✓
Countdown Timer
[IdLE]
✓
Idle
•
The timer requires Output 1 to work as either a heat or as a cool output.
•
The 935A timer is a function of Output 2, which, depending on your unit’s model number, can be ei-
ther switched dc, electromechanical relay, or solid state relay.
•
Hours: minutes (hh:mm) or minutes:seconds (mm:ss) choices reside in Output 2
[`Ot2]
.
•
Timer set-up occurs in two locations, in the Configuration Menu and the Operations Menu.
•
,
starts the timer.
•
.
stops the timer.
•
[dISP]
choices set up the timer display (see p. 16).
•
LED colon flashes when timer runs.
LED colon ON steadily when timer is not running.
Configuration Menu set-up includes: (see p. 16)
•
Output 1
[`Ot1]
; heat
[hEAt]
or cool
[COOL]
.
•
Output 2
[`Ot2]
; timing interval,
hours:minutes
[thM]
, or minutes:seconds
[tMS]
.
•
Timer (Output 2) function
[tIM]
can perform one of four possible actions after timing:
1.
Turn ON, also called, “delay ON”
[dLon]
.
2.
Turn off, also called, “delay off”
[dLof]
.
3.
Toggle ON, also called, “signal ON”
[sgon]
.
4.
Toggle off, also called, “signal off”
[sgof]
.
• Start timer function
[Strt]
choices:
1.
Immediately start
[IMd]
.
2.
Start once inside a ready band
[`rdy]
.
3.
Start once inside a ready band, acknowledging
[rdya]
with a
ß
press.
4.
Start immediately on control power up
[PWr]
without waiting for the Ready Band temp. or a
,
press.
•
Ready band width
[`rdy]
above and below set point: degrees.
•
Signal time
[``St]
(if applicable) duration: seconds.
Operations Menu set-up includes: (see p. 10)
•
Countdown Time
[tMr]
:
hours:minutes or minutes:seconds.
•
Idle Set Point Type
[IdLE]
, two choices:
1.
Track primary set point (always controls at the set point value).
2.
Set an idle set point for control when not timing.
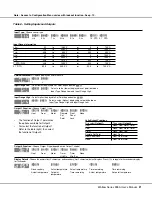
The next page presents this information in graphic format with additional detail.
30
15
45
0
Learn the Countdown Timer


