

Save Water... Save Time... Grow healthier plants
W
P
1300 205 550
E
Published: 22 September 2020
7. Repeat for the opposite corner panel.
8. Insert the the end wall panel
between the 2 corner panels.
9. Place the end rail on top to keep
the end wall panel and the corner
[panels in the correct posi�on as
shown in Figure 2.
10. Insert the other 2 corner panels and
the end wall panel following the
same process as above.
11. Place 2 wall panels in posi�on along
one side.
12. Now add the matching right and le�
side bracket side rails and screw into
posi�on.
13. Place the joiner insert in posi�on
and add screws to secure.
14. Gradually slide the side rail into
posi�on over the top of the corner
and wall panels and once done align
the screw hole in the corner panel
and the matching hole in the rail and
insert screw to secure.
15. Repeat at the other end.
16. Repeat the above to add the other
side rails.
Adding the WaterUps
®
Reservoir Liner
1. Unfold the reservoir liner and clip
corners in to posi�on.
2. Before placing the reservoir liner in
the base of the bed ensure that the
base is level and compacted and
free from any sharp object such as
stones.
3. Place the reservoir liner in the base
so that it sits inside the bo�om
railing.
Adding the WaterUps
®
cells,
plus the Inlet and overflow pipes
1. Place a WaterUps
®
cell in the base
of the liner near the overflow hole
to work out the correct posi�on to
a�ach the overflow pipe to the cell.
A�er a�aching the overflow pipe
and clicking it into posi�on, add the
rubber washer to the overflow pipe
and push in un�l it abuts the liner.
2. Now carefully place the cell with the
overflow pipe in the base of the liner
posi�oning it so that the thread of
the overflow pipe protrudes from
the external wall of the bed frame.
Slide on the white spacer pipe and
push it through the hole in the steel
frame un�l it abuts the wall of the
reservoir liner. Now screw on the
nut and secure �ghtly in posi�on.
3. Cut out the circle in the top of one
of the remaining WaterUps
®
cells
and insert the inlet pipe – refer to
the
WaterUps
®
Installa�on Guide
if
needed.
4. Place all remaining WaterUps
®
cells
in posi�on and fold down the flaps
on the top of the reservoir line.
These can be secured in posi�on
with either cable �es or WaterUps
®
joiners or simply le� folded over.
5. Now fill the 4 wicks of each cell with
perlite and then add your po�ng
mix, compost and plants. Refer to the
WaterUps
®
Installa�on Guide
for more
informa�on (see the link below).
Click here to view & download the
Further Information
Figure 5.
The last bracket side rail just
needs to be screwed into place.
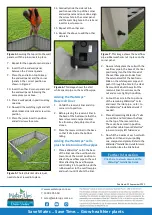
Figure 7 .
This image shows the overflow
pipe rubber washer & nut in place on the
corner panel.
Figure 6.
This image shows the short
white spacer pipe on the overflow pipe.
Figure 4.
Securing the top rail to the wall
panels, with the joiner insert in place.


