Installation and Commissioning
Page
5
of
16
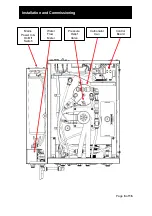
• Before turning on the water supply locate the flush valve at the front
of the filter housing and turn the lever to the ‘Flush Position’. Connect
the clear PVC tubing supplied to the flush outlet and place the other
end of the tubing into an empty bucket or to a drain.
• Turn on the water supply. Water will now begin to flow through the
water filters and the flowmeter will display a flow rate. When the
filters are full, water will flow out of the clear tubing. Initially the water
will contain some sediment from the carbon filtration, this is normal,
allow to flow until clear.
• Once clear, turn the flush valve lever back through 180° into the ‘Unit
Supply Position’. Water will now be directed into the water circuit of
the unit.
• Open the still tap until water flows (this may take a few seconds as
the cooling coil inside the unit fills with water) then close. At this
stage re-fit the lid and filter housing cover.
• Turn on the electrical supply. After a short delay the fridge system
will activate (check for air exhausting to the rear of the machine) and
the carbonator can fill pump will activate; once the can is filled the
pump will automatically switch off.
• To ensure all air is purged from the carbonator can, turn off the
electrical supply and dispense sparkling water until the can is
empty, then allow gas to flow from the dispense tap for 5 secs.
• Restore the electrical supply. The fridge system and can fill pump will
activate as before and the can pump will switch off when the can is
full. When the compressor and fans switch off the unit is ready.
• Depending on the ambient temperature and the temperature of the
incoming water the time required for the fridge system to switch off
can take 3 to 5 hours. In very high ambient conditions (90°F/32°C or
higher) the time required may be over 5 hours.
• Note: If the bath has been filled to the point of overflow,
approximately 17 fl oz (0.5 liters) of water will be displaced as ice
forms in the bath.

