background image

CAUTION: Hotplate burn-

ers can be damaged by soak-

ing, automatic dishwashers (or 

dishwasher powders / liquids), 

caustic pastes, hard implements, 

coarse wire wool, and abrasive 

cleaning pastes.

Clean with a moist soapy pad.

For the burners to work safely, the slots 

in the burner head where the flames 

burn need to be kept clear of deposit. 

Clean with a nylon brush, rinse, & dry 

thoroughly.

Any brownish coloured marks on the 

burners are carbon deposits or fat stains, 

which can be removed by gently rubbing 

with a soapy pad.

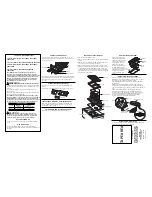
Important: The burner caps and

heads must be repositioned correctly so 

that they sit squarely onto the hob as 

shown below.

This is particularly important with stain-

less steel models as failure to reposition 

the caps correctly may result in discolou-

ration of the stainless steel around the 

burners.

Control knobs


Only use hot soapy water. When cleaning 

the fascia area, care

must be taken on symbols /  arkings. 

Control knobs can be removed for clean-

ing, but take care to ensure that they are 

repositioned correctly after cleaning.

Vitreous enamel surfaces

HOB SPILLAGE WELL (enamel hobs), PAN 

SUPPORTS (if fitted)

Use a mild cream cleaner.

Stainless Steel hob

Only use a clean cloth wrung out in hot 

soapy water, and dry with a soft cloth. 

Stubborn marks can be removed using 

“Luneta”. We recommend that you clean 

the whole of the stainless steel area to 

maintain a uniform finish. Supplies can 

be purchased from the

Customer Care Centre.

Do not use undiluted bleach or any 

products containing chlorides as they can 

permanently damage the steel.

Extra care should be taken when cooking 

food in salted water. Some foods are 

corrosive - eg; vinegar, fruit juices and 

especially salt - they can mark or dam-

age stainless steel if they are left on the 

surface. Turn off and wipe any spillage 

immediately, taking care to avoid skin 

contact with any hot surface or spillage.

Sharp objects can mark the surface of 

stainless steel, but marks will become 

less noticeable with time.

To maintain the finish of stainless steel, 

or to remove any greasy marks, wipe the 

stainless steel surface sparingly with a 

minimum amount of Baby Oil and kitchen 

paper. Do not use cooking oils, as these 

may contain salt, which can damage the 

stainless steel surface.

Summary of Contents for essentials ESSGH60E

Page 1: ...ESSGH60E ESSGH60C ESSGH70C Part No 083342300 Date 12 12 2013 User Guide Installation Handbook...

Page 2: ...f this book For customers outside the UK and North ern Ireland please contact your local supplier WARRANTY Your new appliance comes with our 2 year electrical and mechanical breakdown war ranty To reg...

Page 3: ...ey have been given supervision or instruction concerning the use of the appliance in a safe way and understand the hazards involved Children shall not play with the appliance Cleaning and user mainten...

Page 4: ...in the vicinity of this appliance WARNING Do not modify this appliance WARNING Do not operate the appliance without the glass panel correctly fitted WARNING There is a risk of electric shock so always...

Page 5: ...ventilation for example increasing the level of mechanical ventilation where present Fire Safety Advice Most kitchen fires occur when people are distracted or leave things unattended so remember If yo...

Page 6: ...oking oil fire DISPOSAL Packaging Material The packaging materials used with this appliance can be recycled Please dispose of the packaging materials in the appropriate container at your local waste d...

Page 7: ...ventilation for example increas ing the level of mechanical ventilation where present Before installing and us ing the hob for the first time remove any packaging or protective polythene film Environ...

Page 8: ...ing In the event of the burner flames being accidentally extinguished turn off the burner control and do not attempt to re ignite the burner for at least 1 minute Reduced rate Turn the control knob to...

Page 9: ...so that they do not lick up the sides of the pan Put lids on saucepans and only heat the amount of liquid you need When liquids boil reduce the control setting to maintain a simmer Consider the use o...

Page 10: ...correctly after cleaning Vitreous enamel surfaces HOB SPILLAGE WELL enamel hobs PAN SUPPORTS if fitted Use a mild cream cleaner Stainless Steel hob Only use a clean cloth wrung out in hot soapy water...

Page 11: ...n the data badge This appliance is not connected to a combustion products evacuation device It shall be installed and connected in accordance with current installation regu lations Particular attentio...

Page 12: ...ng appli ances in the same room BS 5440 Part 2 should be consulted to deter mine the air vent requirements This appliance must not be installed in a bed sitting room of less than 20m3 or in a bathroom...

Page 13: ...t with the work top surface There are two ways to install the clamps depending on the thickness of the work top please measure the thickness of your work top and ensure that the correct method is used...

Page 14: ...Cabinet sides If the hob is to be installed across the top of two cabinet housing units then the base of the hob may interfere with the sides of these units It will be neces sary to cut away the top o...

Page 15: ...or similar to the underside of the worktop along the front and rear edges of the cutout Use a strong proprietary adhesive to bond these strips and allow to cure before attempting to clamp the hob into...

Page 16: ...fitted by a quali fied person Troubleshooting Before you call Customer Care please check the following points Burner fails to ignite Check the electricity supply is on Check the fuse There is a spark...

Page 17: ...ions for this appli ance are stated on the data badge This appliance is factory set for either natural gas only or LPG only Gas pressure settings G20 Natural gas 20 mbar G31 Propane gas 37 mbar G30 Bu...

Page 18: ...Please keep this handbook for future reference or for anyone else who may use the appliance...

Page 19: ...Please keep this handbook for future reference or for anyone else who may use the appliance...

Page 20: ...data label on your product which is located Ovens Open the door adjacent to the oven cavity High level grill products Inside the base compartment Hobs On the underside of the product Enter appliance n...

Reviews: