background image


7

STEP 3:  MOUNTING THE TANK BALL VALVE   

  Do not release air from the air valve on the lower side of the storage tank.  It is pre-charged at 7 psi at the factory. 

 put Teflon tape, 6-8 turns 


screw on ball valve hand tight,  push tubing 
through the nut, put tube insert, screw on the 
nut


 the tank can be positioned 
laying down or standing upright 

 
STEP 4:  MOUNTING THE DRAIN SADDLE VALVE  (don’t put in blue area) 


The drain saddle valve should fit most standard drain pipe.  It 
should be installed above the trap and on the horizontal pipe 
(1) or vertical pipe (2). 
DON’T put on position (3), (4), or blue section 


Position the drain saddle in desired location, mark spot.  You need 
to consider available space for drain tubing


Drill 1/ 4” hole into the drainpipe above the water line of the pipe. 
Clean the surface of the pipe.  
Pear off the sticky foam pad, then align the center hole around the 
drilled pipe hole. Then tape it. 

 Align the drilled hole in the drain pipe with the drain saddle 
using a drill bit or narrow screwdriver 


 put the complementary piece and clamp them together with the 
two bolts.  (1) Tighten the two bolts evenly. (2) Connect tubing  

Summary of Contents for RO 585

Page 1: ...UAL Under the sink Reverse Osmosis Water Systems Model RO 585 5 Stage RO system 85 gal day at 80 psi RO 6ALK 6 Stage RO system with Alkaline filter Made by WaterGeneral Mfg Co Made in U S A www Waterg...

Page 2: ...e Sediment filter Recommend changing every 6 12 months Replacement filter Part no 201 2nd Stage Carbon block filter Recommend changing every 6 12 months Replacement filter Part no 205 3rd Stage Carbon...

Page 3: ...n at tank ball valve 3 tubing connection at dispensing faucet RECOMMENDED TOOLS LIST Variable speed drill 1 8 7 16 and 5 8 drill bit 5 8 9 16 open end wrench or adjustable wrench pliers Phillips screw...

Page 4: ...ture and water chemistry At optimal condition the membrane will make 85 GPD but on average it would make about 45 to 60 gallons per day or about 2 to 3 gallons per hour Drain rate The drain rate of th...

Page 5: ...on threaded parts to prevent leaks Then tighten the connection 6 For Solid Copper riser Same procedure as flex tubing except you must cut a piece of the riser tube about 3 4 to 1 so the adapter can f...

Page 6: ...t exercised PORCELAIN ENAMEL SINK STAINLESS STEEL SINK ALUMIUM SINK A 5 8 hole is required for the faucet It is recommended that you get special drill bit for porcelain and tile counter 1 Place a piec...

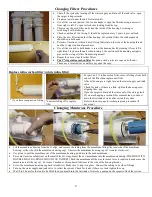
Page 7: ...It should be installed above the trap and on the horizontal pipe 1 or vertical pipe 2 DON T put on position 3 4 or blue section Position the drain saddle in desired location mark spot You need to cons...

Page 8: ...orage tank to be filled up 9 DO NOT DRINK THE FIRST BATCH OF WATER PRODUCED BY THE SYSTEM 10 After storage tank is full turn the RO faucet lever to continuous flow position Lever points up to discharg...

Page 9: ...ove fittings from both ends of the filter then replace new filter After all housings are tight turn on the water supply and tank valve Check for leaks if there is a leak tighten the housing or re alig...

Page 10: ...alve is worn out or becoming ineffective 2 Storage tank not enough pressure 3 Water supply pressure is near 40 psi or below 4 Cold water temperature 5 Filters are clogged up 1 Replace auto shut off va...

Page 11: ...LEMS When you turn on the spigot you get small water pressure and water flow When you turn on the spigot only a quick burst of water comes out of the system then it dies down to trickles When you turn...

Page 12: ...product failure or damage results from freezing neglect misapplication fouling with sediment or scale or failure to operate the system in accordance with the instructions contained in this manual b Th...

Reviews: