3
About the system
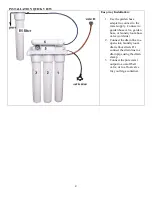
Reverse Osmosis process is a separation process. Tap water enters the system, and it is separated at the 4
th
stage
membrane filter. Pure water would go to one side, and the other side carrying all the minerals is purged to the drain. The
ratio of purified water to drain water for single membrane is about 1:4 (depends on water pressure). That means for every
gallon of water you use, it will drain 3 gallons. The drain is required for the RO process to work. If the drain is
intentionally shut off, all the minerals will be accumulated inside the membrane, and it would permanently damaged the
membrane filter.
All Reverse Osmosis units require purging of water when it’s producing water.
Double membrane design:
The advantage of double membrane design is to double the capacity and halves the drain. A typical single membrane RO
drains about 4 gallons for every gallon of pure water. Double membrane RO only drains 2 gallons for every gallon of
pure water.
Production rate: The system requires higher operating pressure than typical single membrane. The system uses two 150
GPD (gallons per day) RO membranes in series. The actual production rate will depend on water input pressure,
temperature, and water chemistry. At optimal condition the membrane will make 280 GPD, but on average, it would
make about 220 gallons per day at 60psi and 240 GPD at 70psi.
Drain rate: The drain rate of the system is set at 1100 mL/min. using a flow restrictor. This drain rate is constant,
independent of input pressure.
How to attach tubing to the system
There are two types of fittings in the system. Compression and quick-connect
compression fitting connections: first, you
must unscrew the compression nut off the
fitting, then pass the tubing through the
compression nut about 1”, then screw on to
the fitting, then use a 5/8” wrench to tighten
the nut until the thread is not visible. Don’t
over-tighten it.
Quick-connect fitting:
To connect tubing- begin with fresh cut or new tubing, then push the
tubing all the way into the fitting. It has to go through the O-ring that’s
inside. Then it will seal itself.
To disconnect tubing- push the collet (the plastic ring near the opening)
with one hand and pull the tubing using the other hand.
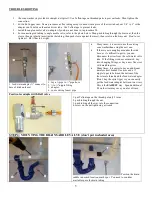
Connect to garden hose or laundry room hose
1.
You can connect the ¾” garden hose adapter directly to a hose valve or to a hose.
2.
Make sure the black rubber gasket is seating at the bottom of the thread. Then screw on the adapter
directly to the hose or hose valve. Use pliers if necessary.
3.
The other end of the adapter is a Quick-connect fitting ¼”. So just push in the ¼” tubing about ½”
into the fitting, then it will seal itself. (Note: to disconnect tubing, just push the plastic ring against
the fitting, then pull out the tubing)
4.
Then for other tubing connection, please refer to the picture shown next page. The drain line can
just run to open drain or to the laundry room drain.
5.
You can also use a hose Y-connector to connect to the hose valve to have two outlets, so one for
the system and one for your laundry room washer.


