


7
Установка /
Installation
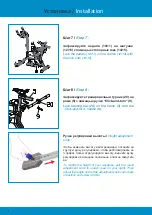
Шаг 4
/
Step 4 :
Установите стойку руля (4) и подседельную
стойку (5) на основную раму (1), затем
отрегулируйте их положение с помощью ручек
“Click-and-turn” (9)
.
Install handlebar tube (4) and seat tube (5) onto
the main frame (1), then adjust their position
with the «Click-and-turn» handles (9).
Шаг 5
/
Step 5 :
Установите
руль (6) на опору (4), затем
закрепите его с помощью ручки “Click-and-turn”
(9).
Install the handlebar (6) onto its support (4) then
fix it with
the «Click-and-turn» handle (9).
Шаг 6
/
Step 6 :
Установите раму седла (7) на подседельную
стойку (5), затем закрепите ее с помощью ручки
“Click-and-turn” (9).
Install the saddle support (7) onto its support (5)
then fix it
with the «Click-and-turn» handle (9).
Installation /
Installation


