background image

UV Sterilizer

• Remove the plug from the “FILTERED” water port;

• Identify the white 1/4” PE tubing;

• Insert one end of the tubing into “INPUT” of 

UV Sterilizer 

(Figure 13), and pop 

the lock clip on the fitting.

NOTE: 

Ensure it is fully inserted until it reaches the mark on the tubing.

• Insert the other end of the tubing into the “FILTERED” water port (Figure 14), 

and pop the lock clip on the fitting.

NOTE:

 Ensure it is fully inserted until it reaches the mark on the tubing.

Summary of Contents for WD-G3P800-W

Page 1: ...Model WD G3P800 W Instruction Manual Read and save these instructions G3 REVERSE OSMOSIS Water Filtration System...

Page 2: ......

Page 3: ...chase from waterdrop We value your patronage and appreciate your confidence in us Counting you among our customers is something for which we are especially grateful Please let us know if we can do any...

Page 4: ......

Page 5: ...tep 4 Position the RO system Housing 8 Step 5 Connect Tubing 9 Step 6 Connect Power Cord 10 Step 7 Install the Filters 11 Step 8 Start up the System 11 Owner s Manual Display and Operation 13 Section...

Page 6: ...800 GPD WD G3P800 W 18 12 5 67 17 72...

Page 7: ...Faucet RO WD G3P800 N2RO UV Sterilizer X 1 Set Activated carbon Filter Reverse Osmosis...

Page 8: ...water port L S From input of faucet to output of UV Sterilizer M J From drain saddle to WASTE water port O G From faucet power cord to FAUCET connector Q P From UV Sterilizer power cord to UV Steriliz...

Page 9: ......

Page 10: ...P800 RO Installation...

Page 11: ...et and UV Sterilizer Non Air Gap Faucet Insert the output the end without lamp ring of UV sterilizer onto faucet stem fully and firmly and pop the lock clip on the fitting UV Sterilizer Countertop UV...

Page 12: ...drain saddle Make sure the hole of foam seal is aligned with the hole of front panel figure 7 Choose a spot on the drain pipe that is convenient for installing the drain saddle Back Plate Front Plate...

Page 13: ...INPUT of UV Sterilizer Figure 13 and pop the lock clip on the fitting NOTE Ensure it is fully inserted until it reaches the mark on the tubing Insert the other end of the tubing into the FILTERED wate...

Page 14: ...hich is attached to the UV sterilizer into the UV sterilizer connector Figure 17 and tighten the nut The UV sterilizer connector can be found at the back of the housing NOTE The power connection of th...

Page 15: ......

Page 16: ......

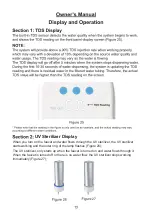
Page 17: ...zer the UV sterilizer starts working and the outer ring of the lamp flashes Figure 26 The UV sterilizer only starts up when the faucet is turned on and water flows through it When the faucet is turned...

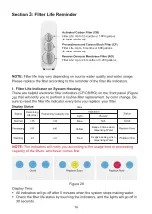
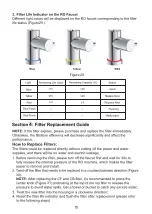
Page 18: ...Remaining Life Day Beeps 2 times when dispensing Water Keeps beeping when dispensing Water Red Yellow Blue 15 28 28 for chlorine reduction only Filter Life Up to 6 months or 800 gallons 1 600 Filter L...

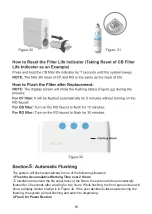
Page 19: ...4 29 29 30 31...

Page 20: ...end the life expectancy of the filters the system will be automatically flushed for 20 seconds after working for two hours While flushing the front panel screen will show a display similar to what is...

Page 21: ...d and then the blue light will be on for 20 seconds The indicators will be off when the flushing is complete 3 Recycled Fresh Water Flushing Recycled fresh water flushing function is to ensure each cu...

Page 22: ......

Page 23: ...The system will provide a 90 TDS rejection rate tested under standard laboratory conditions after full flushing when working properly If the TDS reading is high the following are possible causes...

Page 24: ......

Page 25: ...UV sterilizer only starts up when the faucet is turned on and water flows through it Check if the UV sterilizer power cord is correctly connected or if you turn on the faucet and water flows through...

Page 26: ......

Page 27: ......

Page 28: ...rt 1 888 352 3558 U S Mon Fri 8 00AM 5 00PM PST service waterdropfilter com Qingdao Ecopure Filter Co Ltd If you encounter any problem with our product please contact us to get support via the purchas...

Reviews: