background image


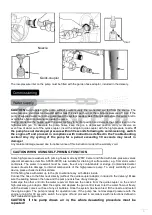
Nut 


Nozzle


 Quick-coupler    


The low-pressure inlet on the pump must be fitted with the garden hose adaptor, included in the delivery. 


Commissioning


  Water supply


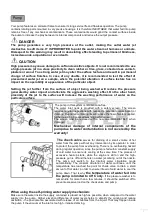
CAUTION 

Avoid operating the pump without a water supply line  connected and fed from the source. The 

water resource yield must correspond with at least 12 litres per hour, at the minimum pressure of 1 bar. If the 
purity of supplied water cannot be guaranteed, the system needs a water filter placed before the pump inlet to 
avoid influx of solid contaminants inside the pump. 
Having connected the hoses, open the water tap fully to its limit position and depress the control lever on the 
high-pressure  gun.  To  deaerate  the  pump  hoses,  keep  the  gun  in  depressed  position  until  you  observe  an 
even flow of water out of the quick-coupler. Insert the adaptor quick-coupler with the high-pressure nozzle

If 

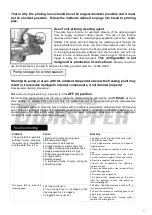
the pump has not developed pressure within 30 seconds following its commissioning, switch 
the  engine  off  and  proceed  in  compliance  with  instructions  defined  in  the  Troubleshooting 
section!  Any  dry  cycling  of  the  pump  for  a  period  exceeding  30  seconds  may  result  in 
damage! 

Any material damage caused due to inobservance of this instruction renders the warranty void. 


  CAUTION WHEN USING SELF-PRIMING FUNCTION 
 

Some high-pressure washers with pirming hoses made by WPW Center and fitted with back-pressure valves 
(special accessories, item No. SP000-HI001) are suitable for draining of surface water, e.g. from storm water 
containers.  The  water  in  reservoir  must  be  clean,  free  of  any  contaminants  or  sludge.  Contaminated  water 
causes  irreversible  damage  to  internal  components  of  the  high-pressure  pump.  To  verify  suitability  of  your 
device, please check its technical data.


Fill the filling hose with water up to the rim to eliminate any air bubbles inside.  
Connect the hose to the filler neck directly (without the quick-coupler adaptor, included in the delivery). Make 
sure the sealing between the hose and the pump neck is free of any damage. 
Submerge  the  other  end  into the  water  reservoir.  Remove the  nozzle from  the  quick-coupler  on  the  end  of 
high-pressure gun adaptor. Start the engine and depress the gun control lever to let the water flow out freely, 
until the stream comes out free of any air bubbles. Once the system has been bled, fit the nozzle and restart 
the  engine  again.  The  pump  is  ready  for  operation  now.  If  the  pump  has  not  developed  pressure  with  the 
engine running for 30 seconds, switch the engine off and proceed in accordance with instructions defined in 
the Troubleshooting section. 

CAUTION    If  the  pump  draws  air  in,  the  whole  deaerating  procedure  must  be 
repeated! 

Summary of Contents for W2900HA

Page 1: ...Operation Manual EN TYP W3100VA Engine driven The picture serves for reference only and it may not represent an exact match of the device delivered...

Page 2: ...ration with accessories using spare parts approved by WPW Center s r o Environmental protection The packaging materials are recyclable Packaging disposal methods must comply with the environment frien...

Page 3: ...out discharge of the high pressure water Once the safety valve opens automatically some of the hot water pours out of the pump to be replaced with cold water from the connected supply However this saf...

Page 4: ...ty void CAUTION WHEN USING SELF PRIMING FUNCTION Some high pressure washers with pirming hoses made by WPW Center and fitted with back pressure valves special accessories item No SP000 HI001 are suita...

Page 5: ...enclosed rooms via unsealed openings When working with the engine on turn the device in such direction where the exhaust does not remain pointed at persons standing in the vicinity or any opening in...

Page 6: ...long term exposure of a loose guard to vibrations causes damage to the mounting holes If damaged the protective guard on the exhaust the air filter or the cooling fan must be replaced with original s...

Page 7: ...d Screw the plug back into the oil sump With the engine operation switch in the OFF position cycle the engine by pulling the starter cord Remove the plug wipe the gauge dry and check the engine oil le...

Page 8: ...ed with a safety screen The screen requires regular inspections with respect to potential contamination or damage Deposited contaminants will reduce the flow of water supplied further resulting in red...

Page 9: ...with the ambient temperature dropping below the freezing point since a significant change of outside temperature may result in condensation of water vapour even in areas regularly not affected by wate...

Page 10: ...ur device Warranty The warranty conditions of our distribution organisation apply in every country Potential failures of your devices will be removed free of charge within the warranty period if due t...

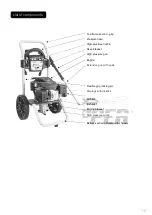
Page 11: ...rip Pressure hose High pressure nozzle Hose bracket High pressure gun Engine Extension gun with quick Flexible grip locking pin Oil plugs with dipstick Air filter Exhaust Engine bracket High pressure...

Page 12: ...measured Guaranteed noise level W2100HA 2569 3 2016 01 97 dB 99 dB W3000HA 2569 3 2016 02 97 dB 99 dB W3100VA 2569 3 2016 04 99 dB 101 dB W3000HB 2569 3 2016 03 100 dB 102 dB W2900HA 3282 3 2016 102...

Page 13: ...ed device to the manufacturer s address The device must be complete including accessories and packed properly to prevent its damage during transport it must be free of mechanical damage and contain no...

Reviews: