


QSG
6
7
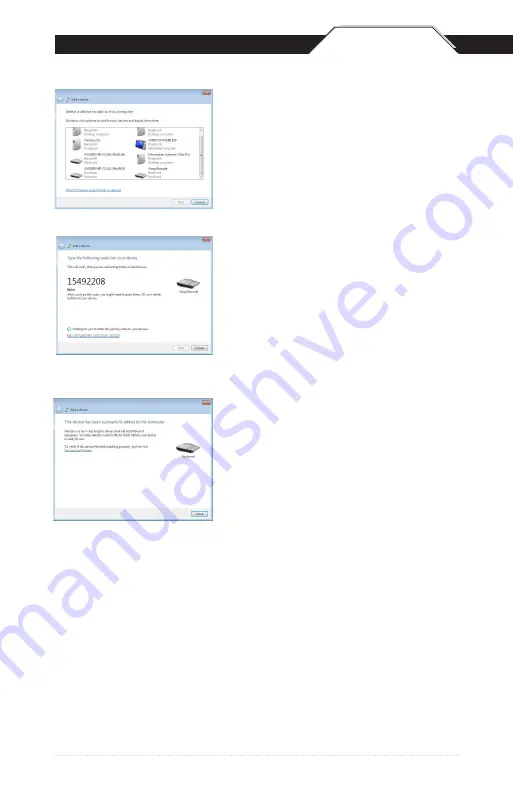
4. Click Wasp Barcode Bluetooth Keyboard,
then click the Next button.
5. Scan the following barcodes found on
page 9:
Note: Maintain a brisk pace when scannng
these codes, as Windows provides a short
time for entering them.
A. Start PIN
B. Each digit of the code (for code 1549...
scan the barcode for 1, then the barcode for
5, etc.)
C. Enter
D. Stop PIN
6. A screen will appear confirming you have
successfully added the scanner.
When the wizard is complete, the scanner
will show up as a Wasp Keyboard. Click OK
to close the screen. You are now ready to
use the WWS550i.
QSG
Troubleshooting:
If the device does not pair, click Back and repeat steps
3-6. Do not omit scanning the Stop Pin barcode in Step 5, even if you
see a message on screen about installing device drivers or that pairing is
complete.
If the device repeatedly fails to pair, it may be stuck in a partially-installed
state. Go to Start > Devices > Printers. In the Devices section, look for
a Wasp Keyboard (or similar name). Right-click it, then click Remove
Device. When complete, start the Pairing procedure again.
To test the connection, open Notepad, MS Word or another application
that accepts text input from a keyboard, then scan a barcode. You can
try the Test Symbols in the scanner manual, or a UPC barcode from a
product. The application should show the data from the barcode.
Summary of Contents for WWS550i
Page 1: ...WWS550i Quick Start Guide...
Page 2: ...This page is intentionally left blank...
Page 11: ...QSG 11 connection Start Pin Stop Pin ENTER...
Page 14: ...QSG 14...
Page 15: ...This page is intentionally left blank...
Page 16: ...16 Wasp Barcode Technologies 1400 10th Street Plano TX 75074 www waspbarcode com...


