background image

Maintenance

3303−1/A1

RT-flex50-D

Wärtsilä Switzerland Ltd

 5/ 5

5.

Tensioning the stud of top end bearing

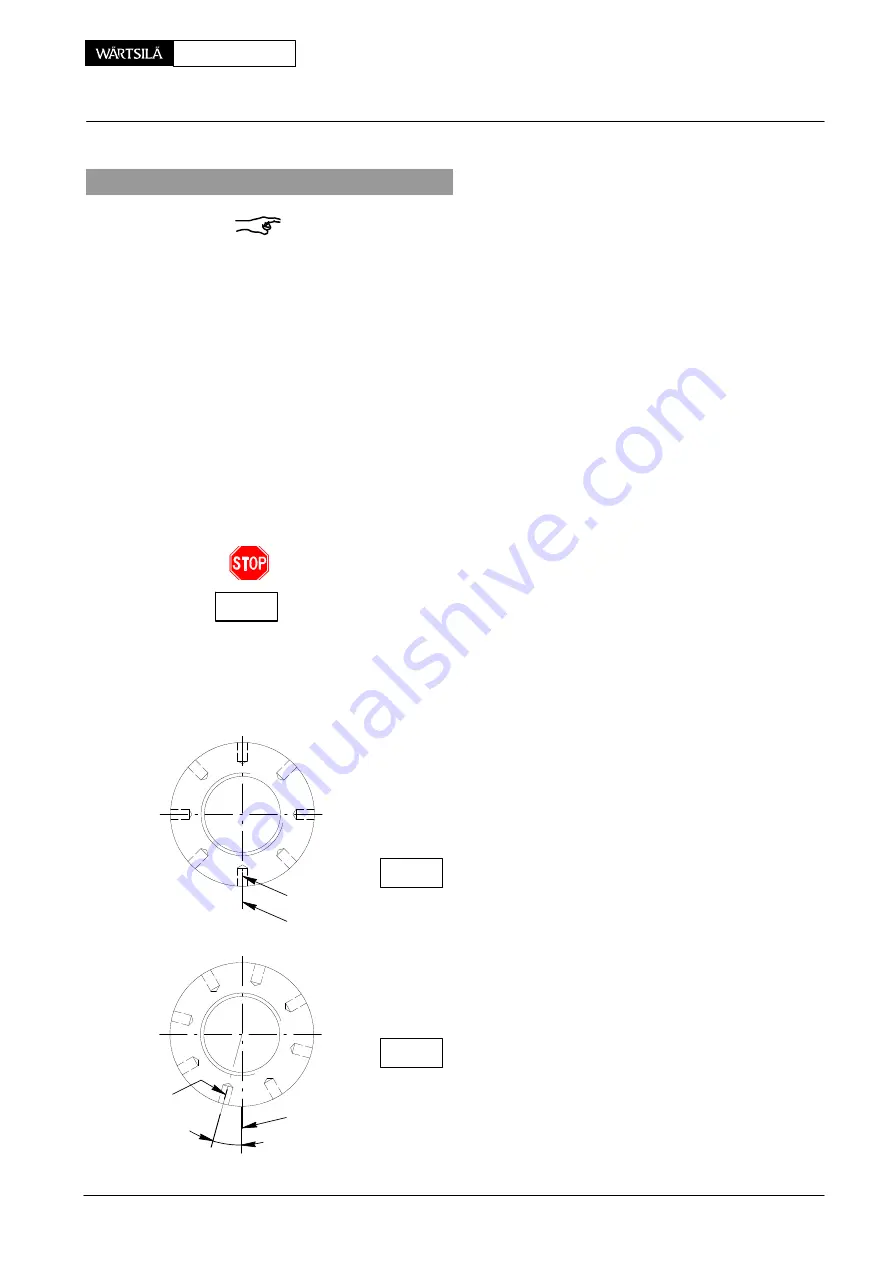
Remark: For tensioning the studs always follow the sequence shown in Fig. ’D’
i.e. a + a and b + b for each step.

Clean the threads of studs 1 as well as the area around nuts 2.

Apply oil to the stud threads and screw on the nuts.

Tighten the nuts with round bar ’RS’ and equally distribute clearance ’y’ be-
tween the bearing halves (bearing protrusion) as shown in Fig. ’D’.

Open vent screw 7.

Place pre-tensioning jacks 94315 diagonally onto studs as shown in Fig. ’D’,
and completely screw them on until there is only little or no clearance at ’x’
(Fig. ’F’).

Connect the pre-tensioning jacks to hydraulic unit 94942 as shown in Fig. ’D’.

Actuate the hydraulic unit till bubble-free oil flows out through the vent screws.
Close vent screws.

Actuate the hydraulic unit and set pressure to 1000 bar (1

st

 step) and keep

pressure constant.

Pistons 8 of the pre-tensioning jacks must never exceed the red limiting grooves
’BN’ (Fig. ’F’).

Tighten the nuts with round bar ’RS’ and check with the feeler gauge through slot
’KO’ (Fig. ’F’) that no clearance remains between nut and supporting surface.
Check with the feeler gauge that no clearance remains between bearing cover and
connecting rod.
(Should clearance remain, loosen the fastening and compare the bearing protru-
sion with the nominal value as indicated in 

3303−3

).

Proceed in the same manner for the second pair of
the connecting rod studs.

After tensioning to the 1

st

 step mark the position of

the nuts against bearing cover as shown in Fig. ’a’.

Raise the pressure to 1500 bar (2

nd

 step) and keep

constant.

Tighten nuts down and check correct seating with the
feeler gauge.
Check from the markings applied by how much the nuts
were turned after pre-tightening (1

st

 step).

Tightening angle to be about 15

_

 (Fig. ’b’).

Should considerable differences to these nominal val-
ues be encountered then repeat the tensioning process.

Release pressure to ’0’ at the hydraulic unit and re-
move pre-tensioning jacks.

Finally check the vertical bearing clearance (see Clear-
ance Table 

0330−1

 ’Top and bottom end bearings to con-

necting rod’).

CHECK

CHECK

TIGHTENING

ANGLE

Fig. ’a’

Fig. ’b’

x

013.432/05

y

x

009.758/02

y

Loosening and Tensioning the Connecting Rod Studs

2010

CHECK

Summary of Contents for RT-flex50-D

Page 1: ...ine Vessel Type Engine No Document ID DBAC251330 W rtsil Switzerland Ltd Tel 41 52 262 49 22 PO Box 414 Fax 41 52 212 49 17 CH 8401 Winterthur http www wartsila com Switzerland E 2012 07 W rtsil Switz...

Page 2: ...This page is intentionally left blank...

Page 3: ...r Starting Air Crankshaft Connecting Rod and Piston Cylinder Liner and Cylinder Cover Bedplate and Tie Rod General Information Supply Unit Injection and Exhaust Valve Control Scavenge Air Receiver and...

Page 4: ...This page is intentionally left blank...

Page 5: ...ston Rod Gland 10 11 Exhaust Valve 12 13 Top and Bottom End Bearings to Connecting Rod 14 15 Piston Cooling and Crosshead Lubrication 16 17 Piston and Piston Rings 18 19 Driving Wheels for Supply Unit...

Page 6: ...This page is intentionally left blank...

Page 7: ...idered therein It must be recognized that such data instructions and graphical illustrations may be subject to changes due to further development widened experience or any other reason This manual is...

Page 8: ...This page is intentionally left blank...

Page 9: ...following main chapters General guidelines for maintenance Clearance tables tightening values of screwed connections masses weights seal rings Maintenance schedule Design groups Tool lists A few expl...

Page 10: ...This page is intentionally left blank...

Page 11: ...r Liner 8 9 Piston Rod Gland 10 11 Exhaust Valve 12 13 Top and Bottom End Bearings to Connecting Rod 14 15 Piston Cooling and Crosshead Lubrication 16 17 Piston and Piston Rings 18 19 Driving Wheels f...

Page 12: ...the Wear Ridge Re dressing Lubricating Grooves and Scavenge Ports 2124 3 A1 o Lubrication Quill with Pulse Feed Lubrication Removal and Fitting 2138 1 A1 with Pulse Jet Lubrication Removal and Fittin...

Page 13: ...nspection Removal and Fitting of Top End Bearing 3303 3 A1 Removal and Fitting 3303 4 A1 Removal of Bearing Cover to Top End Bearing 3303 5 A1 o Crosshead Checking the Clearances and Fitting the Guide...

Page 14: ...itting Dismantling and Assembling 5612 1 A1 o Regulating Linkage Adjusting with Heinzmann StG 10 01 Actuator 5801 1 A1 Adjusting with Woodward ProAct II Analog Actuator 5801 1 A2 Scavenge Air Receiver...

Page 15: ...d Adjusting 9223 1 A1 Tools Explanation 9403 1 A1 Hydraulic Jacks and Pumps Arrangement and Application 9403 2 A1 o Hydraulic Pre tensioning Jacks Storing Servicing and Maintenance 9403 3 A1 General A...

Page 16: ...This page is intentionally left blank...

Page 17: ...E END DRIVING END Thrust Bearing Pads FUEL SIDE EXHAUST SIDE Rail Unit Clockwise Rotation Counter clockwise Rotation Supply Unit Turbocharger Cylinder Numbering Auxiliary Blower 2 Auxiliary Blower 1 0...

Page 18: ...DRIVING END Thrust Bearing Pads FUEL SIDE EXHAUST SIDE Rail Unit Clockwise Rotation Counter clockwise Rotation Supply Unit Turbocharger 1 Cylinder Numbering Auxiliary Blower 2 Auxiliary Blower 1 018 7...

Page 19: ...Pump Actuator 2 Fuel Pump Actuator 3 Fuel Pump 1 Fuel Pump 2 Fuel Pump 3 Servo Oil Pump 2 Servo Oil Pump 1 013 149 05 013 150 05 Supply Unit FUEL SIDE DRIVING END FREE END Crank Angle Sensors Sensor 2...

Page 20: ...This page is intentionally left blank...

Page 21: ...to make sure that all precautions have been taken in order to avoid dangerous situations D The operator has to nominate a person responsible for assigning work tasks to every person who is participat...

Page 22: ...ked with all the clamps when ever the engine is running even if this is only for a short time in order to make temperature checks e g after changing bearings during an overhaul etc D In the case of a...

Page 23: ...ted by wood en pieces leather or special edge guards which are placed between the part and the rope or chain D Always use gloves a face shield and wear safety goggles when working with hydraulic tools...

Page 24: ...damage their thread They must be screwed in by hand until metal to metal contact is achieved Always use the specified lubricants on the threads D Adhere to tightening values wherever they are indicat...

Page 25: ...easons D Determination of the weight of load D Determination of the suspension centres and weight distribution D Choice of attachment elements D Attaching and disconnecting 2 Attachment elements 2 1 W...

Page 26: ...d is only permissible in the direction of the ring therefore the eye bolts or eye nuts must be brought to the right position if necessary by us ing distance rings D If there are through holes a washer...

Page 27: ...htening the ring of the RUD eye bolt is freely rotatable the star profile wrench must be removed from the inner hexagon of the screw as shown in Fig A D Prior to loading the RUD eye bolt adjust it in...

Page 28: ...se shackles may be used which are in accordance with American Stan dard RR C 271A or which fulfil or exceed these values including the safety factor All calculations for components and tools where sha...

Page 29: ...ooth surfaces e g tubes shafts D Protect the ropes against damages by providing a wooden pallet or a rag Sharp edges may even cut steel cables D If possible always tie down the load danger of fall D W...

Page 30: ...This page is intentionally left blank...

Page 31: ...umn Maximum clearance dimension are such values as may be reached after a lengthy operating period which however may not be allowed to be exceeded or fall below On components where the clearance is ad...

Page 32: ...Maintenance 0330 1 A1 RT flex50 D W rtsil Switzerland Ltd 2 25 2 013 025 05 1 2010 Clearance Table Crankshaft and Thrust Bearing...

Page 33: ...method of measuring Nominal dimension normal new mm Maximum clearance dimension due to wear mm 1203 1224 Thrust bearing Thrust bearing pad thickness 67 0 5 0 6 1 Thrust bearing clearance axial total 0...

Page 34: ...Maintenance 0330 1 A1 RT flex50 D W rtsil Switzerland Ltd 4 25 MAIN BEARING No 1 MAIN BEARING No 2 AND FOLLOWING 1 018 600 09 018 663 09 1 2 3 2010 50 D Clearance Table Crankshaft and Main Bearing...

Page 35: ...wear mm 1132 Main bearing No 1 Crankshaft outer 600 0 0 07 Main bearing inner 600 1 Bearing clearance vertical 0 3 0 6 0 9 1132 Main bearing No 2 and following Crankshaft outer 600 0 0 07 Main bearing...

Page 36: ...Maintenance 0330 1 A1 RT flex50 D W rtsil Switzerland Ltd 6 25 013 027 05 4 HB 4 HB 5 6 7 3 5 2 1 x x FUEL SIDE 2010 Clearance Table Crosshead Guide...

Page 37: ...ide rail lateral clearance total 0 80 1 60 2 0 5 Guide shoe lateral clearance total 0 10 0 60 6 Guide shoe bearing pin outer 532 0 0 044 Guide shoe bearing bore inner 532 0 101 0 640 7 Bearing clearan...

Page 38: ...Maintenance 0330 1 A1 RT flex50 D W rtsil Switzerland Ltd 8 25 2 1 3 4 016 555 08 approx 43 75 mm 5 2010 Clearance Table Cylinder Liner...

Page 39: ...et on cylinder cover Water guide jacket 706 0 3 0 1 1 Clearance total 0 40 0 80 Water guide jacket 700 1 40 1 20 2 Clearance total 1 50 1 90 2124 Water guide jacket on cylinder liner Water guide jacke...

Page 40: ...Maintenance 0330 1 A1 RT flex50 D W rtsil Switzerland Ltd 10 25 4 5 6 6 6 6 6 1 1 2 3 013 225 05 2010 Clearance Table Piston Rod Gland...

Page 41: ...ar mm 2303 Piston rod gland 1 Ring width radial 31 min 25 2 Ring width radial 22 min 20 20 3 Ring width radial 5 min 3 20 4 Ring clearance axial 0 10 0 26 0 50 5 Ring clearance axial 0 05 0 16 0 40 6...

Page 42: ...Maintenance 0330 1 A1 RT flex50 D W rtsil Switzerland Ltd 12 25 1 3 L 2 3 L 3 2 1 012 999 05 VALVE SPINDLE GUIDE BUSH L LENGTH 2010 Clearance Table Exhaust Valve...

Page 43: ...irection method of measuring Nominal dimension normal new mm Maximum clearance dimension due to wear mm 2751 Valve spindle 1 Spindle outer 55 0 14 0 17 54 40 2751 Guide bush 2 Bore inner 55 0 03 0 55...

Page 44: ...Maintenance 0330 1 A1 RT flex50 D W rtsil Switzerland Ltd 14 25 10 mm 10 mm 60 mm 60 mm 5 6 5 6 2 3 2 3 013 028 05 1 4 2010 Clearance Table Top and Bottom End Bearings to Connecting Rod...

Page 45: ...ng inner 532 1 Bearing clearance vertical 0 20 0 40 0 60 2 Lateral clearance total 0 40 0 60 3 Lateral clearance total 0 20 0 40 3303 Bottom end bearing Crankshaft outer 600 0 0 07 Bearing inner 600 4...

Page 46: ...Maintenance 0330 1 A1 RT flex50 D W rtsil Switzerland Ltd 16 25 013 029 05 2 1 2011 12 Clearance Table Piston Cooling and Crosshead Lubrication...

Page 47: ...sion normal new mm Maximum clearance dimension due to wear mm 3603 Piston cooling and crosshead lubrication Sleeve inner 56 0 15 0 12 Sleeve length 115 0 08 0 10 1 Radial clearance total 0 30 0 39 0 4...

Page 48: ...RT flex50 D W rtsil Switzerland Ltd 18 25 500 501 502 503 504 mm 16 15 14 13 12 l mm lmin lmin N PISTON RING WIDTH CYLINDER LINER BORE 40 C B A 40 8 8 1 10 2 9 5 3 4 7 6 2010 50 D Clearance Table Pis...

Page 49: ...ngs Ring height vertical 15 0 0 03 6 Ring clearance vertical 0 33 0 41 0 63 7 Ring clearance vertical 0 28 0 36 0 58 8 Ring width radial 16 5 0 25 for Running in Coated RC piston ring see diagram on p...

Page 50: ...Maintenance 0330 1 A1 RT flex50 D W rtsil Switzerland Ltd 20 25 4 5 1 2 3 013 030 05 WCH00139 2010 Clearance Table Driving Wheels for Supply Unit...

Page 51: ...suring Nominal dimension normal new mm Maximum clearance dimension due to wear mm 4103 Intermediate wheel 1 Shaft outer 160 2 Bearing clearance vertical 0 082 0 147 0 25 3 Axial clearance total 0 6 1...

Page 52: ...Maintenance 0330 1 A1 RT flex50 D W rtsil Switzerland Ltd 22 25 013 031 05 6 8 5 4 1 3 2 7 2010 Clearance Table Supply Unit...

Page 53: ...ly unit 1 Pinion outer 80 0 0 019 Bearing fitted inner 80 0 10 0 085 2 Bearing clearance radial 0 085 0 119 3 Axial clearance total 0 25 0 54 0 7 5552 Camshaft unit 4 Cam shaft outer 120 0 0 022 5 Bea...

Page 54: ...Maintenance 0330 1 A1 RT flex50 D W rtsil Switzerland Ltd 24 25 012 098 04 3 8 7 6 1 2 4 5 171 mm 30 mm A B C 013 032 05 PLUNGER CYLINDER 2010 Clearance Table Fuel Pump...

Page 55: ...0 027 Guide piston outer 130 Lower housing inner 130 2 Clearance radial 0 070 0 125 0 149 3 Piston lower spring carrier axial 0 02 0 06 0 08 5556 Roller guide Bush outer 60 Roller inner 60 4 Clearance...

Page 56: ...This page is intentionally left blank...

Page 57: ...nozzle holder 9 M60x2 1st step 100 Nm 1st step to 2nd step 30_ Never Seez NSBT 8 see instructions in 2722 1 with OBEL test bench loosen retaining nut after initial assembly and then repeat tight enin...

Page 58: ...ar Oil Check 1st step to 2nd step 30_ 3403 1 Piston rod crosshead nut to waisted stud 23 M27x2 1500 80_ Oil 3403 3 Piston rod piston crown nut to waisted stud 24 M27x2 1500 115_ Oil Spraying plate pis...

Page 59: ...Never Seez NSBT 8 Transition nipple 37 M27x2 300 Never Seez NSBT 8 Pressure transmitter 38 M14x1 5 25 Never Seez NSBT 8 Screwed connection to end cover fuel rail 39 M16 180 Never Seez NSBT 8 Screwed...

Page 60: ...Drain screw 52 M20 200 Oil 5612 1 Exhaust valve control unit servo oil rail screw 53 M16 170 Oil Cover valve housing screw 54 M10 40 Oil Orifice 55 M10 10 Oil Oil filter 56 M33 225 Oil Screw to pre co...

Page 61: ...oupling disc 70 M12 60 MOLYKOTE G Screw to spring tensioner 71 M10 35 MOLYKOTE G 9923 Connecting unit adjusting disc coupling disc screw 72 M10 35 MOLYKOTE G 9314 Clamping nut to oil mist detector 73...

Page 62: ...other hydraulic jacks required pressure in bar must be calculated in relation to effective jack piston surface Conversion factor 1 Nm 0 102 mkp 1 bar 1 02 kp cm2 2 Tightening torque 3 Tightening angle...

Page 63: ...D W rtsil Switzerland Ltd 7 16 008 570 01 3 75 013 633 05 013 634 05 013 636 05 26 26 7 4 21 22 1 ENGINE STAY FRICTION TYPE LIFTING GEAR FOR CYLINDER LINER 5 6 016 589 08a 50 D 2010 Tightening Values...

Page 64: ...Maintenance 0352 1 A1 RT flex50 D W rtsil Switzerland Ltd 8 16 018 723 09 23 18 19 20 16 27 28 2 17 24 25 016 590 08a 2010 50 D Tightening Values of Important Screwed Connections...

Page 65: ...Maintenance 0352 1 A1 RT flex50 D W rtsil Switzerland Ltd 9 16 15 14 13 61 8 7 9 60 10 60 11 016 591 08 12 61 2010 Tightening Values of Important Screwed Connections...

Page 66: ...Maintenance 0352 1 A1 RT flex50 D W rtsil Switzerland Ltd 10 16 013 645 05 31 32 33 SUPPLY UNIT 29 30 016 592 08 2010 Tightening Values of Important Screwed Connections...

Page 67: ...2 1 A1 RT flex50 D W rtsil Switzerland Ltd 11 16 013 646 05 013 647 05 013 648 05 43 44 42 40 41 I 46 49 48 47 39 63 62 II 39 34 35 36 37 38 FUEL RAIL II I 45 2010 Tightening Values of Important Screw...

Page 68: ...Maintenance 0352 1 A1 RT flex50 D W rtsil Switzerland Ltd 12 16 013 649 05 63 62 62 2010 Tightening Values of Important Screwed Connections...

Page 69: ...nce 0352 1 A1 RT flex50 D W rtsil Switzerland Ltd 13 16 013 651 05 51 I I IV 51 57 50 IV III 54 55 56 SERVO OIL RAIL 53 III I I 52 WCH00678 WCH00678 2011 12 Tightening Values of Important Screwed Conn...

Page 70: ...Maintenance 0352 1 A1 RT flex50 D W rtsil Switzerland Ltd 14 16 013 654 05 701 013 655 013 655 05 013 656 05 59 I I 58 58 58 I I 2010 Tightening Values of Important Screwed Connections...

Page 71: ...rtsil Switzerland Ltd 15 16 G 66 64 69 68 71 G 70 CRANK ANGLE SENSOR UNIT F 008 566 01 008 567 01 008 750 01 010 293 02 I I I I 72 CONNECTING UNIT TO CRANK ANGLE SENSOR UNIT 67 65 2010 Tightening Valu...

Page 72: ...x50 D W rtsil Switzerland Ltd 16 16 013 658 05 013 659 05 73 74 76 79 78 77 016 593 08 80 80 016 594 08 ARRANGEMENT OF BLANK FLANGES 94569 94569a LIFTING TOOL FOR RAIL UNIT 2010 Tightening Values of I...

Page 73: ...ning instructions are valid only if screws are made of the 8 8 material threads have been lubricated with oil Standard thread Fine thread Tightening torque Nm M8 M8 x 1 20 M10 M10 x 1 25 40 M12 M12 x...

Page 74: ...the bottom of the tap hole and tighten Always utilize a stud driver or two nuts Tools like a pipe wrench etc which would damage the stud shank must never be used D For the protection of the waisted st...

Page 75: ...thread 210 3 3 8 3 2 2106 Waisted stud in cylinder block 29 2124 Cylinder liner 2000 2130 Water guide jacket upper Water guide jacket lower 58 194 2303 Piston rod gland 85 2708 Waisted stud for valve...

Page 76: ...rown Piston skirt Piston rod Spraying plate with oil pipe complete 1011 242 39 588 38 3603 Inside telescopic pipe to piston cooling and crosshead lubrication 19 4 4106 Gear wheel on crankshaft 2 part...

Page 77: ...compl ABB A170 compl MET60A complete 4900 3000 4260 6545 Auxiliary blower with electric motor Electric motor complete 591 885 160 194 6606 Scavenge air cooler SAC261 SAC265 SAC285 1650 2100 950 6708 W...

Page 78: ...This page is intentionally left blank...

Page 79: ...6 99 380 37 Valve seat cylinder cover 6 99 329 57 Guide bush valve cage 5 33 75 57 Lower housing valve cage 6 99 148 59 Valve seat valve cage 7 250 Piston valve spindle 5 33 53 34 Transmitter lower h...

Page 80: ...ody 2 10 Valve tip piston 1 78 6 07 Valve body cover 1 78 6 07 Slide valve valve body 2 62 3 63 Intermediate ring intermediate piece 3 53 50 39 Intermediate ring fuel pressure control valve 3 53 32 92...

Page 81: ...4 Fuel pressure retaining valve 2 62 15 54 8733 Fuel pressure piping injection valve Flange injection control unit 2 62 32 99 Flange injection valve 2 62 32 99 Flange HP piping 2 62 28 24 Flange HP pi...

Page 82: ...This page is intentionally left blank...

Page 83: ...tarting air spindle PSR RSR 160 x 155 x 3 8 30 x 33 x 2 8 5556 Regulating toothed rack flange RSR 24 x 26 x 1 8 6735 Scavenge air waste gate piston PSR 140 x 135 x 3 8 Piston Seal Ring PSR Cylinder Pi...

Page 84: ...n cylinder 110 x 100 6 x 1 7 93 4 x 84 x 1 7 97 79 x 5 33 85 09 x 5 33 94252 Waisted studs to exhaust valve piston cylinder 152 x 138 8 x 2 5 105 4 x 96 x 1 7 135 89 x 6 99 94 62 x 5 33 94314 Waisted...

Page 85: ...ce of application Ring type Dimension mm 2751 Exhaust valve piston PSR 108 x 92 5 x 6 3 Piston Seal Ring PSR Nominal dimension da x di x b da Cylinder diameter di Groove diameter b Groove width Cylind...

Page 86: ...This page is intentionally left blank...

Page 87: ...tom drain for free passage 6000 8000 Op h 1224 1 Remove thrust bearing pads for inspection acc to class society 1715 1 Engine stays with friction shims Check pre tension of waisted studs first time af...

Page 88: ...check overhaul 6000 Op h 18 000 Op h 2751 1 to Exhaust valve General inspection of valve housing valve spindle and valve seat without dismantling of exhaust valve at every piston removal 2751 4 Check...

Page 89: ...ing 18 000 20 000 Op h Check tightness on piston in situ and with running oil pump visual check through scavenge ports after refitting 3403 3 Dismantling and assembling open cooling space clean same m...

Page 90: ...clearances at random 12 000 Op h Camshaft check thrust bearing clearances 36 000 Op h 5556 1 Fuel pump Replace O rings in valve block 18 000 Op h Random visual check of plunger cylinder roller and rol...

Page 91: ...ng Manual Air filter Check filter half yearly Cleaning of filter at a np increase of 50 compared to the shop test value at same engine load see Operating Manual 6510 1 as required 6545 1 Auxiliary blo...

Page 92: ...en pre charge pressure CLU4 C min 30 bar max 35 bar directly after installation of a new accumulator then at least once in first week after start up afterwards every three months 8 Servo oil automatic...

Page 93: ...intervals must be taken as guidance and may vary depending on the installation The proper intervals are subject to the points men tioned below Experience will show whether these intervals can be exten...

Page 94: ...This page is intentionally left blank...

Page 95: ...nd Ltd 1 2 Cross section 6606 1 6420 1 3206 1 3301 1 8733 1 2728 1 5562 1 3603 1 3326 1 5556 1 5801 1 4103 1 WCH00123 6708 1 1112 1 3326 2 8752 1 8447 1 8460 1 5552 1 to 5552 5 5612 1 5564 1 Engine Cr...

Page 96: ...nal section WCH00126 2303 1 1132 2 2722 1 4325 1 2124 1 to 2124 3 4103 3 2751 1 to 2751 4 3403 1 to 3403 4 2708 1 to 2708 3 3146 1 9223 1 3303 1 to 3303 5 3130 1 3425 1 1903 1 3130 2 1224 1 1132 1 213...

Page 97: ...ensioning of Waisted Studs 1132 1 A1 Removal and Fitting of a Main Bearing 1132 2 A1 o Thrust Bearing Checking the Axial Clearance 1203 1 A1 Removal and Fitting the Thrust Bearing Pads 1224 1 A1 Engin...

Page 98: ...This page is intentionally left blank...

Page 99: ...p s foundation plate SA Gap 1 General The pre tension of the foundation bolts holding down studs must be checked at longer intervals e g during overhauls see 0380 1 In the area of the thrust bearing t...

Page 100: ...vent screw 1 Close vent screw tension foundation bolt with 1500 bar and keep pressure constant Piston 3 of the pre tensioning jack must never exceed the red limiting groove BN Fig D Check with feeler...

Page 101: ...been reached Piston 3 of the pre tensioning jack must never exceed the red limiting groove BN Fig E Turn back nut 4 by one turn release the pressure to 0 and remove the pre tensioning jack E 012 950 0...

Page 102: ...This page is intentionally left blank...

Page 103: ...tensioning of the waisted studs Prior to screwing the nuts onto the waisted studs the threads and nut seating sur faces must be cleaned Apply oil to the threads and pay attention to the free move ment...

Page 104: ...Close vent screws 6 on the jacks as soon as oil flows bubble free Actuate hydraulic unit until a pressure of approx 1530 bar is indicated Never move piston 8 of the pre tensioning jack further up tha...

Page 105: ...ure to 1500 bar at the hydraulic unit and keep it constant Tighten all nuts 4 with round bar RS till firmly seated check through slot KO using feeler gauge 94122 Release pressure to zero at the hydrau...

Page 106: ...This page is intentionally left blank...

Page 107: ...kg for bearing covers WLL 500 kg for bearing shells DP Depository HU Wooden underlay HZ Spur geared chain block OB Oil bore RC RUD eye bolt M20 Overview 1 General 1 16 2 Placing of thrust device 9411...

Page 108: ...Maintenance 1132 2 A1 RT flex50 D W rtsil Switzerland Ltd 2 17 A 7 I I I I 018 677 09 II II II II 6 3 5 5 3 4 2 OB 4a 2010 50 D Removal and Fitting of a Main Bearing...

Page 109: ...0_ after T D C D Place working platform D Check the bearing clearance see 0330 1 D Loosen the waisted studs and remove their nuts Fit lifting lug 94116b onto the bearing cover using screws 8 8 M12x28...

Page 110: ...e tool 94110 Lift bearing cover 3 over the waisted studs using manual ratchets H1 and H2 connected with lifting lug 94116b Mount manual ratchet H3 and use it to pull the bearing cover towards exhaust...

Page 111: ...device 94110 as described in section 2 Screw RUD eye bolt M20 RC into the guide shoe and tighten it with 115 Nm Fasten lifting ring 94332 with shackle 94332a to cylinder block 14 using screws 15 which...

Page 112: ...l it is completely retracted from the waisted studs By means of manual ratchets H1 and H2 move bearing cover in engine longitu dinal direction under the crosshead Take over the load with manual ratche...

Page 113: ...bearing cover from the crankcase using manual ratchet H3 and spur geared chain block HZ Place bearing cover 3 on wooden underlay HU in order not to damage the fitted upper bearing shell 4 and the seat...

Page 114: ...with jack 16 To protect the flywheel toothing put a copper or aluminium plate between the jack and the flywheel Fig I 5 1 Fitting the hydraulic jacks Turn corresponding crank to exhaust side approx 9...

Page 115: ...no vertical clearance between upper bearing shells and crankshaft In case the bearing shell cannot be turned out both of the adjoining bearing covers have also to be loosened Thus the crankshaft can...

Page 116: ...the other side and connect them with device 94119b Turn out bearing shell using manual ratchet H1 until transportation tool 94116a WLL 50 kg can be fitted Remark If a bearing shell jams during turning...

Page 117: ...the bearing girder Fasten manual ratchet H2 to the platform Hook both manual ratchets in the transportation tool Carefully lift the bearing shell while guiding it manually slacken manual ratch et H1...

Page 118: ...the other side and connect them with device 94119b Fit assembling and dismantling device 94117 to column by means of its prop er pin which must be secured with a double spring clip Pull rope 94120a th...

Page 119: ...are cleared from the bearing girder Fasten lifting ring 94332 with shackle 94332a to cylinder block 14 using screws 15 which must be tightened with a torque of 200 Nm see detail Fig D Connect manual...

Page 120: ...or cracks Slight scratches and running marks can be removed by scotch brite Attention Do not scrape the bearing shell in the loaded area If the running marks are more uneven distributed than expected...

Page 121: ...both ropes b of turning out device 94118a below the crankshaft journal and connect them on the opposite side with device 94119b D To prevent the bearing shell from sliding into the bearing girder due...

Page 122: ...the two measurements If the clearance is within the limits including allowable wear see 0330 1 the bearing can be reused The crank deflection should be measured when new bearing shells have been fitt...

Page 123: ...nd Ltd 17 17 Turning in lower bearing shell No 1 M M1 018 611 09 018 612 09 94118a 94116a 94119b a b Turning in lower bearing shell No 2 and following N N1 018 613 09 018 614 09 94332 94117 94119b 943...

Page 124: ...This page is intentionally left blank...

Page 125: ...cts the thrust bearing pads AHEAD and ASTERN is measured with dial gauge 8 This is then checked against the figure marked on the page Check Dimensions in the engine documents supplied see also Clearan...

Page 126: ...art 2 of the oil baffle with inside micrometer 94101 at the position indicated see Fig B The amount by which distance X is smaller than that given on the page Check Dimensions corresponds to the wear...

Page 127: ...ar wheel RC RUD eye bolt 1 Removal Remark Pay attention to General Guidelines for Lifting Tools 0012 1 Remove casing 1 together with oil baffle upper part 2 Loosen screws 3 to arbor supports 4 4a of t...

Page 128: ...nkshaft is then to be turned with the turning gear pushing the pads out which can then be lifted up and removed one by one as shown in Fig C Remark When only a few thrust bearing pads of a row are to...

Page 129: ...ld slide in without effort to their end position With all the thrust bearing pads in position the distances from the outermost pads on fuel side and exhaust side to the upper edge of the bedplate must...

Page 130: ...ENGINE SIDE VIEW FROM DRIVING END PADS AT DRIVING END AHEAD ASTERN CLOCKWISE ROTATING ENGINE ARRANGEMENT OF THRUST BEARING PADS COUNTER CLOCKWISE ROTATING ENGINE PADS FOR AHEAD AHEAD ASTERN FOR 5 6 CY...

Page 131: ...DS ON ENGINE SIDE VIEW FROM DRIVING END PADS AT DRIVING END SUPPORT SURFACE AHEAD ASTERN AHEAD ASTERN COUNTER CLOCKWISE ROTATING ENGINE PADS FOR AHEAD ARRANGEMENT OF THRUST BEARING PADS FOR 5 6 CYLIND...

Page 132: ...ENGINE SIDE VIEW FROM DRIVING END PADS AT DRIVING END AHEAD ASTERN CLOCKWISE ROTATING ENGINE ARRANGEMENT OF THRUST BEARING PADS COUNTER CLOCKWISE ROTATING ENGINE PADS FOR AHEAD AHEAD ASTERN FOR 7 8 CY...

Page 133: ...rew EV Relief valve 7 Piston KO Slot 8 Cylinder RS Round bar 1 General Two friction type stays 1 each are installed either on exhaust side or on fuel side as shown in Fig A The pre tension of screws 3...

Page 134: ...clearance between nut 4 and its seating If there is no clearance this means that the tensioning condition of the screw has remained unchanged since the last check The pressure can be released to zero...

Page 135: ...ears For such checks it is not required to loosen the waisted studs of the main bearings nor the clamp screws 10 Fig D Remark Pay attention to General Application Instructions 9403 4 for hydraulic pre...

Page 136: ...clearance does exist tighten the nut with rod 94005b until it rests firmly on the intermediate ring Subsequently release the pressure to zero at the hy draulic unit If no clearance exists the pressure...

Page 137: ...minary works D Clamp screws 10 must not be tightened up D Lower tie rod nut 14 is screwed on Clean the seating surface for intermediate ring 2 and upper tie nut 3 and smear them with MOLYKOTE G paste...

Page 138: ...e two upper tie rod nuts 3 with rod 94005b Never move pistons 5 of the pre tensioning jacks further up than to the red limiting grooves BN Measure again distance L and record it as L1 The tie rods are...

Page 139: ...1 A2 RT flex50 D W rtsil Switzerland Ltd 5 5 III I III II I I I I 11 7 15 D 7 8 1 3 2 WCH00668 1 15 12 10 FLUSH 16 AN 13 14 9 II I Checking the Pre tension and Tensioning the Tie Rods with M72x6 Thre...

Page 140: ...This page is intentionally left blank...

Page 141: ...Wear 2303 1 A1 o Cylinder Cover Removal and Fitting of Cylinder Cover and Water Guide Jacket 2708 1 A1 Loosening and Tensioning of Cylinder Cover Waisted Studs 2708 2 A1 Machining of Sealing Face for...

Page 142: ...This page is intentionally left blank...

Page 143: ...etween the top ring wear ridge and the antipolishing ring The unrun position must be thoroughly cleaned from any deposits or lacquer before measurement Hook the measuring gauge over the top face of th...

Page 144: ...This page is intentionally left blank...

Page 145: ...Preparatory works 1 9 2 Removal and fitting of cylinder liner with water guide jacket 3 9 3 Removal and fitting of antipolishing ring 5 9 4 Removal and fitting of water guide jacket 6 9 5 Removal and...

Page 146: ...ane hook and distance plates 94202b Therefore loosen slotted countersunk head screws 12 and remove them with dis tance plates 94202b and 94202c Subsequently distance plates 94202c have to be machined...

Page 147: ...water guide jacket Loosen screws 5 Loosen screws 10 and remove them together with angle plates 11 and con nection pieces 9 from water guide jacket 3 view II II B 016 505 08 I I FUEL SIDE II II I I II...

Page 148: ...rt fixing blocks 94202g into the openings resulting by the removal of con nection pieces 9 from water guide jacket 3 Fig B Fasten these to the lifting gear by means of screws 94202h which have to be t...

Page 149: ...ls and connect their pipings Actuate the cylinder lubricating pump until oil emerges from all the lubricating bores in the corresponding cylinder liner see 2138 1 Function check 3 Removal and fitting...

Page 150: ...jacket 3 from cylinder liner 2 if the latter is located in the cylinder block D Pay attention to instructions in section 1 D Lifting gear 94202 must be placed according to paragraph 2 1 Loosen all scr...

Page 151: ...de jacket 3 with lubricating oil Move the water guide jacket above the cylinder liner slowly lower and align it to ensure that centring pin 14a fits into the corresponding bore on fuel side Fit connec...

Page 152: ...f Fasten fixing blocks 94202e to the lifting gear by means of screws 94202f which have to be tightened with 200 Nm The cylinder liner can be lifted now 5 2 Fitting Place lifting gear 94202 according t...

Page 153: ...ures below D Raising the cylinder liner is carried out in reversed sequence Risk of accident Laying down and raising a cylinder liner must not be done in any other way than as shown in the figures Ne...

Page 154: ...This page is intentionally left blank...

Page 155: ...Remove waste particles which may have passed into the scavenge space through the ports D Actuate the cylinder lubrication until oil flows from all the lubricating points thereby flushing away any met...

Page 156: ...nce 2124 3 A1 RT flex50 D W rtsil Switzerland Ltd 2 3 A WCH00106 SI 015 739 07 II II II SN II II II SHARP EDGES REMOVED I I I I Cylinder Liner Re dressing Lubricating Grooves and Scavenge Ports 2010 P...

Page 157: ...Maintenance 2124 3 A1 RT flex50 D W rtsil Switzerland Ltd 3 3 5 3 7 4 8 9 1 2 6 10 T D C 1mm 2 3mm 11 12 B 009 642 02 013 047 05 94299 11 Cylinder Liner Removing the Wear Ridge 2010...

Page 158: ...This page is intentionally left blank...

Page 159: ...be oil 1 HP hose 94935 8 Bush 21 Pipe bracket 9 9a Flange 22 O ring 10 Joint 11 Screw 12 Adjustable angle union 13 Lubricating oil pipe DF Sealing surface 1 General If only the lubricating quill must...

Page 160: ...move lubricating quill if necessary also bush 8 D When refitting the lubricating quill take care that sealing surface DF is abso lutely clean as it seals metallically Therefore do not use any gaskets...

Page 161: ...SAE 50 at 40_C approx 200 cSt or SAE 30 at 25_C approx 190 cSt must be used 3 2 Test procedure D Instead of screw in union fit connection nipple 94934i into screwed union 6 Connect and vent the lubri...

Page 162: ...w ing bubble free out of the loosened connection Remark As described above the lubricating module can also be operated with the operator interface of the control system Further information and adjustm...

Page 163: ...ve lube oil 1 Connection nipple G 94934i 7 Holder 19 Pipe bracket 1 HP hose 94935 8 Non return valve 9 Allen screw M10x50 10 Screw in union 11 Angle union 12 Lubricating oil pipe DF Sealing surface 1...

Page 164: ...fit de sign The lubricating quill must be replaced as a whole unit i e nozzle tip 6 with non return valve 8 inserted and holder 7 D When refitting the lubricating quill the sealing surface DF must be...

Page 165: ...est procedure D Instead of screw in union fit connection nipple 94934i into lubricating quill Connect lubricating quill 5 to oil pump 94931 as shown below Vent the lubricating quill Apply a pressure o...

Page 166: ...is flow ing bubble free out of the loosened connection Remark As described above the lubricating module can also be operated with the operator interface of the control system Further information and...

Page 167: ...18 Piston rod 9 Tension spring 19 Hinged cover 10 Screw 20 O ring Overview 1 General 1 6 2 Removing dismantling and assembling 2 6 2 1 Removing a gland 2 6 2 2 Dismantling a gland 2 6 2 3 Assembling...

Page 168: ...For this 2 part housing 1 of the gland must rest on the two hinged covers 19 of the device Loosen and remove fitted bolts 13b and screws 13 to 2 part housing 1 Push the two gland housing halves away f...

Page 169: ...1 A1 RT flex50 D W rtsil Switzerland Ltd 3 6 B 20 13a 13 17 16 15 I I I I 16 11 10 11 15 13a 013 215 05 II II 20 17 16 11 10 II II FUEL SIDE 14 18 1 2010 Piston Rod Gland Dismantling and Assembling Me...

Page 170: ...tribute the distances evenly Use assembly tool 94345e see 9403 5 for fitting tension spring 9 Place two distance pieces 94345f 9 mm on ring support 5 and fit another ring support with scraper ring 6 a...

Page 171: ...ng vertical locat ing pins 7 The remaining three segments are provided only with one horizontal locating pin each Place two distance pieces 94345f 13 mm on the assembled sealing ring 3 and fit again s...

Page 172: ...h screws 13 and fitted bolts 13b according to Fig B Place O rings 20 Just before the gland is fitted with the piston apply lubricating oil to the bores in the cylinder block and to the gland housing i...

Page 173: ...valve as well as the expansion piece between exhaust valve and exhaust manifold Loosen and remove the nuts of the cylinder cover studs see 2708 2 Screw spec eye nuts 94265a onto the studs 4 of the ex...

Page 174: ...tached to suspension device 94265 slowly over the cylinder cover studs Screw all the nuts by hand onto the cylinder cover studs paying attention to easy turning Pre tension the studs with hydr pre ten...

Page 175: ...down on it or completely removed Loosen the screws and separate the water guide jacket from cylinder cover using appropriate tools 5 Fitting of water guide jacket Clean all the sealing faces and ring...

Page 176: ...This page is intentionally left blank...

Page 177: ...wed fastenings must be followed Should a cylinder cover stud have to be replaced please observe the indication in 2751 1 2 Set up of pre tensioning jacks Clean the threads of all cylinder cover studs...

Page 178: ...ensioning jacks as mentioned in section 2 Start up hydraulic unit 94942 Close vent screws 3 on the pre tensioning jacks as soon as oil flows bubble free Actuate the hydraulic unit until a pressure of...

Page 179: ...hten nuts 2 with round bar RS Check seating of the nuts with a feeler gauge through slot KO Release pressure to 0 and remove all pre tensioning jacks Ascertain that these have been turned by about the...

Page 180: ...This page is intentionally left blank...

Page 181: ...verhauling de vice 94270 Carefully insert the profiling cutter bolted to the milling cutter holder into the hole in the cylinder cover Fasten guide flange 3 with screws 7 When the tool is being used t...

Page 182: ...This page is intentionally left blank...

Page 183: ...e tip 7 8 9 Assembling a spring cage 8 8 10 Fitting an injection valve in cylinder cover 8 8 1 General For checking dismantling assembling and adjusting the injection valve test bench 94272 as well as...

Page 184: ...Place injection valve 1 with nozzle tip pointing downwards into support 19 of test bench 94272 and fasten it with two Allen screws 2 and spring cages 23 Tighten HP hose 20 of test bench with connecti...

Page 185: ...the opening pressure D In order to test tightness between the nozzle needle and needle seat keep the pressure in the test bench constant at approx 20 bar below the opening pres sure During a time peri...

Page 186: ...sion 5 Assembling an injection valve To assemble an injection valve follow generally the reverse sequence of the dis mantling process but note also the following points D To clean injection valve part...

Page 187: ...A1 RT flex50 D W rtsil Switzerland Ltd 5 8 I I II II B I 013 489 05 013 490 05 013 491 05 I II II FL 16 17 18 12 13 7 6 2 3 4 23 5 22 10 15 14 8 11 9 h 2010 Injection Valve Checking Dismantling Assemb...

Page 188: ...6 1 Determining of total shim thickness h The total shim thickness h can be determined with the following formula h 10 5 x 0 3 p2 p0 p2 p1 Example measured opening pressure p1 389 bar measured openin...

Page 189: ...ody 13 pointing upwards and then proceed as follows Clean all parts with clean diesel oil or kerosine and blow them out with compressed air Place nozzle tip on the nozzle body whereby the position is...

Page 190: ...ing surface of the injection valve in the cylinder cover and check for damages If necessary recondition the seating surface using the special tool supplied with the tools set see 2708 3 The sealing mu...

Page 191: ...inder cover Remove the control air pipe from the starting valve and disconnect plug 14 from control valve 13 Loosen screws 10 Loosen screw 11 and remove upper part consisting of cover 3 and control va...

Page 192: ...heck the easy movement of the spindle by moderately tapping the upper end of the spindle several times with a lead block in an axial direction the spindle must jump every time back on the seat Place a...

Page 193: ...2728 1 A1 RT flex50 D W rtsil Switzerland Ltd 3 3 018 384 09 I I II II 14 3 I I 3 13 8 6 18 12 9 13 GL 2 11 SL 17 10 5 1 7 16 15 2 4 Starting Valve Removal Fitting and Dismantling Grinding in and Asse...

Page 194: ...This page is intentionally left blank...

Page 195: ...which is connected by relief bore RB to the compression chamber An inadmissible high pressure peak in the compression chamber opens the valve and the over pressure is immediately reduced A relief valv...

Page 196: ...ff pressure bar 140 143 200 144 147 205 148 151 210 152 155 220 156 160 225 B 013 484 05 013 486 05 94935 94934a 94272 94931 EV 017 670 08 10 94272c 2 3 Fitting the relief valve Apply Never Seez NSBT...

Page 197: ...Coupling elements 94934g 7 Valve cage KO Slot 3 HP hoses 94935 8 Expansion piece RC RUD eye bolt 1 Hydraulic unit 94942 9 Protection pipe RS Round bar 10 Screw SA Gap 1 Removal Drain cylinder cooling...

Page 198: ...or no clearance at x Screw back pre tensioning jacks by about turn gap SA in Fig B Connect pre tensioning jacks to hydraulic unit 94942 as shown in Fig C Actuate the hydraulic unit and close the vent...

Page 199: ...exhaust valve If the exhaust valve should be laid down first put it in valve protector 94262 then fix it by clamping it with three straps 13 and the cor responding screws Remark Never place the exhaus...

Page 200: ...feeler gauge Mark position of nuts on a corner and their position on valve cage 7 with a felt tip pen for later checks 2 1 Tensioning of waisted studs Screw pre tensioning jacks 94252 onto waisted st...

Page 201: ...exhaust pipe Apply a thin layer of a heat resisting lubricant to joint faces and connecting screws The expansion piece has to be fitted in such a way that protection pipe 9 of the expansion piece come...

Page 202: ...sive primer and any lubricant to the thread Screw in the stud right to the bottom and until it rests on its seating surface and tighten it according to instructions 0352 2 using always a stud driver o...

Page 203: ...ufacturer Products of other manufacturers are also allowed when fulfilling the below specifi cation Containing no acid e g no acetic acid Resistant to oil marine diesel oil heavy fuel oil and water at...

Page 204: ...This page is intentionally left blank...

Page 205: ...BO Bore 18 Disc spring HH Hydr HP pipe 19 Distance ring OB Oil bore 20 Head screw RC Eye bolt Overview 1 General 1 9 2 Dismantling of exhaust valve 3 9 3 Assembling of exhaust valve 5 9 4 Blocking of...

Page 206: ...nance 2751 2 A1 RT flex50 D W rtsil Switzerland Ltd 2 9 41 23 B BO 33 RC 33 34 7 8 35 11 22 17 37 6 3 38 2 39 1 21 15 16 19 18 20 40 25 24 WCH00406 5 9 10 HH 2011 12 Exhaust Valve Dismantling and Asse...

Page 207: ...A Lift the upper valve drive and remove it using eye bolt RC Loosen screws 31 and remove transmitter housing 32 and valve stroke sen sor 30 Loosen and remove all screws 4 Lift lower housing 2 and rem...

Page 208: ...d measure the inner diameter of the guide bush according to Clearance Table 0330 1 Exhaust Valve 2 4 Fitting of guide bush Clean the bore in valve cage 1 concerned and guide bush 21 Check oil bores OB...

Page 209: ...r before fitting them When fitting proceed with care to avoid their damage do not use any sharp edged utensils for assis tance Check all O rings of the dismantled parts for damage and replace them if...

Page 210: ...rt of valve drive paying attention to position of spring dowel pin 12 Fig F Oil nuts 3 fit and tighten them equally up to a torque of 125 Nm 3 3 Fitting of valve stroke sensor Clean valve stroke senso...

Page 211: ...Determine with depth gauge 94126 measure H from the edge of upper hous ing 5 to the bottom of the damper bore in inside piston 7 for this the exhaust valve must be closed check with feeler gauge wheth...

Page 212: ...rifice and check them for fouling 3 7 Checking non return valve Loosen and remove adapter 26 Check non return valve 27 for cleanliness on every overhaul Remark When fitting the non return valve pay at...

Page 213: ...emergency i e with water leakages into the combustion chamber damper 33 can be removed and the exhaust valve blocked in open position by means of pressure element 94259a The latter must also be fitte...

Page 214: ...This page is intentionally left blank...

Page 215: ...inverted upside down position it must be suspended on the engine room crane slightly above a wooden underlay Device 94261 can then be attached from below and the valve seat carefully withdrawn until...

Page 216: ...g 3 of original specification with the same lubricant Push valve seat as far as possible into the bore then mount valve seat fitting and dismantling device 94261 and by equal tightening of the jack sc...

Page 217: ...st be avoided as a matter of principle Therefore always use the valve grinding device 94291 for grinding in the valve seats in the following cases When new or reconditioned valve spindles are fitted W...

Page 218: ...ing allowance on the valve seat is maximum 3 mm The wear condition can be checked efficiently with gauge 94279 in combination with feeler gauge 94122 Possible burn scars at the inside of the valve sea...

Page 219: ...valves makes contact by 50 100 from the outer edge Fig F The blueing check should show that the cold valve makes contact only from inside around the whole circumference The angle difference can be ch...

Page 220: ...This page is intentionally left blank...

Page 221: ...own The machines from the makers HUNGER and CHRIS MARINE are well proven for valve grinding and can also be ordered directly from W rtsil Switzerland Ltd Winterthur 2 Grinding the seating surface D On...

Page 222: ...e Valve plates where the seat surface has been ground back by more than 3 mm can be reconditioned by build up welding D On engines with arduous operating conditions corrosion may form at the bottom of...

Page 223: ...ng the Connecting Rod Studs 3303 1 A1 Inspection Removal and Fitting of Bottom End Bearing 3303 2 A1 Inspection Removal and Fitting of Top End Bearing 3303 3 A1 Removal and Fitting 3303 4 A1 Removal o...

Page 224: ...This page is intentionally left blank...

Page 225: ...ing crank deflection D Under normal circumstances once a year D In case the ship has touched ground D After replacing main bearing shells and again after approx 100 service hours D By signs of damage...

Page 226: ...gauge must not deviate more than 0 01 mm Set subsequently dial gauge to zero Turn crankshaft by means of turning gear reading the dial gauge in the shown crank positions at B D C EXHAUST SIDE T D C FU...

Page 227: ...The values given below are valid for all conditions independent of outside in fluences however considering notes 1 to 3 1 For engine without torsional vibration damper or front disc 2 For engine with...

Page 228: ...This page is intentionally left blank...

Page 229: ...well as changes in the silicone oil properties can reduce the effectiveness of the damper By periodic examination of the silicone oil the makers of the vibration damper can draw conclusions on its con...

Page 230: ...are used for the sample bores of the Metaldyne International and STE vibration dampers Therefore the ends of the sample con tainer are provided with different threads Remove the previously loosened sc...

Page 231: ...onnections and air hose must be clean free from any fouling As soon as fluid reaches open end of sample container shut off compressed air supply and then fit one of the two cap nuts 7 to the sampling...

Page 232: ...t to Hasse Wrede Metaldyne International UK Ltd 131 Parkinson Lane GB Halifax HX1 3RD United Kingdom Tel 44 1422 357 234 Fax 44 1422 354 432 Geislinger GmbH Hallwanger Landesstrasse 3 A 5300 Hallwang...

Page 233: ...st be stopped immediately otherwise the damper may be seriously damaged The oil supply has to be reestablished before restarting the engine D Should damage be noticed on the engine bearings which is d...

Page 234: ...aintenance 3130 2 A1 RT flex50 D W rtsil Switzerland Ltd 2 2 1 5 8 A B 6 9 7 4 8 2 000 940 93 3 013 052 05 FREE END OIL SUPPLY DRAWN FOR STEEL SPRING DAMPER Inspection GEISLINGER Vibration Damper 2010...

Page 235: ...Non return valve 10 Tension spring 11 2 part gasket HZ Lifting tackle 12 Tension spring RC RUD eye bolt 1 Dismantling Attention The engine must not be operated with the oil supply to the axial damper...

Page 236: ...screws 6 Remove all screws 7 to cylinder upper part 4 On engines provided with vibra tion damper loosen the screws and pull them out as far as possible B I I II I I II 20 19 16 17 10 11 14 15 10 11 6...

Page 237: ...ention to General Guidelines for Lifting Tools 0012 1 Screw RUD eye bolts RC into cylinder upper part 4 Connect ropes a and b with lifting tackles HZ and RUD eye bolts RC as shown in figure below C I...

Page 238: ...of 2 part gaskets 11 and 13 without jamming as otherwise the gaskets risk being dam aged Connect rope c with spur geared chain block 18 to cylinder upper part and pull it to fuel side as shown in Fig...

Page 239: ...efore fitting 2 part gaskets smear them with clean engine oil D Newly fitted 2 part gaskets must allow radial movement when fitted D The assembling of the axial damper is done analogously to dismantli...

Page 240: ...This page is intentionally left blank...
Page 241: ...ing the turning gear into operation the condition of the tooth flanks i e the lubricant of pinion 2 and toothing of flywheel 3 must always be checked See also 0750 1 in the Operating Manual For mainte...

Page 242: ...luid to approx 35 _C in a small tin which is put into warm water 2 2 Re lubrication intervals According to visual inspection results when hardly any lubricant is left any more on the highest loaded to...

Page 243: ...ections or works in the crankcase Working platform 94142 must be fastened to the stay bolts of engine longitudinal beam 1 by means of nuts 94142a Working support 94143 can be fitted between the column...

Page 244: ...This page is intentionally left blank...

Page 245: ...side i e with lifting tool 94335 a variant A or with a continu ous crane rail variant B The working procedures however are for both variants identically as described in 3303 2 to 3303 5 and 3326 2 Lif...

Page 246: ...Maintenance 3301 2 A1 RT flex50 D W rtsil Switzerland Ltd 2 2 018 385 09 b B 1 II I 2 I II 4 5 CONTINUOUS CRANE RAIL VARIANT B Upper Platform Arrangement of Lifting Tools 2010...

Page 247: ...SA Gap Overview 1 General 1 5 2 Loosening the stud of bottom end bearing 2 5 3 Tensioning the stud of bottom end bearing 3 5 4 Loosening the stud of top end bearing 4 5 5 Tensioning the stud of top e...

Page 248: ...ic unit 94942 as shown in Fig B Actuate the hydraulic unit till bubble free oil flows out through the vent screws Close vent screws Actuate the hydraulic unit up to about 1530 bar and keep pressure co...

Page 249: ...the feeler gauge through slot KO Fig C that no clearance remains between nut and supporting surface Check with the feeler gauge that no clearance remains between bearing cover and connecting rod Shou...

Page 250: ...94942 as shown in Fig D Actuate the hydraulic unit till bubble free oil flows out through the vent screws Close vent screws Actuate the hydraulic unit up to about 1530 bar and keep pressure constant P...

Page 251: ...bar RS and check with the feeler gauge through slot KO Fig F that no clearance remains between nut and supporting surface Check with the feeler gauge that no clearance remains between bearing cover an...

Page 252: ...This page is intentionally left blank...

Page 253: ...3303 1 for which the respective crank must be at T D C Never turn the crankshaft as long as the pre tensioning jacks are screwed onto the connecting rod studs 2 Inspection and removal 2 1 Lowering th...

Page 254: ...Turn crank 3 by approximately 70_ towards exhaust side Connect rope c with spur geared chain block 11 and the bearing cover as shown in Fig D Pull the bearing cover out of the crankcase and lay it dow...

Page 255: ...their eccen trics contact the guide shoes Secure connecting rod 5 with rope a and lift ing tackle HZ on fuel side Carefully turn down the crankshaft to fuel side following with the connecting rod bot...

Page 256: ...he separating face of the bearing shell be filed to reduce it H 013 540 05 Protrusion of new bottom end bearing shells x1 x2 approx 0 78 0 94 mm total for both bearing shells Remark Above measuring ch...

Page 257: ...earing shell 5 6 3 Fitting the bearing shell 6 6 1 Inspection of bearing shell The bearing shell can be examined with piston in situ or removed Remark Pay attention to General Guidelines for Lifting T...

Page 258: ...Fasten stop plate 94370h to bearing cover 5 and guide shoe 6 Screw RDU eye bolts RC into guide shoe 6 Fasten lifting rings 94332 to cylinder block 8 with screws 7 and tighten these with 200 Nm Connec...

Page 259: ...ing pins into the guide ways Carefully relieve lifting tackles HZ till the guide shoes come to rest on the re taining pins If however not all retaining pins touch the guide shoes turn them such that t...

Page 260: ...rod foot Connect the engine crane to lifting plate and then lift crosshead pin beyond the lower bores in guide ways 9 provided for the retaining pins Insert four retaining pins 94323 into the guide w...

Page 261: ...ig E Remove Allen screw 10 for positioning bearing shell 11 Fit eye bolts M6 into the front faces of the bearing shell and connect these with rope c as shown in Fig F Remove the bearing shell with rop...

Page 262: ...ell be filed to reduce it 3 1 Fitting a new top end bearing shell Proceed as described in section 3 however protru sion x1 x2 must be measured prior to tension con necting rod studs 12 3 1 2 Measuring...

Page 263: ...head pin and bearing cover to the top end bearing D The bearing cover to the bottom end bearing must be removed see 3303 2 D If the crosshead pin is also to be removed after the removal of the connect...

Page 264: ...ane to lifting plate and then lift crosshead pin beyond the lower bores in guide ways 10 provided for the retaining pins Insert four retaining pins 94323 into the guide ways as shown in Fig C Carefull...

Page 265: ...303 1 Fasten stop plate 94370h to bearing cover 8 and guide shoe 9 Screw RDU eye bolts RC into guide shoe 9 Fasten lifting rings 94332 to cylinder block 11 with screws 12 and tighten these with 200 Nm...

Page 266: ...r retaining pins into the guide ways Carefully relieve lifting tackles HZ till the guide shoes come to rest on the re taining pins If however not all retaining pins touch the guide shoes turn them suc...

Page 267: ...F G 013 036 05 R3 R1 H1 94323 94323 H3 b a b a R1 H3 13 Turn crank carefully 45_ before T D C while following steadily directing the connecting rod head through the column door with lifting tackle H3...

Page 268: ...ifting tackles H1 and to RDU eye bolt R3 Tauten rope Remove holder 94331 Carefully separate connecting rod from crankpin using spur geared chain block 13 and lifting tackles H1 and H3 Remove lifting t...

Page 269: ...rk Take care that the marking FUEL SIDE on the connecting rod head points to the fuel side For the assembly bearings and bearing pins must be in perfect condition They must be smeared lavishly with fr...

Page 270: ...This page is intentionally left blank...

Page 271: ...nd turn crank of the cylinder concerned to B D C as de scribed for Changing the Compression Shims 3403 2 Loosen the studs of the top end bearing as described in 3303 1 Screw RUD eye bolts RC into bear...

Page 272: ...g cover 2 towards fuel side Connect rope d with spur geared chain block 7 and RUD eye bolts RC and subsequently remove the bearing cover from the crankcase D Fitting of the bearing cover is carried ou...

Page 273: ...3 Holding plate 7 Shim 4 Guide way in engine column 8 Screw 1 General On the occasion of an overhaul or when a crosshead has been removed the vari ous running clearances have to be measured and compa...

Page 274: ...te crosshead must be pressed axially to a side with suitable hardwood wedges or similar aids The pressure must be exerted onto the guide shoe and not onto the crosshead pin 1 Clearances Lateral cleara...

Page 275: ...ied out as described in 3326 2 First loosen screws 8 and remove holding plate 3 prior to the dismantling of a guide shoe After the assembly of the guide shoe the holding plate has to be fitted so that...

Page 276: ...This page is intentionally left blank...

Page 277: ...rks 1 7 2 Removal of crosshead pin 2 7 3 Removal of guide shoes 6 7 4 Fitting 7 7 1 Preparatory works Remark Pay attention to General Guidelines for Lifting Tools 0012 1 Turn crank of the cylinder con...

Page 278: ...n rod foot Connect wire rope sling with lifting tackle HZ lifting capacity 1500 kg and to one of the shackles at the lifting plate A 3 1 94666 94324 2 94142 013 237 05 2 H2 RC 4 RC H1 013 238 05 Screw...

Page 279: ...fting tackles H1 and H2 Fig B as far as to ensure that it can not tilt back to fuel side Remove lifting tackle H2 and the corresponding RUD eye bolt RC and slowly swivel the connecting rod until it re...

Page 280: ...nnect lifting tackles H3 and H4 lifting capacity 750 kg each with lifting rings and RUD eye bolts RC Tauten lifting tackles H3 and H4 as far as the guide shoes do not rest any more on crosshead pin Re...

Page 281: ...e shoe free end 5 towards driving end and lift off the loose guide shoe Fig F Clear crosshead pin 2 from guide shoe driving end 5 towards free end and lift off the loose guide shoe Fig G F G DRIVING E...

Page 282: ...lifting tackle HZ to RUD eye bolt RC on the guide shoe free end and swivel it into the centre of the cylinder Fig I Remove lifting tackles H3 D Proceed in the same way as mentioned above for the guid...

Page 283: ...guide shoes see 3326 1 D When fitting the inside pipe to the piston cooling see 3603 1 Risk of accident Secure the connecting rod when lifting up in vertical direction with lifting tackle H2 Fig B so...

Page 284: ...This page is intentionally left blank...

Page 285: ...g the piston 7 8 6 Leak test 8 8 1 General Remark Pay attention to General Guidelines for Lifting Tools 0012 1 General Application Instructions 9403 4 for hydraulic pre tensioning jacks D 2124 3 Remov...

Page 286: ...t 1530 bar unscrew nuts 4 by one turn with round bar RS Pistons 7 of the pre tensioning jacks must never exceed the red limiting grooves BN Fig B Release pressure to zero with the aid of relief valve...

Page 287: ...and start up HP oil pump 94931 till bubble free oil flows out through vent screws 5 Shut the vent screws Slowly raise the pressure to 1500 bar Pistons 7 of the pre tensioning jacks must never exceed t...

Page 288: ...ults be tween the relevant crane hook and distance plates 94341a Therefore loosen slotted countersunk head screws 19 and remove them with dis tance plates 94341a and 94341b Subsequently distance plate...

Page 289: ...ig D Turn crank to T D C whereby the piston rod gland is pushed out of its seating in the cylinder block by distance holders 94345 Fig E Use tap 94348 to clean threaded holes of combustion residue in...

Page 290: ...e supporting device until the piston foot pro trudes below the supporting device Turn the two hinged covers down and lower piston until piston rod gland 12 rests on the two hinged covers Push the two...

Page 291: ...n the same grooves as before D Fit the piston rings in such a manner that their marking TOP is on top Check the piston top surface see 3403 4 Measure bore of cylinder liner see 2124 1 and carry out an...

Page 292: ...turned to guide the piston rod foot without jam ming into centring pins 6 Fig A in the crosshead pin Slacken the crane rope a bit and remove the sus pension device Turn piston to B D C loosen crane c...

Page 293: ...I I 4 2 Remark Pay attention to General Guidelines for Lifting Tools 0012 1 Utilization of Working Platform 3301 1 Turn crank of the cylinder concerned to B D C Install working platform 94142 accordin...

Page 294: ...C Take care that the two dowel pins 8 in crosshead pin 4 do not jam in the piston rod foot Loosen and remove the screws fastening compression shim 6 Remove the compression shim with the aid of two eye...

Page 295: ...ole M27x2 11 Screw KO Slot 12 Spring dowel pin RS Round bar 13 Nut SA Gap Overview 1 General 1 6 2 Loosening waisted studs of piston crown 2 6 3 Tensioning waisted studs of piston crown 3 6 4 Dismantl...

Page 296: ...ydraulic unit 94942 Start up hydraulic unit Close vent screws 16 as soon as oil flows out bubble free Operate the hydraulic unit till a pressure of about 1530 bar is reached Unscrew nuts 13 by one tur...

Page 297: ...ose vent screws 16 as soon as oil flows out bubble free Operate the hydraulic unit till a pressure of 1500 bar is reached Pistons 14 of the pre tensioning jacks must never ex ceed the red limiting gro...

Page 298: ...complete unit from piston rod 4 Attention Do not damage the spraying nozzles 5 Assembling of a piston For assembling the piston the following points must be observed D Damaged spraying nozzles 2a may...

Page 299: ...Switzerland Ltd 5 6 018 224 09 2a 2 3 E 2 4 94364 D 016 529 08 018 393 09 C 2 1 7 8 3 4 GB 1 2a 94341 3 5 94350 SEPARATING OF PISTON CROWN SEPARATING OF PISTON SKIRT SECURED WITH CENTRE PUNCH I AF10 5...

Page 300: ...tsil Switzerland Ltd 6 6 018 394 09 FUEL SIDE 1 6 F IV IV III III V V VI VI VII VII II II I I II II 12 4 7 8 9 10 11 3 1 3 4 5 17 18 I 1 2a 3 5 13 AF 14 4 19 I I III IV VI VII V III V VI VII IV 2010 5...

Page 301: ...is sufficient to grind them over and to smooth sharp edged zones with emery cloth Where however burn scars ex ceed x 10 mm the original material thickness must be restored by surface welding This ent...

Page 302: ...This page is intentionally left blank...

Page 303: ...sary i e allowing removal over the piston crown Thoroughly clean piston piston rings and piston ring grooves D Take care not to damage the chromed surfaces A 017 681 08 1 2 or 94338a 94338 2 Measuring...

Page 304: ...2 Running in coated RC piston ring 3 2 1 Ring gap The current piston ring wear can roughly be determined with the piston in situ by means of the ring gap The piston must be moved until the piston ring...

Page 305: ...n line I min and I min N therefore piston ring must be re placed by a new one The new piston ring comes to lie at point 3 Case three Second piston overhaul after total 13 000 operating hours of the en...

Page 306: ...ating thickness of a new CC coated piston ring should be measured and recorded to monitor the wear rate over time Remark New piston rings have to be run in according to the indications in the Operatin...

Page 307: ...g holder 11 Locking plate 5 Sleeve 6 Inside telescopic pipe 7 Cylinder block HZ Lifting tackle 1 Removal Turn the corresponding crank approx 30_ after T D C Dismantle oil inlet pipe 1 to piston coolin...

Page 308: ...with sleeve 5 and ring holder 4 downwards If the engine should be operated with removed connecting rod flange 94337b must be used for blanking off the oil inlet bore 2 Blank off oil inlet pipe C 013...

Page 309: ...f cylinder block 7 and hold them loosely with screws 3 Slightly tighten screws 2 and 3 that inside pipe and ring holder still can be moved Align ring holder and inside pipe by means of centring piece...

Page 310: ...This page is intentionally left blank...

Page 311: ...e for Starting Air Group 4 o Driving Wheels Checking the Running and Backlash Clearances and Condition of Teeth 4103 1 A1 Replacing the Gear Wheel on the Crankshaft 4103 3 A1 Shut off Valve for Starti...

Page 312: ...This page is intentionally left blank...

Page 313: ...s as soon as ever possible to prevent damage to the mating gear wheels D When the gear wheels have run well for an initial running period of 6000 8000 hours the above mentioned inspection may be carri...

Page 314: ...and f2 thickness of lead wire f f1 f2 D Obliquity Df is calculated from the difference in thickness of the squashed lead wires along driving flanks TF Fig A Df a1 b1 or a3 b3 etc D The admissible dev...

Page 315: ...crew 1 Retaining wrench 94412e 2 Crankshaft flange 7 Distance sleeve 3 Waisted stud 8 Self locking nut 4 Castle nut 9 Dowel pin 5 Base Overview 1 General 2 5 2 Preparing assembly of 2 part gear wheel...

Page 316: ...the gear wheel and the center hole of the 2 part spare wheel is manufactured according to these di mensions 2 Preparing assembly of 2 part gear wheel The undersize of center hole d Fig A on 2 part ge...

Page 317: ...LOCTITE 262 to it In addition secure the castle nut with a split pin to prevent it from slipping when tightening the waist ed studs afterwards D Wait one or two days before tightening the waisted stud...

Page 318: ...and tighten it temporarily Fig G Remove flange screws 6 from each end of the lower gear wheel half so that there are now only two flange screws 6 each of them tightened temporarily in the centres of...

Page 319: ...nd Fig H Degrease the threads of all flange screws 6 and their self locking nuts 8 and then apply LOCTITE 262 to them do not use MOLYKOTE Fit all flange screws 6 with distance sleeves 7 and self locki...

Page 320: ...This page is intentionally left blank...

Page 321: ...g operation for a short time Risk of accident Before starting work on the shut off valve for starting air it is es sential to manually close the stop valves on the starting air receivers The turning g...

Page 322: ...nd spindle guide 19 are to be thoroughly degreased and then smeared with LOCTITE Insert the spindle and fully tighten the spindle guide For the assembly smear all the parts lightly with MOLYKOTE G pas...

Page 323: ...iver slowly Check whether the automatic shut off valve is airtight i e verify that no air escapes from the bore of screw plug 14 3 3 Manual opening Open the shut off valve slowly with the help of hand...

Page 324: ...is ob tained as when actuating control valve 9 D Upon opening test valve 2 06 the shut off valve opens automatically The air now escaping at the bore for screw plug 13 indicates that valve 4 of the s...

Page 325: ...orks 5552 5 A1 Fuel Pump Dismantling and Assembling 5556 1 A1 Fuel Pressure Control Valve Removal Fitting Dismantling and Assembling 5562 1 A1 Fuel Overpressure Safety Valve Checking and Setting 5562...

Page 326: ...This page is intentionally left blank...

Page 327: ...the servo oil pump observe the instructions from the manufacturer The servo oil pump drive must be checked in accordance with the Maintenance Schedule 0380 1 Supply Unit In order to prevent damages i...

Page 328: ...n 6 and shaft 5 into a vice Using a hammer and copper rod 10 strike onto the shaft till the latter with snap ring 8 comes off the pinion PROTECTION 2 1 Removal of pinion Loosen screws 3 and remove pum...

Page 329: ...4 Fitting Fitting is carried out analogously to the removal but in reverse sequence whereby attention must be paid to the following D Screws 16 for fastening spray nozzles 11 view II II must be secure...

Page 330: ...This page is intentionally left blank...

Page 331: ...st bearing cover 22 Torque wrench 9 Bearing cover 23 Short backing rod 10 Housing 24 Long backing rod 11 Thrust bearing ring half 12 Camshaft 13 Screw HK Wooden wedge 14 Cover HU Wooden underlay Overv...

Page 332: ...ng of bearings Bearing No 2 is designed as thrust bearing the other ones as normal bearing Remark All bearing covers 8 and 9 are machined together with housing 10 therefore never inter change them The...

Page 333: ...D Press camshaft 12 accordingly by means of wooden underlay HU so that the upper bearing shell can be turned downwards with the assembly template at the same time Fig E Remove the assembly template th...

Page 334: ...4566a Loosen screws 15 a bit Fasten supports 94566 and 94566a to housing 10 as follows using waisted screws 7 belonging to the bearing cover as shown in Fig G and screws 16 to cover 3 in Fig A and the...

Page 335: ...g shells as described in sec tion 3 Roll out the camshaft with the gear wheels onto the supports and secure it at the stop with wooden wedges HK for safety reason as shown in Fig K Remove all bearing...

Page 336: ...so that their bores provided for dowel pins 17 in the bearing covers point to the same side Fig C and D D in order to align the bearing shell centring device 94566b provided for this purpose is inser...

Page 337: ...ers 3 4 5 and fit the latter Fit servo oil pump 2 see 5552 1 Install all pipings Cut in the fuel pumps and remove tools 94430 see 5556 2 in the Operating Manual After assembly turn the engine by means...

Page 338: ...backing rod 23 or 24 together with screw driver bit 21 onto waisted screw 7 to be tightened Remark Place the torque amplifier in such a manner that the corresponding back ing rod 23 or 24 lies on lim...

Page 339: ...er application for every single waisted screw 7 Backing rod 23 or 24 is drawn in the required position with continuous lines for tightening and with broken lines for loosening procedure O P Q R 22 22...

Page 340: ...e 5552 2 A1 RT flex50 D W rtsil Switzerland Ltd 10 11 T U V S 20 23 22 20 23 22 013 072 05 BEARING COVER NO 3 BEARING COVER NO 4 94566c 94566c 2010 Supply Unit Removal and Fitting of Camshaft and Bear...

Page 341: ...e 5552 2 A1 RT flex50 D W rtsil Switzerland Ltd 11 11 X Y Z W 94566c 24 22 20 20 22 24 013 073 05 BEARING COVER NO 5 BEARING COVER NO 6 94566c 2010 Supply Unit Removal and Fitting of Camshaft and Bear...

Page 342: ...This page is intentionally left blank...

Page 343: ...ews M10 2 Fitting All parts must be clean and in perfect condition Oil the mating surfaces of gear wheel 2 and shaft 3 Push gear wheel 2 carefully onto shaft 3 and fasten it with head screws 6 Oil the...

Page 344: ...This page is intentionally left blank...

Page 345: ...g on number of cylinders 4 Dowel pin 12 Holder 5 Screw 6 Screw 7 Screw HZ Lifting tackle 8 Head screw RC RUD eye bolt 1 Removal D Cut out of fuel pump 3 by means of device 94430 see 5556 2 in the Oper...

Page 346: ...s HZ lifting capacity 2000 kg each and connect these with RUD eye bolts RC Tauten lifting tackles HZ Loosen screws 11 and remove them together with the distance sleeves Loosen screws 5 6 7 and cap scr...

Page 347: ...on that the supply unit rests on the housing however can still be freely moved Insert dowel pins 4 Fig C and tighten screws 5 6 7 Check and compare the backlash with 0330 1 Driving wheels for Supply U...

Page 348: ...This page is intentionally left blank...

Page 349: ...system oil bearing oil is used see Operating Manual 0750 1 2 Manual lubrication Loosen cap 1 and remove it from oil pipe 3 Fill clean system oil into the oil pipe via funnel 4 Remark After filling mi...

Page 350: ...This page is intentionally left blank...

Page 351: ...rew 38 Rod seal ring 17 Lower spring carrier 39 41 O rings 18 Pump plunger 19 Compression spring 20 Guide pin DS Pressure piece 21 Regulating sleeve RC Eye bolt M6 22 Upper spring carrier SC Screw M6...

Page 352: ...se circle Fig A Remove all screws 3 Using a jacking screw M12 lift the fuel pump until the locating pin is no longer meshing Fit cover 94552 onto pump cover 4 B C 013 661 05 013 662 05 I I I I 28 9455...

Page 353: ...e fuel pumps in a clean room which should be as dust free as possible grinding dust etc 3 1 Removal of guide pin With the head of the pump turned towards the bot tom fasten the fuel pump onto a work b...

Page 354: ...ger in a manner not to damage it Remove compression spring 19 Remove regulating sleeve 21 together with upper spring carrier 22 Remove Allen screws 16 Separate lower housing 6 from upper housing Remar...

Page 355: ...egulating rack 25 3 5 Removal of pump cylinder With pump cover 4 turned upwards clamp the fuel pump into the work bench Unscrew screws 28 Remove pump cover 4 valve block 29 valve body 30 and compressi...

Page 356: ...screw 32 in the upper housing Screw in and tighten the holding screw together with the Cu ring Remark There must be a clearance between holding screw 32 and the groove base 33 32 5 008 654 00 4 3 Fitt...

Page 357: ...he upper housing the toothed rim turned to the bottom and the groove of 12 mm width being flush with guide pin 20 5 40 4 6 Fitting the pump plunger and lower housing Fit upper spring carrier 22 and co...

Page 358: ...he checking bore and in sert checking gauge 94556 in its place till the stop Remove spacer 94555 again and check whether the regulating rack is blocked With blocked regulating rack the plunger is corr...

Page 359: ...he grooves at lower housing 6 Fig B 5 Preserving If a pump has to be stored over a long period of time the spaces carrying fuel oil must be filled with vaseline oil and plugged with plastic stoppers F...

Page 360: ...This page is intentionally left blank...

Page 361: ...o the fuel pressure control valve PCV W rtsil recommends only performing the below mentioned maintenance PCV maintenance onboard is limited to Replacement of the complete PCV Replacement of the 3 2 wa...

Page 362: ...Fitting the fuel pressure control valve Bring the PCV in fitting position at the fuel rail by means of a manual ratchet Apply Never Seez NSBT 8 to the screw threads 17 Place new O rings 24 and 25 int...

Page 363: ...orage on board The spare parts must be carefully protected against corrosion D The PCV has to be free from any dirt oil and grease D Apply coating liquids e g Tectil 506 ISOTEC 337 or similar on the s...

Page 364: ...This page is intentionally left blank...

Page 365: ...ized repair workshop for inspection and repair The opening pressure of the relief valve must be approved by IACS International Association of Classification Societies and recorded on the Inspection Re...

Page 366: ...nstant during one minute D No leakage is allowed 2 3 Checking the opening pressure Increase the pressure by means of HP oil pump and observe at what value the relief valve opens Correct opening pressu...

Page 367: ...has to be stopped Attention Follow the detailed instructions in 0510 1 of the Operating Manual without fail Maintenance works on the injection control unit may be carried out only by the manufacturer...

Page 368: ...circumstance Lip seal 11 Fig C can be removed if necessary with one of withdrawing tools 94589 2 1 Cleaning the filter Loosen connecting nipple 14 remove filter holder 15 and clean oil filter 16 Remar...

Page 369: ...orque of 110 Nm and subsequently screws 8 with a torque of 55 Nm Replace O rings 18 if necessary Apply Never Seez NSBT 8 to screws 10 and fasten pre control valve 9 to in jection control unit 7 with t...

Page 370: ...This page is intentionally left blank...

Page 371: ...r three months If there is still no change in pressure an annual check might be sufficient however it is recom mended to continue carrying out checks every three months Attention Ensure that servo oil...

Page 372: ...th short hose 4 to the left side A of control unit Open valve A and read pressure from gauge 7 Slowly open valve C and refill accumulator to the required pressure of 35 bar Close valves A and C and dr...

Page 373: ...4 Case with measurement set 94720c for CLU4 C and PRV 8 18 1 4 4a A C B 3 5 2 1 7 Case 94720c 4 A DRAWN FOR CLU4 C Arrangement of equipment B 8 WCH00703 15 1 13 2 4 5 A B C 4a 3 12 14 7 PI2041L 2011 P...

Page 374: ...2 8 10 11 FREE END 9 14 RETURN PIPING SERVO OIL PIPE TO LUBRICATING PUMPS Details of servo oil rail 4 11 pressure reducing valve 8 11 1 lubricating pump 8 06 D DRAWN FROM CONTROL DIAGRAM 4003 2 E WCH0...

Page 375: ...rod RC Eye bolt 14 Screw plug with seal AF Seating surface 1 General The piston and slide rod should be checked at random according to Maintenance Schedule 0380 1 When working on the exhaust valve con...

Page 376: ...prevent dirt from entering in any circumstance 2 2 Fitting Clean seating surfaces AF and place new O ring 24 into the groove of servo oil rail 1 Pay attention to dowel pin 23 while fitting the comple...

Page 377: ...r 15 and clean oil filter 18 Fig B Remark Maintain the flow direction when refitting or replacing the oil filter More over the three oil filters must be secured by means of circlip 17 Apply oil to fil...

Page 378: ...This page is intentionally left blank...

Page 379: ...ver 6 Sleeve 7 Screw MA Mark 1 General After overhauling the linkage or the fuel pumps as well as after fitting a new fuel pump or a new actuator the adjustment of the linkage must be checked and if n...

Page 380: ...inserted sleeve 6 and adjusting pin 94575a on actuator shaft 4 so that the pinpoint points at 0_ line as exactly as possible Slightly tighten screw 7 Rotate lever 5 to 75_ mark maxi mum stop so that...

Page 381: ...nt Join connecting element 8 with lever 5 and toothed rack 9 of fuel pump 1 using set screws 10 Remark The connecting element must be fitted in such a way that its spot face 11 points to lever 5 C 012...

Page 382: ...This page is intentionally left blank...

Page 383: ...points observed D Connecting element 8 and damper 4 retracted x 190 mm or extended x 240 mm freely movable and part concerned lubricated with MOLYKOTE paste G Mark lever position to output shaft with...

Page 384: ...801 1 A2 RT flex50 D W rtsil Switzerland Ltd 2 2 B MA 3 6 7 36 mm 36 mm 9 8 10 5 12 016 366 07 94555a 4 11 2 10 8 x I I WCH00245 012 882 05 Regulating Linkage Adjusting with Woodward ProAct II Analog...

Page 385: ...ceiver Checking the Air Flaps and Cleaning the Scavenge Air Receiver 6420 1 A1 Auxiliary Blower Maintenance 6545 1 A1 Removal and Fitting of Scavenge Air Cooler 6606 1 A1 Removal and Fitting of Water...

Page 386: ...This page is intentionally left blank...

Page 387: ...the scavenge air receiver the air flaps must be checked for damage movability and fouling To check air flaps 5 Fig B in scavenge air receiver 1 the relevant covers 3 and 4 are to be opened For the rem...

Page 388: ...tervals At these opportunities check whether drains 10 are not clogged Fig A During a major overhaul relief valve 9 must be checked The valve is set to an opening pressure of 4 5 0 2 bar Remark Do not...

Page 389: ...be started up for a short time twice a month Where this is not feasible the impeller should be turned by hand by several turns This is necessary to protect the bear ings from corrosion damage As the...

Page 390: ...This page is intentionally left blank...

Page 391: ...me geared chain block 11 Screw H3 H4 Manual ratchet 1 Preparation Remove platform element 14 and auxiliary blower 15 with the corresponding connection tube Fig B Remove bottom plates and railing eleme...

Page 392: ...e cooler Fit RUD eye bolt 94040 M30 RC on removal side Attach wire rope sling 94666 to swivel lugs Fasten support 94661 IL to the corresponding platform support Fasten manual ratchet H3 WLL 800 kg to...

Page 393: ...H2 Fit supports 94663a IL and 94663b IL to the left and right side of the receiver frame Fasten both lugs 94663c IL to the cooler Check length x1 of safety chains 94663d 1222 mm for SAC261 IL 1654 mm...

Page 394: ...ct it to spur geared chain block H1 The strand angle of max 135_ may not be exceeded corresponding to the admis sible lifting capacity WLL Working Load Limit for SAC261 IL WLL 900 kg SAC265 IL WLL 120...

Page 395: ...spur geared chain block H2 from RUD eye bolt RC E 94666 H1 H2 RC WCH00115 Continue pulling out the cooler until trolley with spur geared chain block H1 lies next to the platform lug Hook manual ratche...

Page 396: ...car ries no more load The weight of the cooler having been taken over by manual ratchet H4 Carefully tilt the cooler until it is hanging on the engine crane Remove lifting plate 94663 IL Carry the co...

Page 397: ...e cooler analogously to the removal but in reverse sequence Carefully pull the cooler approx x 750 mm into the receiver by means of manual ratchet H3 keeping the cooler in horizontal position with spu...

Page 398: ...This page is intentionally left blank...

Page 399: ...12 geared chain block 10 Rod 6 mm H3 Manual ratchet 1 Preparation Risk of accident Immediately close the openings off after removing the bottom plates Remark Pay attention to General Guidelines for Li...

Page 400: ...enance 6708 1 A1 RT flex50 D W rtsil Switzerland Ltd 2 10 B I I III II II III IV IV I I I II II III III IV IV I 7 8 10 13 14 13 11 3 1 6 9 018 359 09 AIR FLOW 10 2010 Removal and Fitting of Water Sepa...

Page 401: ...g and withdrawing gear 94667 and holder 94667f Fasten manual ratchet H3 to the holder and connect it to the shackle of gear 94667 Hook spur geared chain block H2 in gear 94667 Using manual ratchet H3...

Page 402: ...an half of the water sepa rator Continuously follow with spur geared chain block H2 adjusting the height accordingly till the wire rope of limiter 94667d is tensioned 018 324 09 E H1 94667b H3 Dismant...

Page 403: ...inuously following with spur geared chain blocks H1 H2 and adjust ing the height correspondingly 018 326 09 G H1 Remove manual ratchet H3 and detach spur geared chain block H2 then re move lifting and...

Page 404: ...cord ends must be glued together Lubricate well guide bars as well as round rubber cord and then carefully fit the water separator into the After inserting the water separator carefully fit a new rou...

Page 405: ...withdrawing gear 94667 and bracket 94667b Fasten manual ratchet H3 to bracket 94667c and connect it to the shackle of gear 94667 Hook spur geared chain block H2 in gear 94667 Using manual ratchet H3 c...

Page 406: ...an half of the water separa tor Continuously follow with spur geared chain block H2 adjusting the height accordingly till the wire rope of limiter 94667e is tensioned 018 330 09 L H1 94667b H3 Dismant...

Page 407: ...inuously following with spur geared chain blocks H1 H2 and adjust ing the height correspondingly 018 332 09 N H1 Remove manual ratchet H3 and detach spur geared chain block H2 then re move lifting and...

Page 408: ...e cord ends must be glued together Lubricate well guide bars as well as round rubber cord and then carefully fit the water separator into the After inserting the water separator carefully fit a new ro...

Page 409: ...must not be readjusted Loosen screw 8 for cover 2 Specially long screws are fitted for releasing the spring 11 Dismantle piston 3 Clean piston and housing 1 Check piston seal ring 10 guide ring 9 and...

Page 410: ...This page is intentionally left blank...

Page 411: ...tenance Group7 RT flex50 D W rtsil Switzerland Ltd 1 4 Cylinder Lubrication Group 7 Lubrication Pump CLU4 C Checking the Gas Pre charge Pressure 7218 1 A2 W rtsil Switzerland Ltd Pulse RT flex50 D MM...

Page 412: ...This page is intentionally left blank...

Page 413: ...nnual check might be sufficient however it is recom mended to continue carrying out checks every three months Attention Ensure that servo oil supply is shut off before starting accumulator pressure ch...

Page 414: ...ort hose 4 to the left side A of control unit Open valve A and read pressure from gauge 7 Slowly open valve C and refill accumulator to the required pressure of 35 bar Close valves A and C and drain r...

Page 415: ...W rtsil Switzerland Ltd 3 4 Case with measurement set 94720c for CLU4 C 4 4a A C B 3 5 2 1 7 Case 94720c 4 A Arrangement of equipment 15 4 3 4a A C B 7 5 10 B CLU4 C 2010 Lubricating Pump CLU4 C Chec...

Page 416: ...09 9 SERVO OIL TO LUBRICATING QUILLS 10 12 11 8 1 2 Details of servo oil rail 4 11 pressure reducing valve 8 11 1 lubricating pump 8 06 D DRAWN FROM CONTROL DIAGRAM 4003 2 E WCH00409 13 4 11 8 11 1 P...

Page 417: ...ulic Piping for Exhaust Valve Drive Removing Fitting and Regrinding 8460 1 A1 o Fuel Pressure Piping Removing Fitting and Regrinding of Sealing Faces 8733 1 A1 Removing Fitting and Regrinding 5 and 6...

Page 418: ...This page is intentionally left blank...

Page 419: ...should be placed under the connecting blocks D For that screws 4a must be loosened and flange 5a resp 4 and 5 at connecting block 14 pushed back in order to sepa rate servo oil piping from its sealing...

Page 420: ...Removal of servo oil piping 2 Loosen screws 4a and push flanges 5 back Loosen screws 6 and remove them together with intermediate piece 7 Loosen screws 4b and remove servo oil piping 2 C III I II 013...

Page 421: ...the sealing face with grinding com pound No 200 then finish grind it with grinding compound No 500 After grinding thoroughly clean the servo oil piping 4 Adjusting the claws Before fitting the servo...

Page 422: ...d D Apply oil to the threads of screws 4 a b and tighten them crosswise with a torque of 40 Nm D If the non return valves Fig C have been removed maintain their flow direc tion and observe the followi...

Page 423: ...n working on a hydraulic piping 1 the engine has to be stopped and it is essen tial that instructions 0520 1 Exchange of a defective hydraulic piping in the Oper ating Manual be strictly followed Befo...

Page 424: ...11 3 DF 10 1 4 7 5 6 11 DF III III LB WCH00696 2 Regrinding the sealing faces DF Loosen claw 6 Fig B To prevent grinding compound from entering the hy draulic piping plug its opening with a piece of...

Page 425: ...by turning the claw using an open end wrench D 013 461 05 x 5 5 mm 1 7 6 5 4 Fitting D Fitting together should be carried out axially i e the parts to be connected must not be moved closer together la...

Page 426: ...This page is intentionally left blank...

Page 427: ...e pipe 3 the engine has to be stopped and it is essential that instructions 0510 1 in the Operating Manual be strictly followed Carefully loosen drain screws 11 by several turns in order to drain fuel...

Page 428: ...re pipe 3 check whether its claws 5 are screwed on properly i e the fuel pressure pipe must protrude by x 8 mm compared to the claw as shown in Fig B Measurement x can be adjusted by turning the claw...

Page 429: ...off use a fine or ultra fine emery cloth D E 016 738 08 016 738 08 94870d EC 94870b GRAINED FACE TIGHTENED CONDITION Place template 94870d on the back of emery cloth EC Trace inner contour using a po...

Page 430: ...t slightly touches the fuel pressure pipe Let the grinding tool rotate with a max speed of 1500 rpm and grind for 3 to 5 seconds Withdraw the grinding tool from the screw on sleeve and blow out both p...

Page 431: ...2 Lip seal LB Leakage fuel bore A 019 070 09 2 1 General The engine must be stopped the fuel supply pump switched off and then the fuel pressure pipings can be drained via bores LB section III III and...

Page 432: ...together with fuel pressure piping 1 down by approx 2 mm and push the the latter sideways towards the engine Remove the intermediate ring together with the fuel pressure piping D Pay attention not to...

Page 433: ...ompared to the claw Measurement x can be adjusted by turning the claw using an open end spanner Apply Never Seez NSBT 8 to threads and head surfaces of screws 6 7 Fig C and tighten them crosswise with...

Page 434: ...use a fine or ultra fine emery cloth E F 016 738 08 016 738 08 94870h EC 94870f GRAINED FACE TIGHTENED CONDITION Place template 94870h on the back of emery cloth EC Trace inner contour using a pointe...

Page 435: ...ightly touches the fuel pressure piping Let the grinding tool rotate with a max speed of 1500 rpm and grind for 3 to 5 seconds Withdraw the grinding tool from the screw on sleeve and blow out both par...

Page 436: ...This page is intentionally left blank...

Page 437: ...l LB Leakage fuel bore A 2 1 General The engine must be stopped the fuel supply pump switched off and then the fuel pressure pipings can be drained via bores LB section III III and leakage fuel pipes...

Page 438: ...together with fuel pressure piping 1 down by approx 2 mm and push the the latter sideways towards the engine Remove the intermediate ring together with the fuel pressure piping D Pay attention not to...

Page 439: ...ompared to the claw Measurement x can be adjusted by turning the claw using an open end spanner Apply Never Seez NSBT 8 to threads and head surfaces of screws 6 7 Fig C and tighten them crosswise with...

Page 440: ...use a fine or ultra fine emery cloth E F 016 738 08 016 738 08 94870h EC 94870f GRAINED FACE TIGHTENED CONDITION Place template 94870h on the back of emery cloth EC Trace inner contour using a pointe...

Page 441: ...ightly touches the fuel pressure piping Let the grinding tool rotate with a max speed of 1500 rpm and grind for 3 to 5 seconds Withdraw the grinding tool from the screw on sleeve and blow out both par...

Page 442: ...This page is intentionally left blank...

Page 443: ...ion 9403 1 A1 Hydraulic Jacks and Pumps Arrangement and Application 9403 2 A1 o Hydraulic Pre tensioning Jacks Storing Servicing and Maintenance 9403 3 A1 General Application Instructions 9403 4 A1 o...

Page 444: ...This page is intentionally left blank...

Page 445: ...crew 56 Distance piece 21 Screw with locking plate 57 Screw with locking plate 22 Packing ring 58 Locating pin 23 Adjusting disc 59 Spring balance 24 Locking plate 60 O ring 25 Shaft nut 26 Locking pl...

Page 446: ...ec tive sleeve SH and withdraw sensor cable from protective pipes SR 1 2 Outer shaft encoder Loosen screws 3 and remove them together with protection plates 10 Loosen screws 11 and remove them togethe...

Page 447: ...k angle sensor 6 is fastened to the holder 7 and set by the manufacturer Attention Never loosen screw 8 008 728 00 008 728 00 7 D 6 19 8 3 Fitting the shaft encoder 3 1 Inner shaft encoder Turn cranks...

Page 448: ...plates 17 Apply MOLYKOTE paste G to the threads and head seatings Align toothed belt exactly in running direction Attach spring balance 59 to the shaft encoder and slightly preload it according to Fig...

Page 449: ...ates bending them once only 3 3 Outer shaft encoder Fitting the outer shaft encoder 13 is carried out analo gously to the inner one Attention When fitting shaft encoders toothed belts or crank angle s...

Page 450: ...belt proceed as follows Remove protection plate 10 and angle holder 12 Fig B Remove screws 15a with locking plates and washers Remove screws 15 replace locking plates and loosely refit the screws Push...

Page 451: ...ng of the crankcase see Warning labels located near the crankcase doors on the engine Start the flexView programme and go to the ADJUST card With the flywheel position as described above read the cran...

Page 452: ...nuts 4 Attention When loosening nut 4 hold up shaft 5 by means of an open end span ner AF27 Remove screws 21 and withdraw the crank angle sensor from the waisted screw 20 view II Remark Do not unscre...

Page 453: ...move shaft encoder according to paragraphs 1 2 and 1 3 Unbend locking plate 24 loosen and remove shaft nut 25 using hook spanner 94924 Withdraw gear wheel 18 from the shaft 5 Remark If withdrawing by...

Page 454: ...sealing ring 30 and O ring 60 Distance ring 31 Ball bearing 32 distance ring 33 distance sleeve 34 and disc springs 35 Circlip 36 Disc 37 together with ball bearing 32a Parts to be removed in the fol...

Page 455: ...tance ring 31 onto the shaft 5 according to Fig O Attention Big collar SU on inner ring of the ball bearings must point outwards Screw shaft nut 27 onto shaft 5 and lightly tighten it by means of hook...

Page 456: ...aring and fit circlip 36 6 3 Completing of the bearing housing Oil all parts Fit shaft 5 Push distance sleeve 34 onto the shaft Fit disc springs 35 according to view I Fit distance ring 33 with thickn...

Page 457: ...ook spanner 94925 Lock shaft nut with locking plate Fit circlip 28 008 738 01 S 5 27 26 28 6 5 Fitting gear wheel 18 Oil bore and push gear wheel 18 onto shaft 5 till the stop Apply MOLYKOTE paste G t...

Page 458: ...nding bore in the shaft are in line Push crank angle sensor drive further till the locating pin fits into the corre sponding bore in shaft 5 Fasten screws 21 with their locking plates Turn crankshaft...

Page 459: ...tion Remove oil inlet OE Fig A Dismantle crank angle sensor drive according to section 4 Remove screws 47 and housing 46 Remove screws 48 and connecting unit 49 Remove screws 44 and withdraw waisted s...

Page 460: ...08 750 01 008 749 01 8 2 Removing the compression spring Loosen screws 53 and remove them together with spring tensioner 52 Remove and check compression springs Remark When replacing only one compress...

Page 461: ...with a torque of 35 Nm and lock them 008 752 01 008 749 01 Z II II II II 42 55 43 56 x x 54 40 50 8 6 Fitting the connecting unit Fig W Fit waisted screw 20 and screw 44 with new locking plates Tighte...

Page 462: ...be carried out according to Maintenance Schedule 0380 1 Crank angle sensor unit 9 1 Lubricating oil flow in the crank angle sensor drive Start main lubricating oil pump and adjust bearing oil pressur...

Page 463: ...antity and also keeps back larger oil particles Checking the throttle is carried out as follows Stop main lubricating pump Remove oil inlet OE from the throttle Unscrew throttle and check its oil spra...

Page 464: ...the CAS drive see Fig B Install the magnetic base with dial gauge MB MB 9 18 D1 Remark The measuring point must be horizontally adjacent of the gear wheel 18 Read the deviation on the dial gauge while...

Page 465: ...removing the toothed belt tighten the screws 15a and 15 again Install the magnetic base with dial gauge MB as shown below Push the gear wheel of the CAS to the left and right direction The measuremen...

Page 466: ...ragraph 9 3 Maintenance schedule Work to be carried out at 48 000 operating hours Before carrying out the replacement of a CAS drive which is available as a stan dard spare part a new CAS drive must b...

Page 467: ...lso can be used in exceptional cases A separate set of tools is issued for certain components from sub suppliers which should also be stored separately from the engine tools 2 Standard tools are tools...

Page 468: ...This page is intentionally left blank...

Page 469: ...loosening of tie rods waisted studs to exhaust valve cages top and bottom end bearings to connecting rod piston rod screwing and waisted studs to piston crown B Tensioning loosening of waisted studs t...

Page 470: ...ning of waisted studs to main bearing E Removal and fitting of main bearing shells F Checking and setting of fuel overpressure safety valve G Set up of pre tensioning jacks 94215a i e collecting the s...

Page 471: ...6 Coupling element 94934g 7 Connection piece with high pressure hoses 94215b 8 Pre tensioning jack 94215a 9 Pre tensioning jack 94145 10 Hydr jack 500 kN 50 t 94936 11 Double pre tensioning jack 94114...

Page 472: ...This page is intentionally left blank...

Page 473: ...specified quality and di mensions When fitting new back up rings piston and rod seal rings proceed with care to avoid their damage do not use any sharp edged utensils for assistance Heat unslit back u...

Page 474: ...oning jack for foundation bolt and engine stay 1 Piston 6 Back up ring O ring Sealing ring 2 Cylinder 7 3 Vent screw 8 Back up ring O ring Sealing ring 4 Adapter 9 5 Connection piece 3 1 2 5 013 471 0...

Page 475: ...jack for waisted stud to cylinder cover 1 Piston 6 Back up ring O ring Sealing ring 2 Cylinder 7 3 Vent screw 8 Back up ring O ring Sealing ring 4 Adapter 9 5 Connection piece 10 Holder 013 472 05 3...

Page 476: ...1 Piston 6 Back up ring O ring Sealing ring 2 Cylinder 7 3 Vent screw 8 Back up ring O ring Sealing ring 4 Adapter 9 5 Connection piece 10 Eyelet 94180a KJ Kit with back up and O rings for pre tension...

Page 477: ...for waisted stud to bottom end bearing 1 Piston 7 Back up ring O ring Sealing ring 2 Cylinder 8 3 Distance bush 9 Back up ring O ring Sealing ring 4 Vent screw 10 5 Adapter 6 Connection piece 4 1 2 6...

Page 478: ...ck for waisted stud to exhaust valve cage 1 Piston 6 Back up ring O ring Sealing ring 2 Cylinder 7 3 Vent screw 8 Back up ring O ring Sealing ring 4 Adapter 9 5 Connection piece 10 Holder 013 475 05 3...

Page 479: ...jack for waisted stud to top end bearing 1 Piston 6 Back up ring O ring Sealing ring 2 Cylinder 7 3 Vent screw 8 Back up ring O ring Sealing ring 4 Adapter 9 5 Connection piece 10 Holder 010 039 02 2...

Page 480: ...ng jack for waisted stud to piston foot fastening 1 Piston 6 Back up ring O ring Sealing ring 2 Cylinder 7 3 Vent screw 8 Back up ring O ring Sealing ring 4 Adapter 9 5 Connection piece 3 1 5 4 2 013...

Page 481: ...sioning jack for waisted stud to piston crown 1 Piston 6 Back up ring O ring Sealing ring 2 Cylinder 7 3 Vent screw 8 Back up ring O ring Sealing ring 4 Adapter 9 5 Connection piece 016 651 08 6 7 9 8...

Page 482: ...This page is intentionally left blank...

Page 483: ...ad end of the bolts studs to be loosened until it is landed on the part and the piston on the cylinder without any clearance On pre tensioning jacks with round nuts these have to be slightly tightened...

Page 484: ...the HP oil pump and actuate it As soon as oil flows out bubble free close the vent screw at the pre tensioning jack Never move the piston of the pre tensioning jack further up than to the red limitin...

Page 485: ...02 36 94002 41 94002 46 94002 50 94002 55 94002 60 94002 65 94002 75 94002 110 Ring slugging wrenches 1 Piece AF 27 1 Piece AF 30 1 Piece AF 32 1 Piece AF 36 1 Piece AF 41 1 Piece AF 46 1 Piece AF 50...

Page 486: ...1 Piece AF 14 1 Piece AF 17 1 Piece AF 19 1 Piece AF 22 1 Piece AF 27 000 377 93 94007 94007 C8 94007 C19 94007 C40 Tongs 1 Piece Type C 8 1 Piece Type C 19 1 Piece Type C 40 000 376 93 94007 A8 94007...

Page 487: ...h extension tube and tool box adapter piece shell type ratchet 010 231 02 94013 94013 16 1 Torque spanner Range of adjustment 8 40 Nm with open end spanner insert AF 16 013 558 05 94014 94014 46 94014...

Page 488: ...b c 94021 1 Large backing rod to power amplifier X 540 mm 701 013 55 X 013 555 05 94022 94022a 1 1 Adapter piece 3 8 Socket wrench insert AF 3 010 233 02 94023 94024 1 1 Hex head driver 1 AF 22 Hex h...

Page 489: ...s M10 6 Pieces M12 6 Pieces M16 6 Pieces M20 4 Pieces M24 4 Pieces M30 013 560 05 94048 94048 M30 Swivel lug 4 Pieces M30 WCH00113 94050 94050a 94050b 94050c 94050d 94050e 94050f 94050g 94050h 1 Tool...

Page 490: ...nsioning jacks for waisted studs to main bearing including a metal box X 222 mm 018 664 09 X 94116a 1 Transportation tool with 2 head screws M6x25 for removal and fitting of main bearing shell X 210 m...

Page 491: ...crews M6x25 for removal and fitting of main bearing shell X 215 mm 018 662 09 X 94119b 1 Device with 3 shackles for removal and fitting of main bearing shell X 190 mm 018 662 09 X 94120a 1 Rope 6 mm f...

Page 492: ...gauge for main bearing X 620 mm 000 395 93 X 94126 1 Depth gauge measuring range 760 mm 000 394 93 94141 1 Support for removal of main bearing shells X 735 mm X 013 565 05 94142 94142a 1 2 Working pla...

Page 493: ...M20x90 for turning out thrust bearing pads with 1 part gear wheel X 161 4 mm X 013 568 05 94155a 1 Turning out device with screws M20x45 for turning out thrust bearing pads with 2 part gear wheel X 16...

Page 494: ...blocks for removal and fitting of a cylinder liner without water guide jacket Screws M24x55 Fixing blocks for removal and fitting of a cylinder liner with water guide jacket Screws M24x90 94202g 94202...

Page 495: ...th HP hoses Tool box X 841 mm 701 013 574 013 574 05 013 575 05 X X 94215a 94215b 94219 1 Cylinder pressure measuring tool indicator including a wooden box X 165 mm 012 243 04 X 94225 1 Measuring gaug...

Page 496: ...age including a metal box X 194 mm 009 952 02 X 94259a 1 Pressure element for exhaust valve X 216 mm X 016 765 08 94261 1 Valve seat fitting and extracting device X 490 mm 000 415 93 X 94262 1 Valve p...

Page 497: ...and exhaust valve cage X 604 mm including a 2 special eye nuts X 238 mm WLL 2100 kg X a a 003 971 96 013 577 05 X 94270 1 Device for overhauling injection valve seat in cylinder cover X 316 mm 003 29...

Page 498: ...ve X 149 mm Connecting piece for injection valve X 124 mm Valve holder for relief valve to cylinder cover X 66 mm X X 94272a 94272b X 013 579 05 94272c X 94279 1 Gauge for checking wear and burn scar...

Page 499: ...05 1 Crankshaft checking equipment for measuring crank deflection in wooden box X 364 mm X 000 412 93 94314 94314a 2 2 Pre tensioning jacks for connecting rod studs to bottom end bearing including a m...

Page 500: ...ing a connecting rod or a crosshead X 75 mm 701 013 584 X 013 584 05 94324 1 Cover and lifting plate to crosshead including 2 shackles 6 5 t X 257 mm WLL 3400 kg 701 013 585 013 585 05 X 94331 1 Holde...

Page 501: ...94333 94333a 94333b 1 2 2 Lifting device to piston for removal and fitting of top end bearing cover crosshead pin and changing compression shim consisting of Lifting bosses with 4 Allen screws M16x45...

Page 502: ...137 mm 701 013 589 X 013 589 05 94337a 1 Centring piece for alignment of inside pipe X 58 mm 701 013 590 X 013 590 05 94337b 1 Flange for blanking off oil bore X 155 mm X 013 591 05 94338 94338a 1 2 P...

Page 503: ...nnection including a metal box X 88 mm X 013 594 05 94341 94341a 94341b 1 2 4 Piston suspension device X 417 mm WLL 3000 kg Distance plates Distance plates 013 012 05 X 94341b 94341a 94342 1 Insertion...

Page 504: ...ng scraper rings X 270 mm X 701 013 597 013 597 05 94345d 1 Cover plate for covering bore in cylinder block when piston and gland are removed including O ring 4 Screws M16x200 with nuts X 432 mm X 701...

Page 505: ...a metal box X 66 mm 016 649 08 X 94348 1 Tap M16 for cleaning carbon deposits in threaded holes of piston crown X 102 mm X 013 599 05 94350 1 Device for supporting piston and removal of piston rod gla...

Page 506: ...009 972 02 X Y 94370h 1 Stop plate for locking top end bearing cover X 133 mm X 013 601 05 94410e 2 Head bolts M30x169 for intermediate wheel assembly 013 699 05 94410f 2 Pins for intermediate wheel...

Page 507: ...4555a Spacer for cutting out of individual fuel pumps 1 piece for 5 8 cylinder engines X 72 mm Spacers for cutting out of individual fuel pumps 2 pieces for 5 6 cylinder engines 4 pieces for 7 8 cylin...

Page 508: ...emoval and fitting of camshaft X 510 mm X 013 606 05 94566b 1 Centring device for aligning bearing shells X 70 mm X 013 607 05 94566c 1 Limiter for tightening or loosening bearing covers to supply uni...

Page 509: ...Adjusting scale for Heinzmann StG 10 01 Actuator for regulating linkage X 120 mm including 701 013 610 013 610 05 X 94575a 1 Adjusting pin for Heinzmann StG 10 01 Actuator X 51 mm 701 013 611 013 611...

Page 510: ...rbocharger 94653 94653 94653 94653 94653 2 1 1 1 1 Covers to gas inlet housing and gas connection X 810 mm Cover to air connection at diffuser X 625 mm Engines with 1x MET60A turbocharger Cover hole p...

Page 511: ...DP WCH00113 94663 IL 1 Lifting plate including 1 Shackle WLL 6500 kg 2 Shackles WLL 4750 kg X 779 mm SAC261 WLL 900 kg at max 135_ SAC265 WLL 1200 kg at max 135_ WCH00113 X 94663a IL 94663b IL 1 1 Sup...

Page 512: ...d 6000 N X 016 829 08 kg N DP 94667a 1 Withdrawing gear including 1 RUD eye bolt 4 Screws M12x25 X 240 mm WLL 6000 N DP X 016 829 08 94667b 1 Lifting tool including 1 RUD eye bolt 1 Shackle 2 Screws M...

Page 513: ...awing gear including 1 RUD eye bolt 4 Screws M12x25 X 240 mm WLL 6000 N DP X 016 829 08 94667b 1 Lifting tool including 1 RUD eye bolt 1 Shackle 2 Screws M12x65 X 330 mm WLL 400 kg X 016 829 08 94667c...

Page 514: ...at 0 45_ 012 316 04 X 94720c 1 Case for CLU4 C consisting of measurement set complete for checking refilling of hydraulic accumulator 5610 1 and 7218 1 018 472 09 94831 1 Blank flange for blanking of...

Page 515: ...1 1 1 1 1 Regrinding device for sealing surfaces on fuel pressure piping 8752 1 X 151 mm consisting of Screw on sleeve AF 50 Grinding tool with countersunk screw M8 Lock nut M30x2 AF 46 Template X 75...

Page 516: ...orking pressure max 2800 bar Adapter piece 010 001 02 94934f 94934 1 Connection block 005 956 00 94934a 2 Hydr distributors with pressure gauges 010 242 02 94934g 2 Coupling elements 013 620 05 94934h...

Page 517: ...th closing valves and coupling sockets X 2130 mm X 005 954 00 94935c 1 Hose for set up of pre tensioning jacks Length 2000 mm 701 013 621 013 621 05 94936 2 Hydraulic jacks 500 kN 50 t 005 952 00 9494...

Page 518: ...anual ratchets WLL 1600 kg Manual ratchets WLL 3200 kg Manual ratchets WLL 6300 kg 012 233 04 94102 1 Tool cylinder liner measuring complete with extension and case Measuring range 150 600 mm 018 223...

Page 519: ...38 94300 1 Tool cupboard X 1120 mm X 000 500 93 94335a 94335b 94335c 1 2 2 Lifting tool for removal and fitting of heavy engine components platform without crane rail Bushes Screws X 964 mm WLL 1740...

Page 520: ...06 94412e 1 Retaining wrench for 2 part gear wheel on crankshaft AF 46 X 116 mm 013 623 05 X 94481 1 Metal box for storage of spare filter cartridges Remark Dimensions are depending on size of parts t...

Page 521: ...to upper tie rod thread including 4 screws M24x60 X 43 mm WCH00668 X 94177a 1 Thread protector to lower tie rod thread including 1 screw M16x25 X 85 mm X 94599 1 Lifting tool for transporting a comple...

Page 522: ...Maintenance 9403 5 A1 RT flex50 D W rtsil Switzerland Ltd 38 38 94922 1 Alignment tool for crank angle sensor X 172 mm 008 773 00 2010 Special Tools Obtainable on Loan...

Reviews: