background image

WARN INDUSTRIES

PAGE 4

71874A2

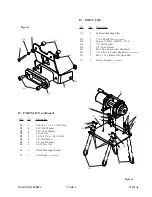
Figure 4  U-Bolt Installation

Figure 3  Mount winch to mounting plate

1.

Attach winch (F1) to winch mounting plate (E1) using
M8 hardware found in winch kit.  See Figure 3.  Tighten
M8 hardware to torque specifications found on page 2.

2.

Place assembled winch (F1) and mounting plate (E1) on
frame, being sure that winch motor is to the left when
standing in front of ATV.

Attach mounting plate E1 to frame using u-bolts (D1
and D5),  1/4 and 5/16 nuts (D4 and D8), 1/4 and 5/16
lock washers (D3 and D7) and 1/4 and 5/16 flat washers
(D2 and D6).  Do not tighten at this time.

Tighten all 5/16” nuts (D4) to torque specifications on
page 2.

3.

This completes winch mounting.

V. WINCH MOUNTING PLATE INSTALLATION

F1

E1

D1, D2, D3
and D4

D5, D6, D7 and D8

Clamp edge of plate 2 

1

/

2

inches from edge of bolt

Summary of Contents for 79840

Page 1: ...urely per the installation and operation Always perform regular inspections and maintenance on the winch winch mount and related hardware Never operate this WARN product with damaged or missing parts WARNING INSTALLATION INSTRUCTIONS 1 5 WINCH MOUNTING KIT Part Number 79840 Application 2005 2008 Honda Recon Your safety and the safety of others is very important To help you make informed decisions ...

Page 2: ... t ailure to obser o obser o obser o obser o observ v v v ve these instructions could lead t e these instructions could lead t e these instructions could lead t e these instructions could lead t e these instructions could lead to minor or moderat o minor or moderat o minor or moderat o minor or moderat o minor or moderate injur e injur e injur e injur e injury y y y y Always take time to fully rea...

Page 3: ... Bolt not included B7 2 M8 x 1 25 x 25mm Hex Head Bolt C1 1 Hawse Fairlead not included Figure 1 Figure 2 IV PARTS LIST continued Ref Qty Description D1 2 5 16 18 x 1 1 8 x 1 3 4 U Bolt D2 4 5 16 Flat Washer D3 4 5 16 Lock Washer D4 4 5 16 18 Nut D5 2 1 4 20 x 3 4 x 1 1 4 U Bolt D6 4 1 4 Flat Washer D7 4 1 4 Lock Washer D8 4 1 4 20 Hex Nut E1 1 Winch Mounting Bracket F1 1 1 5ci Winch not included ...

Page 4: ...plate E1 on frame being sure that winch motor is to the left when standing in front of ATV Attach mounting plate E1 to frame using u bolts D1 and D5 1 4 and 5 16 nuts D4 and D8 1 4 and 5 16 lock washers D3 and D7 and 1 4 and 5 16 flat washers D2 and D6 Do not tighten at this time Tighten all 5 16 nuts D4 to torque specifications on page 2 3 This completes winch mounting V WINCH MOUNTING PLATE INST...

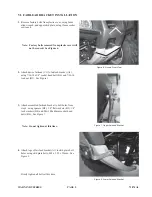
Page 5: ...x3 4 socket head bolt B6 and 7 16 14 lock nut B1 See Figure 1 3 Attach assembled fairlead bracket to bolt holes from step 1 using spacers B2 1 4 flat washers B3 1 4 lock washers B4 and M6 1 00x40mm socket head bolts B6 See Figure 7 Note Do not tighten at this time 4 Attach legs of fairlead bracket A1 to skid plate bolt holes using skid plate bolts M8 x 1 25 x 25mm See Figure 8 Firmly tighten all b...

Page 6: ...ing to instructions found in winch kit Proceed to section titled Maintenance Care Figure 9 Completed Assembly READ THE VEHICLE S OPERATOR MANUAL WINCH OPERATOR MANUAL AND ALL WARN ING LABELS PRIOR TO OPERATION OFATV AND WINCH WARNING FAILURE TO SECURELY TIGHTEN ALL BOLTS ON THE WINCH PLATE WINCH AND FAIRLEAD CAN RESULT IN PRODUCT FAILURE WHICH MAY RESULT IN VEHICLE DAMAGE AND OPERATOR INJURY OR DE...

Page 7: ...ten all nuts that appear to be loose Stripped fractured or bent bolts or nuts need to be replaced 3 Check all cables prior to use Replace cables that look worn or frayed 4 Check all moving or rotating parts Remove debris that may inhibit the part from moving freely WARNING PERFORM REGULAR INSPECTIONS ON THE WINCH WINCH MOUNT AND RELATED HARD WARE NEVER OPERATE THE WINCH WITH DAMAGED OR MISSING PAR...

Reviews: