background image

2

Adjust the setpoint until the heating symbol (

) appears. Use the 

Up


button to increase the heating demand and then press the 

OK

 button 

Wait 10 seconds to allow the thermostat to adjust to the new setpoint.
Then press the 

TEST

 button on the top of the thermostat.

The test is successful if the red light in the 

TEST

 button lights up and 

GROUND FAULT

 is shown on the display. If this does not occur, check 

the installation/contact your electrical installer.
Press the 

Standby/Reset

 button to reset the GFCI.

The red light should go out and the display returns to normal appearance.
Press the 

Down

 button to return to the original temperature setting.

If the test fails, check the heating cable and thermostat.

If during normal operation the GFCI trips without the 

TEST

 button being 

pressed, there could be a ground fault! To check whether it is a ground 
fault or nuisance tripping, press 

Standby/Reset

If this causes the red light to go off and stay off, it was nuisance tripping 
and the system is operating correctly. If this does not occur, there is a 
ground fault! Contact your electrical installer.

4-Event Program

I want the temperature to be controlled automatically in accord-
ance with a program of individual temperature settings for four 
separate events during a day:

• 

when I wake up in the morning, 


• when I am away at work, 
• when I come home, 
• and at night. 

To do so, you must perform the following 3 steps:

Step 1: Select automatic temperature control.

1

 Press the 

OK

 button to activate the menu.

2

 Press the 

Up

 or 

Down

 buttons until the 

Mode

 option flashes.

3

 Press the 

OK

 button.

4

 Press the 

Up

 or 

Down

 buttons until the 

Auto

 options flashes in the 

upper part of the display.

5

 Press the 

OK

 button.

Factory setting: Auto mode

AUTO
OVERRIDE
MAN. MODE

MODE
SCHEDULE
PROGRAM
SETTINGS
EXIT

Step 2: Choosing the weekly schedule for your program. 
You have the following options:

5:2

 will give you 5 days (Monday to Friday) with the same four events 

(Morning, Out, Home, Night) and 2 days (Saturday and Sunday) with the 
same two events (Morning and Night).

6:1

 will give you 6 days (Monday to Saturday) with the same four events 

(Morning, Out, Home, Night) and 1 day (Sunday) with the same two 
events (Day and Night).

7:0

 will give you individual settings for each day from Monday to Sunday.

1

 Press the 

OK

 button to activate the menu.

2

 Press the 

Up

 or 

Down

 buttons until the 

Schedule

 option flashes.

3

 Press the 

OK

 button.

4

  Press the 

Up

 or 

Down

 buttons until the required program (

5:2

6:1 

or 

7:0

) flashes in the lower part of the display.

5

 Press the 

OK

 button.

 
SCHEDULE

MON

FRI

TUE WED THU

Step 3: Select the time and temperature settings for each event 
in the program of days selected in the previous step.

SET TEMP

PROGRAM

MON

FRI

TUE WED THU

EXIT

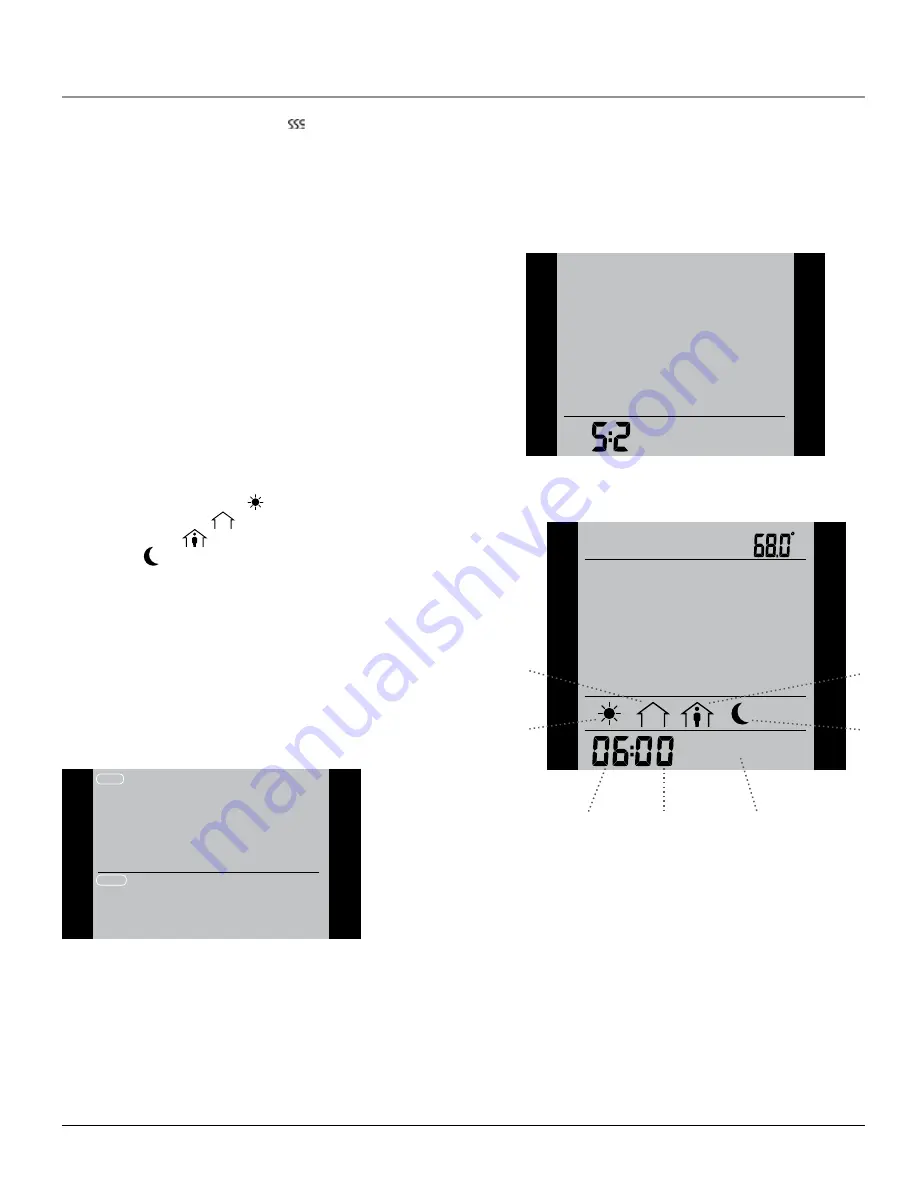
Hour

Morning

At work

At home

Night

Minutes

5-day period

Please note:

 The following description illustrates an example in which 

settings are made for the daily events in a 5:2 program.

1

 Press the 

Up

 or 

Down

 buttons until the 

Program

 option flashes. 

2

 Press the 

OK

 button.

3

  Press the 

Up

 or 

Down

 buttons until the day(s) that you wish to 

program flash in the lower part of the display, e.g. 

Mon Tue Wed Thu 

Fri

4

  Press the 

OK

 button. The symbol for the first event (e.g. morning) will 

now flash.

5

  Press the 

OK

 button. The hour will flash, allowing you to set the hour 

at which you want the morning period to begin. 

6

  Press the 

Up

 or 

Down

 buttons until the required hour is displayed. 

7

 Press the 

OK

 button. The minutes will flash.

8

  Press the 

Up

 or 

Down

 buttons until the required minutes are dis-

played.

9

  Press the 

OK

 button. The temperature setting will now flash in the 

upper part of the display. 

10

  Press the 

Up

 or 

Down

 buttons to set the required temperature.

Type UCG/UDG  

   English

Summary of Contents for UCG

Page 1: ...function has learned when the heating must be switched on First Time Settings The first time you turn on the thermostat time and day must be set The time flashes Set the current time using the Up or Down buttons Then press the OK button to confirm the time The day of the week will then flash Select the current day using the Up and Down buttons Press the OK button The thermostat is now ready for us...

Page 2: ...ODE SCHEDULE PROGRAM SETTINGS EXIT Step 2 Choosing the weekly schedule for your program You have the following options 5 2 will give you 5 days Monday to Friday with the same four events Morning Out Home Night and 2 days Saturday and Sunday with the same two events Morning and Night 6 1 will give you 6 days Monday to Saturday with the same four events Morning Out Home Night and 1 day Sunday with t...

Page 3: ...he Up or Down buttons until On flashes 7 Press the OK button 8 Select Exit to exit the option Please note The adaptive function is only related to the 4 event program and only works in connection with going from one event to another where the temperature is going to be raised The adaptive function calculates when the thermostat must start the heating system to ensure that the required temperature ...

Page 4: ...ings option flashes 3 Press the OK button 4 Press the Up or Down buttons until C F flashes in the menu area The unit currently selected will flash in the upper part of the display 5 Press the Up or Down buttons until the required unit C F flashes 6 Press the OK button 7 Select Exit to exit the option Please note Temperatures are displayed in Celsius with a resolution of 0 5 degree and in Fahrenhei...

Page 5: ...it to exit the option Offset is used to compensate for any difference between the thermostat and a room thermometer It is possible to adjust the offset by up to 10 C or 18 F Once the offset has been set correctly the thermostat will display the same temperature as the thermometer If for example the thermostat shows 1 too much the offset should be set to 1 The temperature will then be set 1 lower S...

Page 6: ... appears 6 Press the Up or Down buttons until the Reset option flashes 7 Press the OK button 8 Select Exit to exit the option SETTINGS TIME DAY CHILDLOCK C F APPLICATION OFFSET TEMP READOUT ADAPTIVE DISPLAY FACTORY RESET EXIT RESET EXIT Exit Menu I want to exit a menu To do so you must use the Exit option The various menus and submenus contain an Exit option 1 Press the Up or Down buttons until Ex...

Page 7: ...s boutons Up hausse ou Down baisse Appuyez ensuite sur le bouton OK pour confirmer l heure Le jour de la semaine clignotera Sélectionnez le jour actuel en utilisant les boutons Up hausse ou Down baisse Appuyez sur le bouton OK Le thermostat est maintenant prêt et il contrôlera votre chauffage en suivant le programme 4 événements par défaut voir les réglages d usine pour le programme automatique 5 ...

Page 8: ...e souhaitée Vérification du disjoncteur de fuite à la terre intégré La vérification ne peut s effectuer que si le thermostat active le chauffage Réglez le point de consigne jusqu à ce que le symbole du chauffage apparaisse Utilisez le bouton Up hausse pour accroître le besoin de chauffage puis appuyez sur le bouton OK Attendez 10 secondes pour permettre au thermostat de s ajuster au nouveau point ...

Page 9: ...teinte quand je me lève le matin ou quand je reviens du travail Vous devez alors activer la fonction d adaptation 1 Appuyez sur le bouton OK pour activer le menu 2 Appuyez sur les boutons Up hausse ou Down baisse jusqu à ce que l option Settings réglages clignote 3 Appuyez sur le bouton OK 4 Appuyez sur les boutons Up hausse ou Down baisse jusqu à ce que l option Adaptive adaptation clignote 5 App...

Page 10: ...les boutons Up hausse ou Down baisse jusqu à ce que la température souhaitée clignote 6 Appuyer sur le bouton OK Veuillez noter Cette fonction peut être utile par exemple si vous vous absentez pour les vacances et que vous souhaitez maintenir une tempéra ture de protection contre le gel par ex 41 F pendant votre absence Pour retourner au programme automatique à 4 événements vous devez sélectionner...

Page 11: ...lisé pour réduire toute différence entre le thermostat et un thermomètre de pièce Il est possible de régler le décalage jusqu à Réglage de l heure Je veux changer l heure Pour le faire vous devez 1 Appuyer deux fois sur le bouton OK pour activer le menu 2 Appuyer sur les boutons Up hausse ou Down baisse jusqu à ce que l option Settings réglages clignote 3 Appuyer sur le bouton OK 4 Appuyer sur les...

Page 12: ...lication Je veux choisir le type de contrôle de la température Pour le faire vous devez 1 Appuyer deux fois sur le bouton OK pour activer le menu 2 Appuyer sur les boutons Up hausse ou Down baisse jusqu à ce que l option Settings réglages clignote 3 Appuyer sur le bouton OK 4 Appuyer sur les boutons Up hausse ou Down baisse jusqu à ce que l option Application application clignote 5 Appuyer sur les...

Page 13: ...s 1 et 2 pour retourner à l option Exit sortie finale Veuillez noter Quand vous activez un menu le dernier item du menu qui a été activé commencera à clignoter Ceci vous permet de voir le dernier réglage Si par exemple vous activez le menu Mode Man Mode mode manuel clignotera si vous avez utilisé Man Mode mode manuel la dernière fois Ce principe s applique également aux réglages courants de tempér...

Page 14: ... el día Parpadea la hora Ajuste la hora actual con los botones Up Arriba o Down Abajo Después pulse el botón OK Aceptar para con firmar la hora Entonces parpadeará el día de la semana Seleccione el día actual con los botones Up o Down Pulse el botón OK El termostato ya está listo para el uso y controlará su calefacción de acuerdo con el programa de 4 eventos establecido previamente ver Ajustes de ...

Page 15: ...estoy en el trabajo Cuando regreso a casa y durante la noche Para hacerlo será necesario realizar los 3 pasos siguientes Paso 1 Seleccione el control de temperatura automático 1 Pulse el botón OK para activar el menú 2 Pulse los botones Up o Down hasta que parpadee la opción Mode Modo 3 Pulse el botón OK 4 Pulse los botones Up o Down hasta que parpadee la opción Auto Automático en la parte superio...

Page 16: ...nto actualmente activo 2 Pulse el botón OK Entonces se guardará el nuevo ajuste de temperatura y se utilizará en el futuro para este evento Ejemplo Si usted cambia la temperatura para el martes en la mañana mientras el termostato ejecuta un programa 5 2 la nueva temperatura se aplicará a todas las mañanas de lunes a viernes Función adaptativa Deseo garantizar que ya se haya llegado a la temperatur...

Page 17: ...a regresar al programa automático de 4 eventos deberá seleccionar Auto La página 2 incluye instrucciones MAN MODE MODE Anulación temporal Deseo establecer temporalmente una temperatura de confort para un solo evento por ejemplo no voy al trabajo un día y deseo una temperatura más alta o porque tendré una fiesta Para hacerlo deberá usar la modalidad de anulación 1 Pulse dos veces el botón OK para a...

Page 18: ... opción Readout Valor de lectura 5 Pulse los botones Up o Down para seleccionar el período de interés 2 días 30 días o 365 días El porcentaje de tiempo que la calefacción ha estado encendida aparecerá en la parte superior de la pantalla El submenú Readout contiene también información sobre la versión del Software y sobre el tipo de control Ambiente Piso Regulador o Límite ambiente para la Aplicaci...

Page 19: ... temperatura para su aplicación ROOM FLOOR REGULATOR ROOM LIMIT SETTINGS TIME DAY CHILDLOCK C F APPLICATION OFFSET TEMP READOUT ADAPTIVE DISPLAY FACTORY RESET EXIT Pantalla Deseo seleccionar la información que aparecerá en la pantalla del termostato Para hacerlo es necesario lo siguiente 1 Pulse dos veces el botón OK para activar el menú 2 Pulse los botones Up o Down hasta que parpadee la opción S...

Page 20: ...almente ingresa a un menú puede salir sin cambiar los ajustes si confirma el ajuste actual y para ello deberá hacer Clic en el botón OK Mensajes de error E0 Error interno Cambie el termostato E1 El sensor interno está defectuoso o en cortocircuito Cambie el termostato E2 El sensor externo está defectuoso o en cortocircuito Inspeccione el sensor externo Tipo UCG UDG Español Ajustes de fábrica para ...

Reviews: