background image

5

SAVE THESE INSTRUCTIONS

FOR COMMERCIAL USE ONLY

GROUNDING INSTRUCTIONS

This appliance must be grounded while in use to  

protect the operator from electrical shock. The  
appliance is equipped with a 3-conductor cord and  
3-prong grounding-type plug to fit the proper  
grounding-type receptacle. The appliance has a plug  
that looks like the plug in drawing (1). An adapter, as in 
drawing (), should be used for connecting the appliance 
plug to two-prong receptacles. The grounding tab which 
extends from the adapter must be connected to a  
permanent ground such as a properly grounded outlet  
box as shown in drawing (3) using a metal screw.

Note: The use of an adapter is not authorized in Canada.

EXTENSION CORDS


Use only 3-wire extension cords which have 3-prong 
grounding-type plugs and 3-pole cord connectors that 
accept the plug from the appliance. Use only extension 
cords which are intended for indoor use. Use only extension 
cords having an electrical rating not less than the rating 
of the appliance. Do not use damaged extension cords.  
Examine extension cord before using and replace if  
damaged. Do not abuse extension cord and do not yank 
on any cord to disconnect. Keep cord away from heat 
and sharp edges. 

Summary of Contents for WCO500

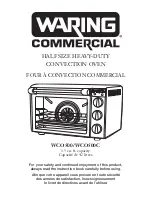
Page 1: ...inued enjoyment of this product always read the instruction book carefully before using Afin que votre appareil vous procure en toute s curit des ann es de satisfaction lisez soigneusement le livret d...

Page 2: ...OUTLET WHEN NOT IN USE BEFORE PUTTING ON OR TAKING OFF PARTS AND BEFORE CLEANING Allow to cool before cleaning or handling 6 Avoid contacting moving parts 7 Must keep 4 clearance above top surface of...

Page 3: ...roiler as they may involve a risk of fire or electric shock 19 A fire may occur if the convection oven is covered or touching flammable material 20 Do not store any items on top of the appliance when...

Page 4: ...uctions 5 Introduction 6 Parts and Accessories 6 Before Using Your Oven 10 Function Guidelines 11 Bake 11 Convection Bake 11 Rotisserie 13 Trussing A Chicken 13 14 Roast 15 Broil 16 Bakeware Reference...

Page 5: ...apter must be connected to a permanent ground such as a properly grounded outlet box as shown in drawing 3 using a metal screw Note The use of an adapter is not authorized in Canada EXTENSION CORDS Us...

Page 6: ...ke thus saving energy Cooking time is also reduced by approximately 25 to 30 Use your convection oven to roast meat or whole chickens bake cakes cookies and more Safe and easy to use Exceptionally qui...

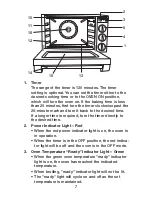
Page 7: ...If a longer time is required turn the timer directly to the desired time 2 Power Indicator Light Red When the red power indicator light is on the oven is in operation When the timer is in the OFF posi...

Page 8: ...asting poultry pork and steaks Rotisserie Indicates that the rotisserie motor and top heating elements are operating Rotisserie can be used for poultry pork beef filets lamb and veal Roast Indicates t...

Page 9: ...cure the food item for rotisserie into position 10 Upper Heating Elements There are two straight and one U shaped electric heating elements in the upper part of the oven 11 Rotisserie Sockets The roti...

Page 10: ...y rotisserie spit and skewers with soapy water rinse with clear water and dry These parts should be washed and thoroughly dried by hand only Use a damp cloth to lightly wipe the inner walls of the ove...

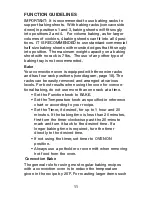
Page 11: ...he racks can be easily removed and arranged at various levels For best results when using the oven for conven tional baking do not use more than one rack at a time Set the Function knob to Bake Set th...

Page 12: ...airflow Set wire rack to desired position see page 18 Set the Function knob to C Bake Set the Temperature knob to the desired level Set the Timer if desired If the baking time is less than 20 minutes...

Page 13: ...ewers It is especially crucial to truss all poultry with butcher s twine before securing to rotisserie spit Trussing a chicken There are different methods of trussing but all are basically designed to...

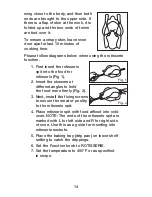
Page 14: ...isserie Fig 1 2 Insert the skewers at different angles to hold the food more firmly Fig 2 3 Next install the fixing screws to secure the meat or poultry to the rotisserie spit 4 Place rotisserie spit...

Page 15: ...11 NOTE It is recommended to add an extra 10 minutes of cooking time to allow for preheating of oven Roast Set wire rack to desired position see page 18 Set the Function knob to Roast Set the tempera...

Page 16: ...desired If the broiling time is less than 20 minutes first turn the timer clockwise past the 20 minute mark and turn it back to the desired time If a longer broiling time is required turn the timer d...

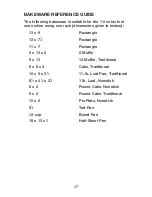
Page 17: ...Rectangle 12 x 71 2 Rectangle 11 x 7 Rectangle 9 x 13 x 2 6 Muffin 9 x 13 12 Muffin Traditional 8 x 8 x 2 Cake Traditional 10 x 5 x 31 2 11 2 lb Loaf Pan Traditional 81 2 x 41 2 x 23 4 1 lb Loaf Nons...

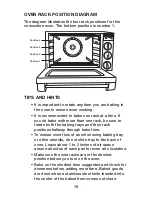
Page 18: ...their rack positions halfway through bake time To ensure even flow of air when using baking tray or other utensils do not slide tray to the back of oven Leave about 1 to 2 inches of air space around a...

Page 19: ...pliance 5 The wire racks baking tray rotisserie spit and skewers should be washed and thoroughly dried by hand only 6 To clean the glass door use a glass cleaner or a damp cloth Wipe dry with a clean...

Page 20: ...7464 to order a light bulb C Replace the Oven Light Cover 1 Insert the tab of the oven light cover into the slot in the side of the oven light compartment 2 Insert the screw into the hole in the oven...

Page 21: ...r des enfants ou des personnes souffrant d un handicap physique mental ou sensoriel ou ne sachant pas l utiliser moins que la personne responsable de leur s curit leur ait donn les instructions n cess...

Page 22: ...pareil sur ou proximit d une plaque lectrique ou d un br leur gaz ou dans un four allum 13 Utilisez cet appareil uniquement aux fins pour lesquelles il a t con u 14 teignez toujours l appareil en mett...

Page 23: ...ifs Ces derniers peuvent s effriter Les particules m talliques pourraient entrer en contact avec les composants lectriques de l appareil pr sentant un risque d lectrocution 22 N essayez pas de d loger...

Page 24: ...ser le four pour la premi re fois 30 Directives d utilisation 31 Mode Cuisson au four conventionnel 31 Mode Cuisson au four convection 32 Mode R tisserie la broche 33 Mode R tisserie par convection 35...

Page 25: ...adaptateur doit toujours tre fix par une vis en m tal Fig 3 Important L utilisation d un adaptateur comme celui mentionn ci dessus est interdite au Canada RALLONGE LECTRIQUE S il est absolument n ces...

Page 26: ...d assurer une r partition uniforme de la chaleur Cela permet d utiliser des temp ratures 10 C plus basses et r duit le temps de cuisson de 25 30 ce qui conomise de l nergie Utilisez votre four convec...

Page 27: ...cuisson 5 Bouton de r glage de la temp rature 6 Grilles 7 Poign e du tournebroche 8 Broche 9 Fourchettes 10 l ments chauffants sup rieurs 11 Supports du tournebroche 12 Supports des grilles 13 l ments...

Page 28: ...four atteint la temp rature voulue Il s teindra et s allumera tour tour pendant la cuisson par convection Remarque Le voyant vert ne fonctionne pas avec la fonction grill 4 Bouton de s lection du mod...

Page 29: ...mp rature pendant toute la dur e de la cuisson 6 Grilles Grilles en acier chrom 7 Poign e du tournebroche Sert retirer le tournebroche du four 8 Broche Sert embrocher la viande ou la volaille pour les...

Page 30: ...onneuse Ne les lavez pas au lave vaisselle Rincez les et s chez les avant de les utilisez Essuyez l int rieure du four l aide d un linge humide Si vous le souhaitez vous pouvez utiliser un peu de d te...

Page 31: ...s le four peut accommoder jusqu 4 t les La capacit maximale de chaque t le sera alors de 7 livres 3 kg Mode Cuisson au four conventionnel 1 Installez la grille la position voulue voir page 36 Il est c...

Page 32: ...voulue voir page 36 2 Placez le bouton de s lection du mode de cuisson sur C BAKE 3 R glez la temp rature au niveau voulu 4 Si vous souhaitez utiliser le minuteur programmez le temps de cuisson jusqu...

Page 33: ...plus long que le poulet Posez le poulet sur le dos Passez la ficelle sous le croupion puis croisez la sur le des sus en serrant bien Glissez chaque bout de la ficelle entre le corps et les pattes pui...

Page 34: ...6 Placez le bouton de s lection du mode de cuisson sur ROTISSERIE 7 R glez la temp rature sur 400 F ou au niveau indiqu dans la recette 8 Si vous souhaitez utiliser le minuteur programmez le temps de...

Page 35: ...120 minutes Si le temps de cuisson est inf rieur 20 minutes tournez le bouton dans le sens des aiguilles d une montre jusqu la marque des 20 minutes puis dans le sens inverse jusqu au temps d sir Si...

Page 36: ...le bouton dans le sens des aiguilles d une montre jusqu la marque des 20 minutes puis dans le sens inverse jusqu au temps d sir Si vous ne souhaitez pas utiliser le minuteur placez le bouton de r gla...

Page 37: ...cm Moule muffins 6 ou 12 muffins de 9 x 13 pouces 23 x 33 cm Moule g teau carr de 8 x 8 x 2 pouces 20 x 20 x 5 cm Moule pain de 700g de 10 x 5 x 3 pouces 25 5 x 13 x 9 cm Moule pain 450g de 8 x 4 x 2...

Page 38: ...ur Lorsque vous faites un g teau v rifiez s il est cuit au bout temps de cuisson minimum recommand La pointe d un couteau ins r e au centre du g teau devrait ressortir s che Augmentez le temps de cuis...

Page 39: ...aring au 1 800 492 7464 REMPLACEMENT DE L AMPOULE D CLAIRAGE A D montez le couvercle 1 Introduisez un tournevis cruciforme dans la t te de la vis tenant le couvercle en place 2 D vissez la vis en tour...

Page 40: ...e pr vu cet effet 3 Tenez la vis et poussez le couvercle l g rement vers le c t du four jusqu ce que la vis rentre dans le trou 4 Tournez la vis dans le sens des aiguilles d une montre pour engager le...

Page 41: ...__________ ______________________________________________ ______________________________________________ ______________________________________________ ______________________________________________ _...

Page 42: ...__________ ______________________________________________ ______________________________________________ ______________________________________________ ______________________________________________ _...

Page 43: ...__________ ______________________________________________ ______________________________________________ ______________________________________________ ______________________________________________ _...

Page 44: ...2008 Waring Commercial Division of Conair Corporation 314 Ella T Grasso Avenue Torrington CT 06790 www waringproducts com Printed in China Imprim en Chine 08WC015 IB 8160...

Reviews: