


6
7
GETTING STARTED/CHARGING YOUR ELLIPSE DRIVE
CAUTION:
Store the Ellipse chargers and Ellipse drive at room temperature
only. Avoid exposure to high temperatures to prevent damage.
1. Your Ellipse Blending System comes with one single charging station.
Please ensure you fully charge your Ellipse drive before using it for the
first time and after every service day.
2. Plug your adapter into a wall outlet.
3. Before first use, place your Ellipse drive on the charging station and
charge for 2.5-3 hours. The LED will indicate your battery level.
a. Low battery (1-25%) = Blinking red
b. Medium battery (26-75%) = Blinking orange
c. High battery (76-99%) = Blinking green
d. Full battery (100%) = Solid green
4. Once your drive has reached the solid green stage, your Ellipse drive
is fully charged and ready to use.
OPERATING YOUR ELLIPSE DRIVE
1. The Ellipse drive can be activated in two ways, automatically and manually:
–
Automatic activation:
The Ellipse drive needs to be
activated by pressing and holding the AUTO START
button for three seconds (see figure 1). When the
drive is active, you’ll see the green LED blinking.
This indicates your drive is now in AUTO START
mode. The Ellipse drive can be activated
automatically by closing the sound enclosure.
Once activated, the drive will run continuously
for 30 seconds or until the sound enclosure is opened.
NOTE:
In AUTO START mode, do not store the drive upside down.
–
Manual activation:
The Ellipse drive can also be
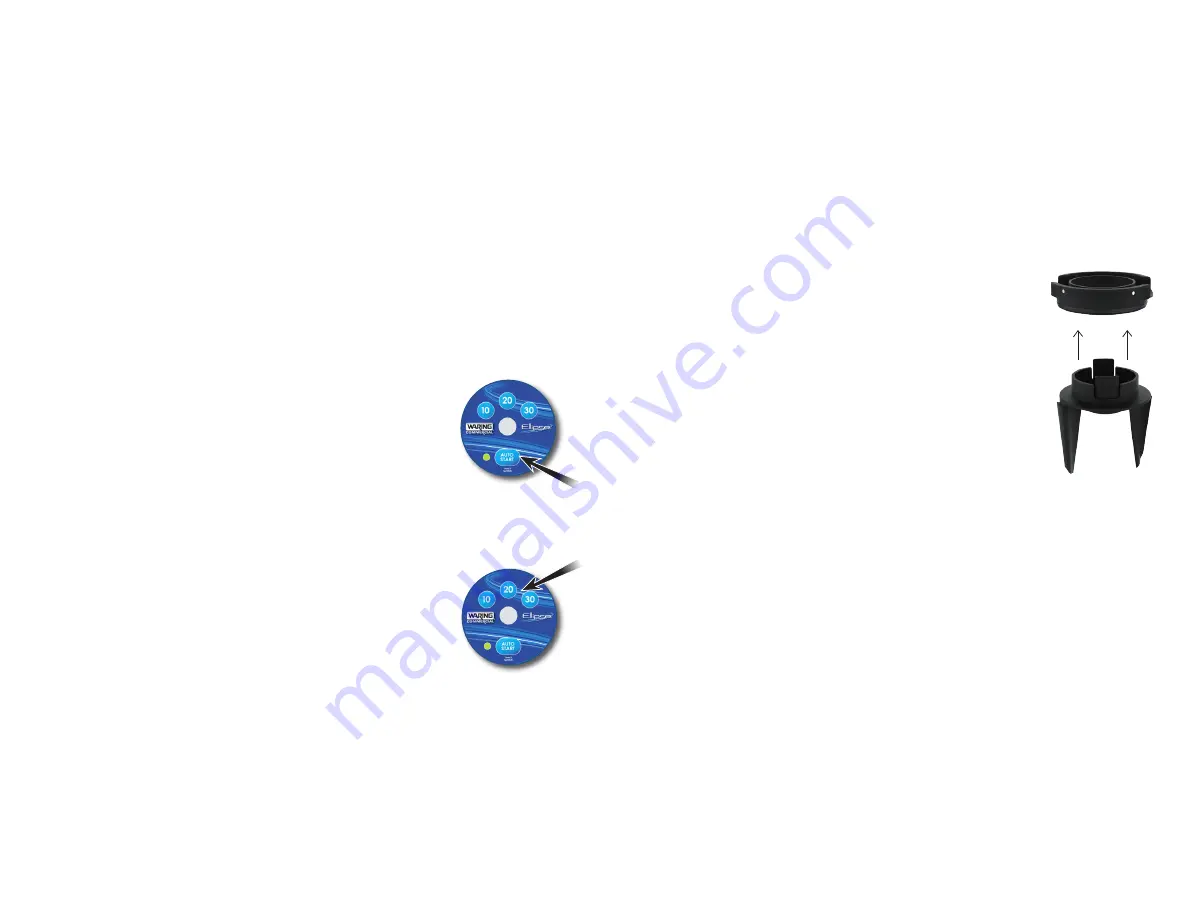
activated by pressing one of the three buttons on top
of the drive at any time (see figure 2). Each button
indicates the duration the drive will remain on —
10 seconds, 20 seconds or 30 seconds—depending
on your specific blending needs.
NOTE:
To stop or cancel any automatic or manually
activated mode, press any of the time buttons again.
2. To turn off AUTO START mode on your Ellipse drive, press and hold the
AUTO START button for three seconds. You can confirm the drive is off if
the LED is no longer blinking.
3. At the end of every service day, place the drive on the provided charger to
ensure your drive is fully charged for the next service day or shift.
NOTE:
The Ellipse drive will fully charge in 3 hours. Each full charge
can last up to 8 hours, depending on use.
FIGURE 1
FIGURE 2
NOTE:
Use a soft, damp cloth to clean the clear window of the
Ellipse drive. This will ensure the drive runs properly.
NOTE:
Do not overcharge the Ellipse drive. Ellipse drive should not
be left on charging station indefinitely. This will degrade the battery
over time. To preserve battery life of the Ellipse drive, only charge
when needed.
4. Please ensure the Ellipse dasher and lid are in place before placing the
drive on the jar.
NOTE:
When blender is not in use, place Ellipse drive on the docking
station for easy access.
ELLIPSE DASHER SYSTEM
1. The Ellipse dasher system is made up of two primary
parts. Each individual piece cannot operate without
the other.
2.
Assembly:
The dasher features two locking tabs on each
of its sides. In order to properly assemble the
dasher into the lid, insert the dasher into the bottom of
the lid (as shown in the image to the right) until each
of the locking tabs clicks into place. Once in place, the
dasher is securely locked to the lid and can be placed
on the Ellipse jar.
3.
Disassembly:
In order to disassemble the dasher from
the lid, gently press inward on the two locking tabs.
This will disengage the dasher from the lid. Gently press
down on the locking tabs pushing through the lid using both thumbs.
NOTE:
Please perform this operation over a sink or counter to prevent the
dasher from falling and being damaged.
NOTE:
The Ellipse lid features two gaskets, one located on the inside
of the lid and the second located around the outside of the lid. Both
gaskets must be in place in order to properly run the Ellipse system.
Both gaskets must be removed and cleaned at the end of each service
day or as needed.
ELLIPSE DOCKING STATION
Your Ellipse blender comes with a docking station that functions as a
storage option for your Ellipse drive. The docking station can be placed in front
of your blender base or on the right or left side, depending on your storage
and/or usage needs.
NOTE:
The docking station is not a charging device. It will not charge your
Ellipse drive when in place.
Lid
Dasher