Use of W840 charger module
To use the W840 device:
•
put the W840 device close to the radio-buoy that needs to be
recharged and lay it on the three contact elements (see W800 /
W810 radio-buoy instructions)
•
Take action on the wing nut (3) and turn the screw clockwise. Do
not close the screw all the way down but leave it in a light tension
thanks to the spring retainer.
•
The W840 equipment will begin charging the battery and it will
end automatically after 6 hours.
•
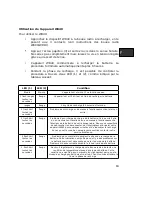
During the charging phase, it is possible to monitor the charging
process through the two indicator lights (1) and (2) according to
the following table:
LED (1)
LED (2)
Condition
Switched off
Switched
off
The device is turned off and does not operate
1 Red flashing
every second
Red
The equipment is active and the battery is charging
Red
Red
The charging cycle (6 hours) is terminated
4 green flashing
every second
Red
Problem of overload or malfunction of the output relay. Problem of
low current during the charging phase of the battery. This
indication does not mean that there are problems with the battery
but you need to pay attention to the battery life.
3 green flashing
every second
Red
Problem of overload in charging the battery. This could be due to a
temporary situation or an internal malfunction of the battery of
your radio buoy. We recommend you to disconnect the W840
equipment (or disconnect from the main switch) for a few minutes
and retry charging. If you repeat this condition, contact the
customer service.
2 green flashing
every second
Red
Problem of low current during the charging phase of the battery.
This indication does not mean that there are problems with the
battery but you need to pay attention to the battery life.
1 green flashing
every second
Red
The charge regulator circuit inside the radio buoy has detected a
condition of high temperature of the battery pack. This does not
indicate an abnormal condition of operation, as the state of
charge may already be reached . In any case, wait for the
completion of the charging process.
31
EN
Summary of Contents for W840
Page 2: ...1 3 2 ...


