


6
7
EN
We are pleased that you have chosen a Walimex pro product from WALSER and
wish you lots of pleasure with our product.
With the brands Walimex pro and Mantona, WALSER offers its customers inex-
pensive, selected and exclusive products for creative photography and
videography directly from the manufacturer.
Both ambitious beginners and professionals benefit from our product know-how
and excellent service.Whether you have questions about technical details or
areas of application for our products - with individual expert advice from trained
photo graphers, we support our customers in all aspects of our portfolio even
after the purchase.
Share our enthusiasm for profes sional photography and videography and let
yourself be inspired by our products!
Your team from WALSER
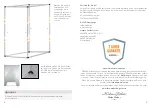
Shooting Tent Poles
A 8 x
B 8 x
C 8 x
D 4 x
E 1 x
F 1 x
Assemble 8 identical corner units from
1 x A, 1 x B and 1 x C. Loosen the hexa-
gon socket screws of the sleeves. Then
interlock 1 x B and 1 x C at a right angle as
shown in the picture and insert 1 x A with
the closed side into the joint. Make sure
that the right angle between B and C is
maintained and re-tighten the hexagon
socket screws.
A
C
B
D
E
F
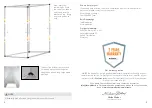
A
B
C
Make sure that all 8 corner units are
identical.
Assemble the base of the light cube from
four corner units as shown in the picture.
Make sure that the corner connectors are
properly connected.
Tip:
If you want to use the light cube for
longer than just one shooting, you can fix
all the plug connections additionally with
gaffer tape.
Now assemble the ceiling from four
corner units as well. From components E
and F, you can optionally install a cross
beam on which you can hang equipment
weighing up to 2 kg. As the sleeves can
be opened and closed with the hexa-
gon socket key, you can also install them
subsequently.
E
F