background image


Revision 5


28 

Product Manual ThriiTap

+

 Wall Mounted Hand Wash 

Dryer 

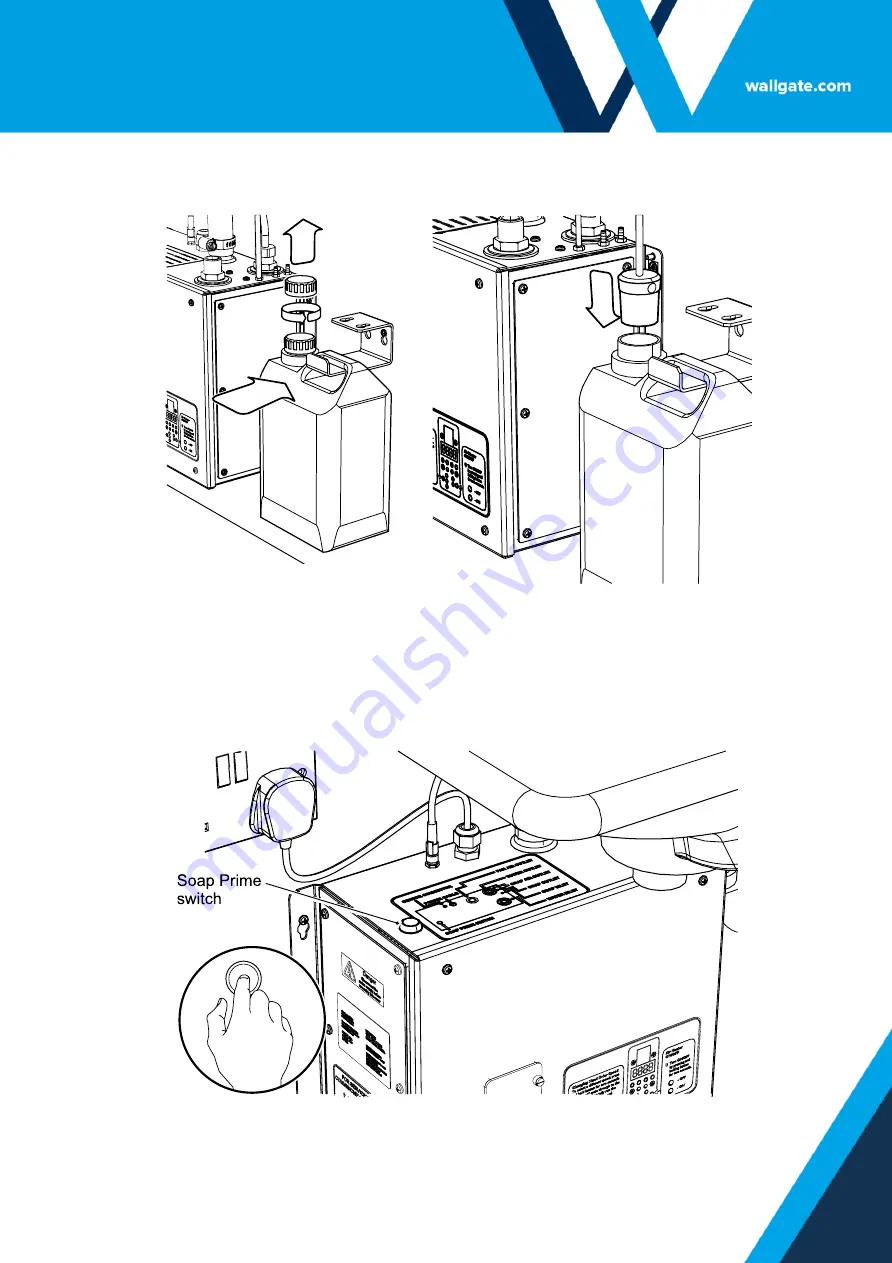
7.  To install the soap container, place the soap container onto its mounting 

hook, ensure the soap bottle is level and stable. 

8.  Unscrew the cap from the soap container and replace with the push-fit cap 

pre-connected to the soap tube pushing fully into place ensuring no leaks.  

9.  Press the soap prime switch, (The button on the underside of the Control 

Module next to the air intake grille and the soap mode switch) until soap is 
consistently dispensed into the bowl. 


Figure 20: 

Soap bottle installation/connection. 


Figure 21: 

Soap prime switch operation. 


Summary of Contents for Thrii-Tap+

Page 1: ...Product Manual ThriiTap Hand Wash Dryer ThriiTap Wall Mounted Original Instructions ...

Page 2: ...Revision 5 2 Product Manual ThriiTap Wall Mounted Hand Wash Dryer ...

Page 3: ...n occur We recommend that adequate frost protection is provided in the building to ensure freezing does not occur The resistivity of the water supply must not be less than 1300Ωcm Minimum water pressure 100kPa Maximum water pressure 1000kPa This appliance can be used by children aged from 8 years and above and persons with reduced physical sensory or mental capabilities or lack of experience and k...

Page 4: ... Mounted Tap Head 15 7 2 Mounting Guidelines 16 7 2 1 Control Module Mounting Guidelines 16 7 2 2 Soap Hook Mounting Guidelines 18 7 2 3 Tap Head Mounting Guidelines 19 7 2 3 1 Wall Mounted Tap Head 19 7 2 3 2 Front Fix Wall Mounted Tap Head 21 7 3 Connecting the Control Module to the Tap head 23 7 4 Mains Water Connection to Control Module 27 7 5 Commissioning for use 27 8 Programmed Settings 29 ...

Page 5: ...Revision 5 5 Product Manual ThriiTap Wall Mounted Hand Wash Dryer 9 3 Service and Repair 37 9 4 Spare Parts 37 ...

Page 6: ...roduct specification at any time without prior notice This manual is specific to the product that it has been supplied with at the date of supply Without prejudice to any warranties in Wallgate Limited s terms and conditions of sale any warranty will be invalidated if the equipment is installed or serviced by unqualified personnel No part of this publication and the information contained may be re...

Page 7: ...ath Read and understand these warnings before you install and commission the ThriiTap Failure to heed these warnings can have serious consequences WARNING This is a warning 2 2 Note A note with black text on a yellow background is used to draw your attention to important and useful information NOTE This is a note 2 3 Numbered procedures Steps in procedures are numbered starting from 1 1 This is st...

Page 8: ...ad IR Sensor The infrared IR sensor transmits an invisible beam into the washbowl area so that when interrupted by a person s hand the beam is rebounded back to the receiver sensor This creates an electrical signal which rapidly activates the hand wash cycle BSP The British Standard Pipe BSP thread is a family of standard screw thread types that has been adopted internationally for interconnecting...

Page 9: ...Control Module Dimensions Width Height Depth 344 mm 252 mm 160 mm Water Supply Minimum pressure Maximum rating Inlet connection size Dynamic 1 Bar 100 kPa 10 Bar 1000 kPa BSP Male Electrical Power requirement 220 240V 50 60Hz single phase 1100W UK plug socket Enclosure IP Rating IPX4 Regulatory compliance Complies with RoHS LVD 2014 35 EU EMC 2014 30 EU directives Flow rate Regulated to 1 9lpm alt...

Page 10: ...sion to be installed with the Control Module mounted below a basin or vanity top These instructions deal with the wall mounted version When hands are placed under the centre of the tap head an infra red sensor activates the hand washing and drying cycle supplying soap liquid or foam warm water and dryer air in amounts and intervals preset as required The unit can be installed in a variety of wall ...

Page 11: ...Revision 5 11 Product Manual ThriiTap Wall Mounted Hand Wash Dryer Figure 2 Tap head outlet nozzles ...

Page 12: ...sh Dryer 6 Package Contents Before you begin the installation make sure that you have the following items 1 Tap head 1 Installation instructions 1 Air hose with 2 jubilee clips 2 Cable ties 1 Control Module 1 Soap bracket 1 Container of liquid soap 2 5 litres ...

Page 13: ...ead to the wall Warning All electrical work must be carried out by a qualified electrician and should be installed in accordance with the current Nationally Approved Regulation The installer must Provide an electrical supply of 220 240VAC 50 60Hz with a socket suitable for the installation environment For installations into rooms with baths or showers the control module is to be installed into a s...

Page 14: ...ual ThriiTap Wall Mounted Hand Wash Dryer 7 1 1 Wall Mounted Tap Head Measure mark and core a hole through wall substrate or panelling to the dimensions shown in figure 3 below Figure 3 Wall Mounted Tap Head mounting dimensions ...

Page 15: ... when chasing the services for the tap into the wall If this is the case carefully route the hoses into the chased opening 54mm wide x 90mm deep See 7 2 3 2 Front Fix Wall Mounted Tap Head for further details Measure mark and install wall anchors to dimensions as shown in figure 4 below Figure 4 Front Fixed Wall Mounted Tap Head mounting dimensions ...

Page 16: ... for both through wall and under basin installations The module is to be mounted to a flat sturdy wall via the mounting tabs These are bi directional slotted for ease of installation regardless of the modules orientation The module must be fastened to the wall using mounting hardware suitable for the wall material to be provided by others and the wall must be robust enough to support the weight of...

Page 17: ...cted to an easily accessible switched UK plug socket or switched fused spur depending on installation requirements The electrical installation must be compliant to local building and electrical regulations Warning All electrical work must be carried out by a qualified electrician and should be installed in accordance with the current Nationally Approved Regulations Figure 6 Minimum control module ...

Page 18: ...talled remotely from the module in a position convenient for access and within space constraints 0 6m of soap tube is supplied for connection between the soap bottle and the module The soap hook must be fastened to the wall with appropriate fasteners for the wall material to be supplied by others Figure 7 Soap Hook installation ...

Page 19: ...uts and mounting bracket from tap head 2 Carefully pass tap head hoses through hole made in wall panel before seating tap head against the wall as shown in figure 8 3 Thread the hoses through the mounting bracket on the rear side of the wall panel Figure 8 Front view tap head installation into wall Figure 9 Rear view tap head installation into wall ...

Page 20: ...ace 5 Thread the 2x M6 nuts onto the studs to secure the mounting bracket into position Tighten bolts hand tight 6 Check the orientation of the tap head is correctly positioned over the basin Also use a spirit level to check the tap head is level horizontally as this must be the case for optimum performance 7 Once the previous steps are complete gradually tighten each bolt equally to 5Nm Figure 10...

Page 21: ...de x 90mm deep 2 Lift off tap head lid by unscrewing Torx screw on right hand side of tap body and 2x M4 monobloc fixings Set cover and fixings aside in a safe place for refitting once tap head is mounting is complete 3 Using the wall mounting plate as a template secure four wall anchors or suitable equivalent into the wall substrate Secure the mounting plate into position ensuring that it is cent...

Page 22: ...wo M6 fixing bolts Use a 10mm spanner to tighten bolts loosely hand tight 5 Check the orientation of the tap head is correctly positioned over the basin Also use a spirit level to check the tap head is level horizontally as this must be the case for optimum performance Tighten the fixings and reinstate the tap head lid Figure 12 Front fix wall mounting plate Figure 13 Front fix wall mounted tap in...

Page 23: ...sion 5 23 Product Manual ThriiTap Wall Mounted Hand Wash Dryer 7 3 Connecting the Control Module to the Tap head Figure 15 Control Module I O arrangement Figure 14 Wall mounted tap shown without vanity top ...

Page 24: ... each end of air hose Push one end of air hose over black air hose spigot protruding from the tap head Then push the other end over the air outlet spigot on the Control Module see fig 15 for reference 2 Ensure each jubilee clip is positioned over spigot and then tighten with flat head screwdriver to hold air hose in place Figure 16 Air hose connection ...

Page 25: ...orrectly in half inch BSP female nut Then screw on to Control Module water outlet by hand Tighten with 23mm spanner 4 Next take M8 sensor cable connection from tap head and connect to sensor connection on Control Module Align pins and tighten by hand Figure 17 Flexi hose water outlet connection Figure 18 Sensor cable connection ...

Page 26: ...hriiTap Wall Mounted Hand Wash Dryer 5 Take 2x soap hoses from bottom of tap head and push over soap and air outlets indicated in fig 15 Use 2x cable ties to secure soap tube onto outlet spigots Figure 19 Soap Air outlet connections ...

Page 27: ...let detailed in fig 15 7 5 Commissioning for use To commission the Wallgate ThriiTap 1 Ensure the Control Module cover panels are securely fitted and the electrical plug is securely connected to the socket 2 Inspect all connections on the top of the Control Module to make sure the soap water air and sensor connections are secure and seated correctly 3 Fully open the mains water supply isolating ta...

Page 28: ...cap from the soap container and replace with the push fit cap pre connected to the soap tube pushing fully into place ensuring no leaks 9 Press the soap prime switch The button on the underside of the Control Module next to the air intake grille and the soap mode switch until soap is consistently dispensed into the bowl Figure 20 Soap bottle installation connection Figure 21 Soap prime switch oper...

Page 29: ...d the water and air will stop when the sensor fails to detect any hands after a period of 2 seconds 11 Upon completion ensure that a copy of the instruction manual or leaflet is passed to the customer 8 Programmed Settings The Wallgate ThriiTap operational program is supplied factory set but can be adjusted to suit the end user requirements Any service or repair work must be done by a qualified en...

Page 30: ...er Fig 22 The panel must be replaced when the in use to prevent ingress of water into the module Figure 23 Display panel key Item Description Item Description 1 LCD 8 MED Fan speed LED indicator 2 Menu Select button 9 LOW Fan speed LED indicator 3 UP Button 10 Air Heater ON OFF 4 DOWN Button 11 Air Heater OFF LED indicator 5 ENTER Button 12 Air Heater ON LED indicator 6 FAN SPEED Button 13 Ribbon ...

Page 31: ...cycle that is in operation should the user remove their hands from underneath the tap head before either cycle has completed its preset time The cycle cancels after the user s hands have been removed from under the tap head Water 4 sec Hand drier 2 sec This feature can be adjusted to increase or decrease the 2 second default time or the feature can be disabled refer to section 7 2 for information ...

Page 32: ...ThriiTap hand dryer has an air heater installed to ensure the user dries their hands in comfortable high velocity air The air heater is set to ON by default however can be turned on or off with the LCD control panel shown in figure23 Press and hold button 10 for 2 seconds to switch between the two settings To show the setting has been confirmed the correct LED will illuminate 8 1 4 Hygiene Purge T...

Page 33: ...e press and hold MENU and ENTER buttons simultaneously for 5 seconds see figure 23 After this period the display will read F 01 2 With F menu item displayed as shown in the figure 23 momentarily pressing the UP and DOWN buttons will move up and down the menu selection 3 When the desired menu item is selected press the ENTER button to confirm The display will show the current value flashing for tha...

Page 34: ...vious section to enter and navigate the F Functions menu F54 and F55 sets the time of day to purge F56 F62 enable disable specific days to purge the repeat setting F63 refers how many purges required interval is the time between purges F64 and the run time F65 is the water purge time Figure 26 Purge Adjustment table Description Factory Settings Setting range Function Min Max Increment Automatic Hy...

Page 35: ...efficient service If you need any further information or advice please contact Wallgate Customer Services 9 1 Care and Cleaning The ThriiTap should be cleaned daily Follow these 3 steps to ensure the unit performs to its best and remains hygienic Using the wrong cleaning method or product may invalidate the warranty 1 Wipe sensor and nozzles using a soft cloth and non abrasive cleaner 2 Clean all ...

Page 36: ...4594 www wallgate com 9 2 Routine Maintenance The following routine regular maintenance in between service intervals will help to prevent premature parts failure Flush the soap pump system with warm water to remove congealed soap within the pump tube soap nozzle Clean the external surfaces of the soap nozzle to remove congealed soap De scale the water spray nozzle Clean the lens on the infra red h...

Page 37: ...ce agent Refer to the Wallgate terms and conditions for warranty information Warning Risk of electric shock serious injury or death Only qualified personnel should remove the cover of the Control Module when powered up 9 4 Spare Parts Part No Description Part No Description SPU102 Soap Pump Assembly DL7546 Water nozzle service tool SNA102 Soap Nozzle FF4002 External filter media SF0002 Soap Filter...

Page 38: ...12 1 Function F1 F12 0 F6 F4 F4 F11 F26 Task 6 0 12 1 Function F1 F12 0 F11 F10 F10 F2 F27 Task 7 0 12 1 Function F1 F12 0 0 F6 F6 F10 F28 Task 8 0 12 1 Function F1 F12 0 0 F11 F11 F6 F35 Operating Mode 0 1 1 0 Manual 1 Automatic 0 1 1 1 1 F36 RTC Hour Note 6 0 23 1 RTC Hour GMT BST n a n a n a n a n a F37 RTC Minute Note 6 0 59 1 RTC Minute GMT BST n a n a n a n a n a F38 RTC Day Note 1 Note 6 1 ...

Page 39: ...mp Iterations 1 20 1 Note 7 1 1 1 1 1 F134 Soap Counter X 100 Operations F135 Fan Counter Fan Usage in Hours F145 Soap Warning LED Colour 0 8 1 1 1 1 1 1 F146 Soap Counter Warning Level 0 250 1 X 100 Operations 0 0 0 0 0 F147 Soap Warning LED Pulses 1 5 1 1 1 1 1 1 F148 Soap Counter Reset on Prime 0 1 1 1 1 1 1 1 F149 Auto Water Off 0 100 10 Note 9 0 0 0 0 0 F151 Hot Air Enable Off On Enable heate...

Page 40: ...2 Wallgate Ltd Crow Lane Wilton Salisbury Wiltshire SP2 0HB England tel 44 0 1722 744594 fax 44 0 1722 742096 email service wallgate com web www wallgate com ...

Reviews: