background image

English

   - 9 -

Power Connection

IMPORTANT

: The TV set is designed to operate on 

220-240V AC, 50 Hz.

• 

After unpacking, allow the TV set to reach the 

ambient room temperature before you connect the 

set to the mains. Plug the power cable to the mains 

socket outlet.

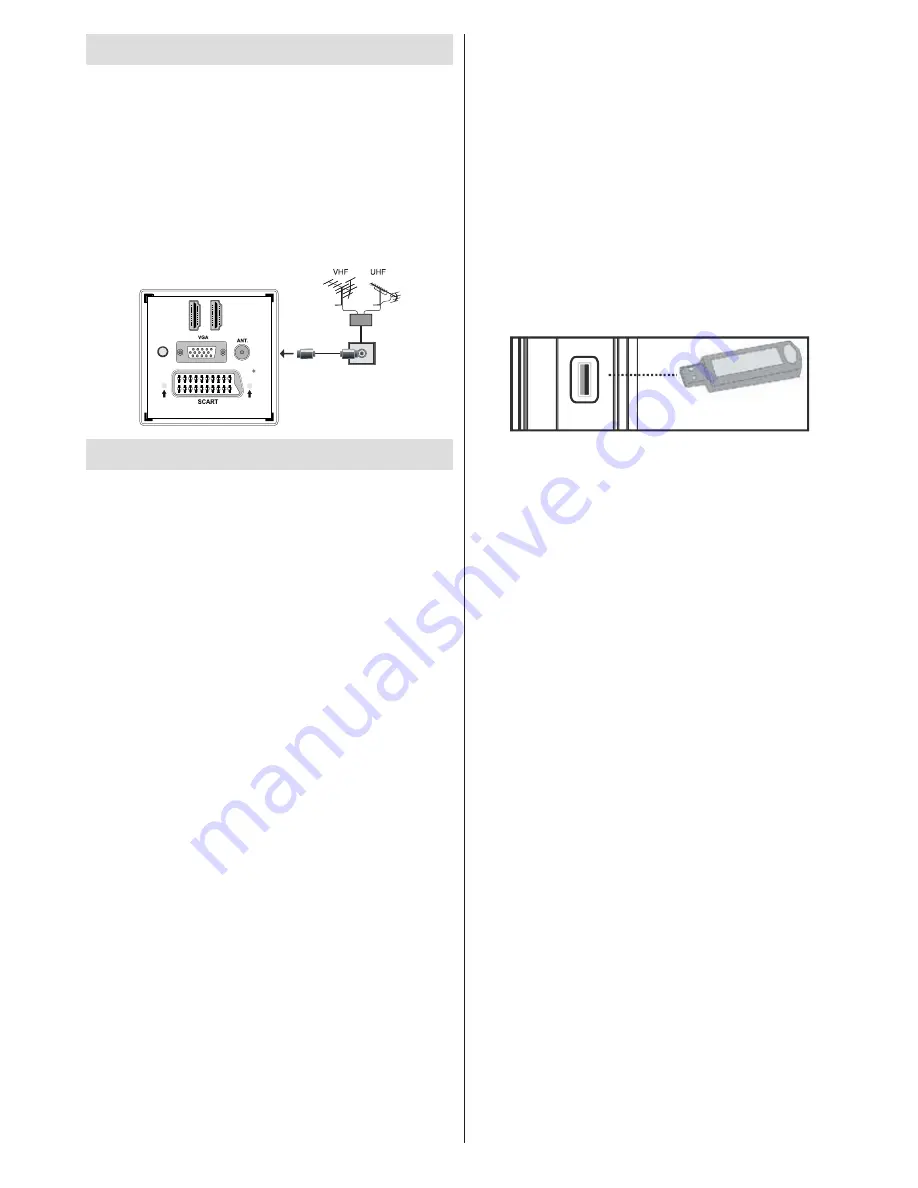
Aerial Connection

• 

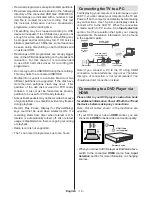
Connect the aerial plug to the 

AERIAL INPUT (ANT)


socket located at the rear of the TV.

D

H

M

1

SPDIF

Coax.OUT

D

H

M

2

Using USB Input

USB Connection

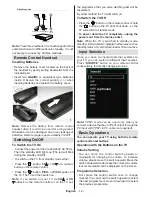
• You  can  connect  a  USB  hard  disk  drive  or  USB 

memory stick to your TV by using the USB inputs 

of the TV. This feature allows you to play files stored 

in a USB drive or record programmes.

• 

2.5” and 3.5” inch (hdd with external power supply) 

external hard disk drives are supported.

• To record a programme, you should first connect 

a USB disk to your TV while the TV is switched 

off. You  should  then  switch  on  the TV  to  enable 

recording feature. Otherwise, recording feature will 

not be available. 

IMPORTANT !

• You  may  back  up  your  files  before  making  any 

connections to the TV set in order to avoid any 

possible data loss. Note that manufacturer will not 

be responsible for any file damage or dataloss.

• 

It is possible that certain types of USB devices (e.g. 

MP3 Players) or USB hard disk drives/memory sticks 

may not be compatible with this TV.

IMPORTANT

: The TV supports only FAT32 disk 

formatting. NTFS format is not supported. If you 

connect a USB disk with NTFS format, the TV will ask 

you to format the content. See the section, “Format 

Disk” in the following pages for more information on 

disk formatting.
Note that ALL the data stored on the USB disk will 

be lost and then the disk format will be converted to 

FAT32 in such a case.

USB Disk Connection

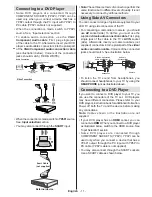
• Plug your USB device to the USB input of the TV. 

Note: Plug or unplug your USB disk while the TV is 

switched off.
Note: If you are going to connect a USB hard disk drive 

to the TV set, USB connection cable used between 

the disk drive and the TV should have a USB logo 

and should be as short as possible.
Note: While formatting a USB hard disk that has 1TB 

(Tera Byte) or more file capacity, you can experience 

problems with the formatting process. In such a 

case, you should format the disk with your personal 

computer and the formatted disk type should be 
FAT32.

SIDE VIEW        USB MEMORY

5Vdc

Max:500mA

USB

CAUTION ! 

• 

Quickly plugging and unplugging USB devices, 

is a very hazardous operation. Especially, do not 

repeatedly quickly plug and unplug the drive. This 

may cause physical damage to the USB player and 

especially the USB device itself.

• 

Do not pull out USB module while playing or 

recording a file.

Programme Recording

To record a programme, you should first connect a 

USB disk to your TV while the TV is switched off. 

You should then switch on the TV to enable recording 

feature.

IMPORTANT: When using a new USB hard disk drive, 

it is recommended that you first format the disk using 

your TV’s “Format Disk” option.

• 

For using recording function, you should connect a 

USB disk or an external hard disk drive to the TV 

and connected USB disk should have at least 1 GB 

capacity and should have 2.0 speed compatibility. 

If the connected USB device does not support 2.0 

speed, an error message will be displayed.

Note: Recorded programmes are saved into the 

connected USB disk. If desired, you can store/copy 

recordings on a computer; however,  these files will 

not be available to be played on a computer. You can 

play the recordings only via your TV.

• 

An hour of the recordings stored occupies 

approximately 2 GB of space.

• 

For more information on recording programmes, 

see sections “Instant Recording”, “Timeshifting”, 

“Electronic Programme Guide”, “Recordings Library” 

or “Recording Timers” in the following parts.

Summary of Contents for WP32ELED

Page 1: ...COLOUR TELEVISION WITH REMOTE CONTROL OPERATING INSTRUCTIONS WP32ELED BE WALKER WISE logon to www walker ie APPROVED...

Page 2: ...leting a Channel 17 Renaming a Channel 17 Locking a Channel 17 Managing Stations Favourites 18 Button Functions 18 Managing Stations Sorting Channel List 18 On Screen Information 18 Media Playback Usi...

Page 3: ...ual will guide you for the proper operation of your TV Before operating the TV please read this manual thoroughly Please do keep this manual in a safe place for future references This device is intend...

Page 4: ...the manufacturer or have the same specifications as the original one Unauthorized substitutions may result in fire electrical shock or other hazards Servicing Please refer all servicing to qualified...

Page 5: ...uld be set up in a way that an unobstructed access to mains socket is guaranteed so that in case of emergency the mains plug can be pulled immediately To exclude the danger of fire the power cord shou...

Page 6: ...ETS LANG FAV EPG SWAP SOURCE C DISP SEARCH MODE INFO CH V Remote Control LED TV Batteries 2 X AAA Instruction Book 1 X Video Audio Connection Cable Note You should check the accessories after purchasi...

Page 7: ...er mode 18 Play in Media Browser mode 19 Red button Stop in Media Browser 20 Green button List Schedule in EPG Tag Untag All in favourite list Play Slideshow in Media Browser 21 Picture mode selecion...

Page 8: ...evision with an appropriate antenna cable as shown in the illustration in the following pages 3 SCART input or output for external devices Connect the SCART cable between SCART socket on TV and SCART...

Page 9: ...drives to this input 3 Side audio video connection input is used for connecting video and audio signals of external devices To make a video connection you must use the supplied AV connection cable fo...

Page 10: ...or unplug your USB disk while the TV is switched off Note If you are going to connect a USB hard disk drive to the TV set USB connection cable used between the disk drive and the TV should have a USB...

Page 11: ...ns Recorded programmes are stored in the following directory of the connected USB disk DVR RECS All recordings are indicated with a number A text txt file is created for each recording This text file...

Page 12: ...to your LED TV using side connectors of the TV For connecting a camcorder or camera you should use AV socket side To do this you must use the supplied video audio connection cable First plug single j...

Page 13: ...programme that you were watching last will be reselected By either method the TV will switch on To Switch the TV Off Press the button on the remote control or hold the button on the TV until shut down...

Page 14: ...e electronic programme guide EPG to view information about available programmes To view the EPG menu please press EPG button on the remote control Press buttons to navigate through channels Press butt...

Page 15: ...nu Select Channel In EPG menu using this option you can switch to the selected channel Record Delete Record Timer IMPORTANT To record a programme you should first connect a USB disk to your TV while t...

Page 16: ...nd continue After selecting the language Welcome screen will be displayed requiring you to set Country Search Type Teletext Language and Scan Encrypted options By pressing or button select the country...

Page 17: ...ct broadcast entry Select Manual Channel Scan from the Installation menu by using and OK buttons Manual Scan options screen will be displayed Select the desired Search Type using or button Manual sear...

Page 18: ...mber screen will be displayed Enter the desired channel number by using the numeric buttons on the remote control If there is a previously stored channel on that number a warning screen will be displa...

Page 19: ...by using or button Press OK button to continue You can select a broadcast type option from the list by using and OK buttons On Screen Information You can press INFO button to display on screen informa...

Page 20: ...Play Preview Displays selected file in a small preview screen RED Sorts files by name Play button Plays all media files starting with the selected one Yellow Button Change viewing style Loop Shuffle G...

Page 21: ...s once to disable Loop Press again to disable both Loop and Shuffle Press once more to enable only Shuffle Press again to enable all You can follow the disabled functions with the change of the icons...

Page 22: ...de show interval time Show Subtitle Sets subtitle enabling preference Subtitle Language Sets supported subtitle language Subtitle Position Sets subtitle position as up or down Subtitle Font Size Sets...

Page 23: ...Programmes In the main menu use or buttons to select Media Browser Highlight Recordings Library item by using or button and press OK button to enter Recordings Library will then be displayed IMPORTANT...

Page 24: ...DTV sources 16 9 This uniformly stretches the left and right sides of a normal picture 4 3 aspect ratio to fill the wide TV screen For 16 9 aspect ratio pictures that have been squeezed into a normal...

Page 25: ...set to one of these options Low Medium High or Off Advanced Settings Colour Temp Sets the desired colour tone Setting Cool option gives white colours a slight blue stress For normal colours select No...

Page 26: ...ighlight a menu item Use or button to set an item Press MENU button to exit Sound Settings Menu Items Volume Adjusts volume level Equalizer Press OK button to view equalizer sub menu In equalizer menu...

Page 27: ...he card is activated When no module is inserted No Common Interface module detected message appears on the screen Refer to the module instruction manual for details of the settings Viewing Conditional...

Page 28: ...ect an item by using or button Use or button to set an item Press OK button to view more options Menu Lock optional Menu lock setting enables or disables the menu access You can disable access to the...

Page 29: ...onfiguration Select Recording Configuration item in the Settings menu to configure recording settings The following menu is displayed for recording configuration The following options are available fo...

Page 30: ...menu and press OK button Press or buttons to select a source Use or button to enable or disable the selected source Changes are automatically stored Note YPbPr mode can be used only when you connect a...

Page 31: ...information is displayed on the screen when a new programme is entered or INFO button is pressed Mute Function Press button to disable sound Mute indicator will be displayed in the upper side of the...

Page 32: ...gnisable Check if you have entered the correct frequency Please retune the channels The picture quality may degrade when two peripherals are connected to the TV at the same time In such a case disconn...

Page 33: ...B 16 1400x1050 75Hz 85Hz 17 1400x900 65Hz 75Hz 18 1600x1200 60 Hz 19 1680x1050 60 Hz 20 1920x1080 60 HzA 21 1920x1080 60 HzB 22 1920x1200 60HzA 23 1920x1200 60Hz Appendix B AV and HDMI Signal Compatib...

Page 34: ...Upgrade Options menu In Upgrade Options menu select Scan for upgrade and press OK button If a new upgrade is found it starts to download the upgrade A progress bar indicates the remaining download pro...

Page 35: ...EAC3 AC3 mp4 MPEG4 Xvid 1 00 Xvid 1 01 Xvid 1 02 Xvid 1 03 Xvid 1 10 beta1 2 H 264 PCM MP3 avi MPEG2 MPEG4 PCM MP3 MAX 1920x1080 30P 20Mbit sec Xvid 1 00 Xvid 1 01 Xvid 1 02 Xvid 1 03 Xvid 1 10 beta1...

Page 36: ...es Video MP ML PAL 4 3 16 9 Audio MPEG Layer I II 32 44 148kHz Specifications TV BROADCASTING PAL SECAM B G D K K I I L L RECEIVING CHANNELS VHF BAND I III UHF BAND U HYPERBAND NUMBER OF PRESET CHANNE...

Page 37: ...green or green and yellow The wire which is coloured blue or black must be connected to the terminal which is marked with the letter N or coloured Black The wire which is coloured brown or red must b...

Page 38: ...50234425...
Reviews: