Version A (Select Colors)
P.10
Version B (Select Colors)
Copyright
©
2016 by Walker Edison Furniture Co., LLC. All rights reserved.
Page 1: ...P 1 Copyright 2016 by Walker Edison Furniture Co LLC All rights reserved W58FP18HB tem N W58FP18HB Artikel W58FP18HB W58FP18HB Revised 13 09 2022 R TM...
Page 2: ...d glue is to secure wood dowels in place When first inserting dowels locate the appropriate hole for the dowel place a small amount of glue in the hole and insert the dowel Wipe away excess glue immed...
Page 3: ...Quand vous ins rez les goujons localisez le trou appropri pour le goujon d posez une petite quantit de colle dans le trou et ins rez le goujon Essuyez l exc s de colle imm diatement Dans les prochaine...
Page 4: ...lavijas ubique el agujero adecuado para la clavija coloque una peque a cantidad de pegamento en el agujero e inserte la clavija Limpie el exceso de pegamento de inmediato En los pasos posteriores del...
Page 5: ...nsetzen von D beln das passende D belloch finden eine kleine Menge Kleber in das Loch geben und den D bel einsetzen bersch ssigen Kleber sofort abwischen In zuk nftigen Montageschritten wenn D bel zur...
Page 6: ...P 6 1 17 15 18 18 2 13 19 9 10 19 11 12 4 4 5 7 6 8 3 14 16 20 21 Copyright 2016 by Walker Edison Furniture Co LLC All rights reserved Lista de piezas...
Page 7: ...crew 6x50mm pcs Chevilles en bois Boulons de came Butoirs de porte Vis Poign es Boulons de poign e Vis Serrure came Vis F18V66L Fireplace Insert Insert pour le foyer Hardware List Liste du mat riel Li...
Page 8: ...es en plastique Charni res de porte Goupilles de support de plateau Boulons Autocollants Cl molette Tubes de colle Coins en plastique Vis P 8 Hardware List Liste du mat riel Liste des pi ces Pieza de...
Page 9: ...riel indiqu es ci dessus sont requises pour un montage ad quat Du mat riel suppl mentaire peut aussi avoir t inclus Las cantidades de materiales antes mencionadas son necesarias para el ensamblaje apr...
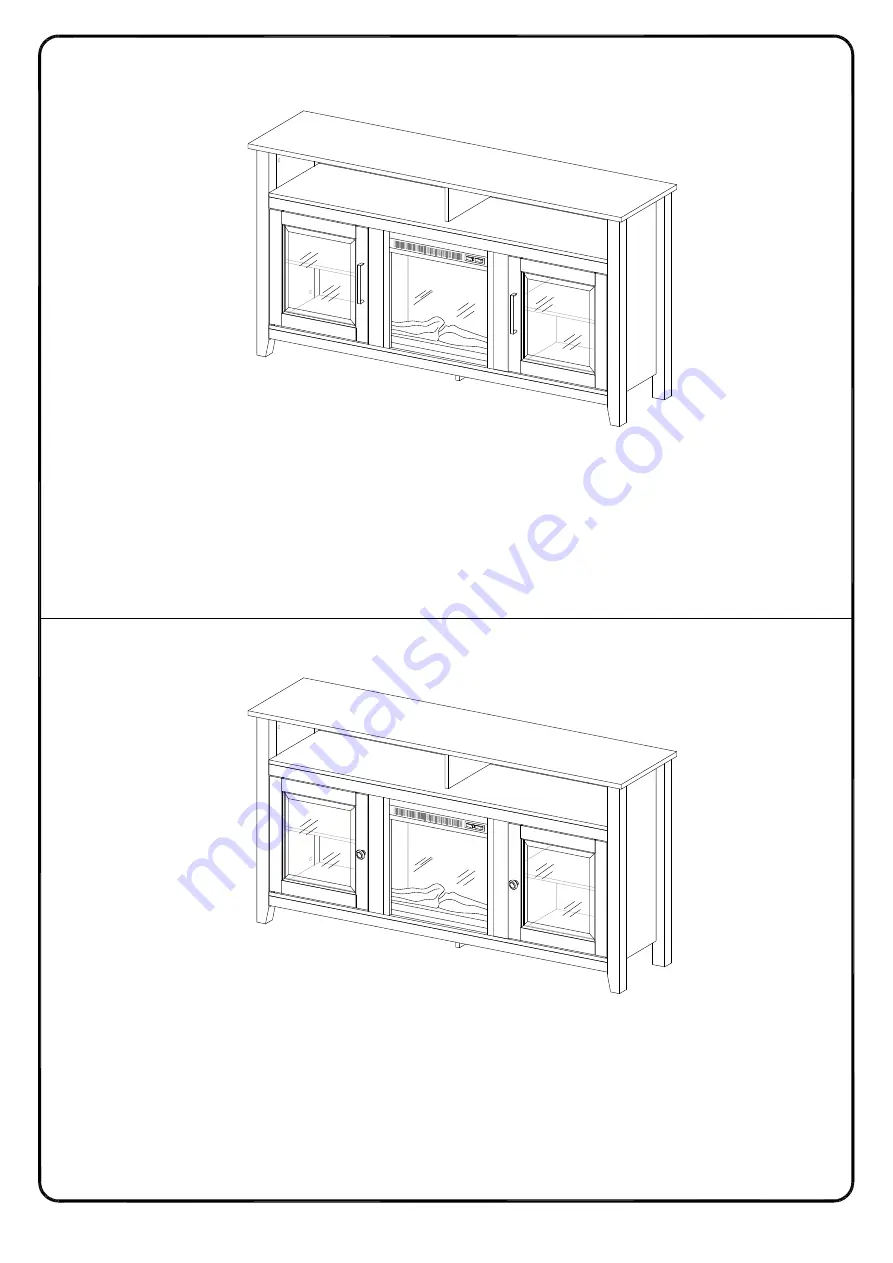
Page 10: ...Version A Select Colors P 10 Version B Select Colors Copyright 2016 by Walker Edison Furniture Co LLC All rights reserved...
Page 11: ...sert the cam bolt B into the top panel 1 face plate 11 12 P 11 1 9 11 10 12 A A A A A A B B B B B B B ESP Inserte la clavija de madera A en el panel de soporte 9 10 Inserte el perno de leva B en el pa...
Page 12: ...middle panel 2 Insert the wooden dowel A into the skirt 13 P 12 2 13 A A A A A A B B B Copyright 2016 by Walker Edison Furniture Co LLC All rights reserved ESP Inserte la clavija de madera A y el pern...
Page 13: ...the door stopper F to the skirt 13 and secure it by screw G P 13 3 13 14 15 A A A A A B F G B F G Copyright 2016 by Walker Edison Furniture Co LLC All rights reserved ESP Inserte el perno de leva B y...
Page 14: ...6 7 8 Insert the wooden dowel A into the side panel 4 P 14 x 2 4 5 6 7 8 A A A A A A A A B B B B Copyright 2016 by Walker Edison Furniture Co LLC All rights reserved ESP Inserte la clavija de madera A...
Page 15: ...lock C to attach the wooden legs 5 7 to the side panel 4 P 15 2 1 3 5 7 4 4 7 5 C Copyright 2016 by Walker Edison Furniture Co LLC All rights reserved ESP Use la cerradura de leva C para fajar la pata...
Page 16: ...pieds en bois 6 8 Repeat step 5 for wooden legs 6 8 P 16 2 1 3 8 6 4 4 6 8 C Copyright 2016 by Walker Edison Furniture Co LLC All rights reserved ESP Repita el paso 5 para las patas de madera 6 8 DE S...
Page 17: ...e skirt 14 and support leg 16 to the bottom panel 3 P 17 3 16 14 C C 2 1 3 Copyright 2016 by Walker Edison Furniture Co LLC All rights reserved ESP Use la cerradura de leva C para fijar la falda 14 y...
Page 18: ...attach the face plate 11 12 to the support panel 9 10 P 18 9 11 10 12 C C C C 2 1 3 ESP Use la cerradura de leva C para fajar la placa frontal 11 12 a el panel de soporte 9 10 DE Frontplatte 11 12 mi...
Page 19: ...to the bottom panel 3 and secure it by bolt H and wrench U P 19 9 10 3 H U Copyright 2016 by Walker Edison Furniture Co LLC All rights reserved ESP Fije el panel lateral 9 10 al panel inferior 3 y f...
Page 20: ...d wrench U to attach the support panel 15 P 20 2 15 13 C C H H U 2 1 3 Copyright 2016 by Walker Edison Furniture Co LLC All rights reserved ESP Ponga el panel central 2 al rev s y utilice el cierre de...
Page 21: ...bolts C to secure the middle panel 2 into the support panel 9 10 P 21 2 1 3 9 10 2 C C Copyright 2016 by Walker Edison Furniture Co LLC All rights reserved ESP Use los pernos de leva C para fijar el...
Page 22: ...panel 3 and skirt 13 14 and secure it with cam lock C P 22 4 5 7 2 3 13 14 18 C C 2 1 3 Copyright 2016 by Walker Edison Furniture Co LLC All rights reserved ESP Inserte el panel trasero 18 en la ranur...
Page 23: ...en bois 6 8 Repeat step 12 for wooden legs 6 8 P 23 18 6 8 4 2 3 13 14 C C 2 1 3 Copyright 2016 by Walker Edison Furniture Co LLC All rights reserved ESP Repita el paso 12 para las patas de madera 6...
Page 24: ...tand up right and place the back panel 17 in the slot in the legs P 24 17 Copyright 2016 by Walker Edison Furniture Co LLC All rights reserved ESP Coloque el soporte derecho y coloque el panel trasero...
Page 25: ...el 1 on the stand and secure it with the cam locks C P 25 1 4 4 15 C C C 2 1 3 ESP Coloque el panel superior 1 sobre el soporte y f jelo con los cierres de leva C DE Obere Platte 1 auf den St nder ste...
Page 26: ...T and plastic wedge S to secure the back panel 17 18 P 26 S T 17 18 18 Copyright 2016 by Walker Edison Furniture Co LLC All rights reserved ESP Use el tornillo de cabeza plana T y la cu a de pl stico...
Page 27: ...s cames de soutien Use the stickers W to cover the cam locks P 27 W W W W Copyright 2016 by Walker Edison Furniture Co LLC All rights reserved ESP Use la pegatina W para cubrir los cierres de leva DE...
Page 28: ...support pin R into the stand and place the wooden shelf 19 on top P 28 19 19 R R Copyright 2016 by Walker Edison Furniture Co LLC All rights reserved ESP Inserte el perno de soporte de la estanter a R...
Page 29: ...emble the fireplace insert D to the stand and secure it P 29 Copyright 2016 by Walker Edison Furniture Co LLC All rights reserved D ESP Ensamble el inserto de la chimenea D en el soporte y f jelo DE M...
Page 30: ...ce insert in place P 30 D Z O 10 Copyright 2016 by Walker Edison Furniture Co LLC All rights reserved ESP Aseg rese de que el inserto de la chimenea est colocado completamente hacia adelante en su lug...
Page 31: ...ce insert in place P 31 D 9 Z O Copyright 2016 by Walker Edison Furniture Co LLC All rights reserved ESP Aseg rese de que el inserto de la chimenea est colocado completamente hacia adelante en su luga...
Page 32: ...ciforme conform ment au sch ma Fije el perno M en las partes 20 21 luego use el tornillo L para fijar la bisagra de la puerta N en la parte 20 use el tornillo L para fijar la bisagra de la puerta P en...
Page 33: ...rme conform ment au sch ma Fije el perno M en las partes 20 21 luego use el tornillo L para fijar la bisagra de la puerta N en la parte 20 use el tornillo L para fijar la bisagra de la puerta P en la...
Page 34: ...13 Insert the plastic pivot Q into the bottom panel 3 and skirt 13 P 34 13 3 Q ESP Inserte el pivote de pl stico Q en el panel inferior 3 y la falda 13 DE Kunststoffgelenk Q in untere Platte 3 und Ra...
Page 35: ...13 and secure the door hinge P with screw L P 35 20 21 13 3 L L P N P N Q ESP Inserte la bisagra de la puerta P en el pivote de pl stico Q del panel inferior 3 Fije la bisagra de la puerta N al pivot...
Page 36: ...locatable bande de sortie puissance ESP No comparta un enchufe con otros electrodom sticos cuando utilice chimeneas el ctricas utilice un enchufe espec fico Nunca se utilice con un cable de extensi n...
Page 37: ...Step 26 P 37 Final Assembly Copyright 2016 by Walker Edison Furniture Co LLC All rights reserved...