P.5
Copyright
©
2019 b
y
Walker Edison Furniture Co., LLC. All rights reserved.
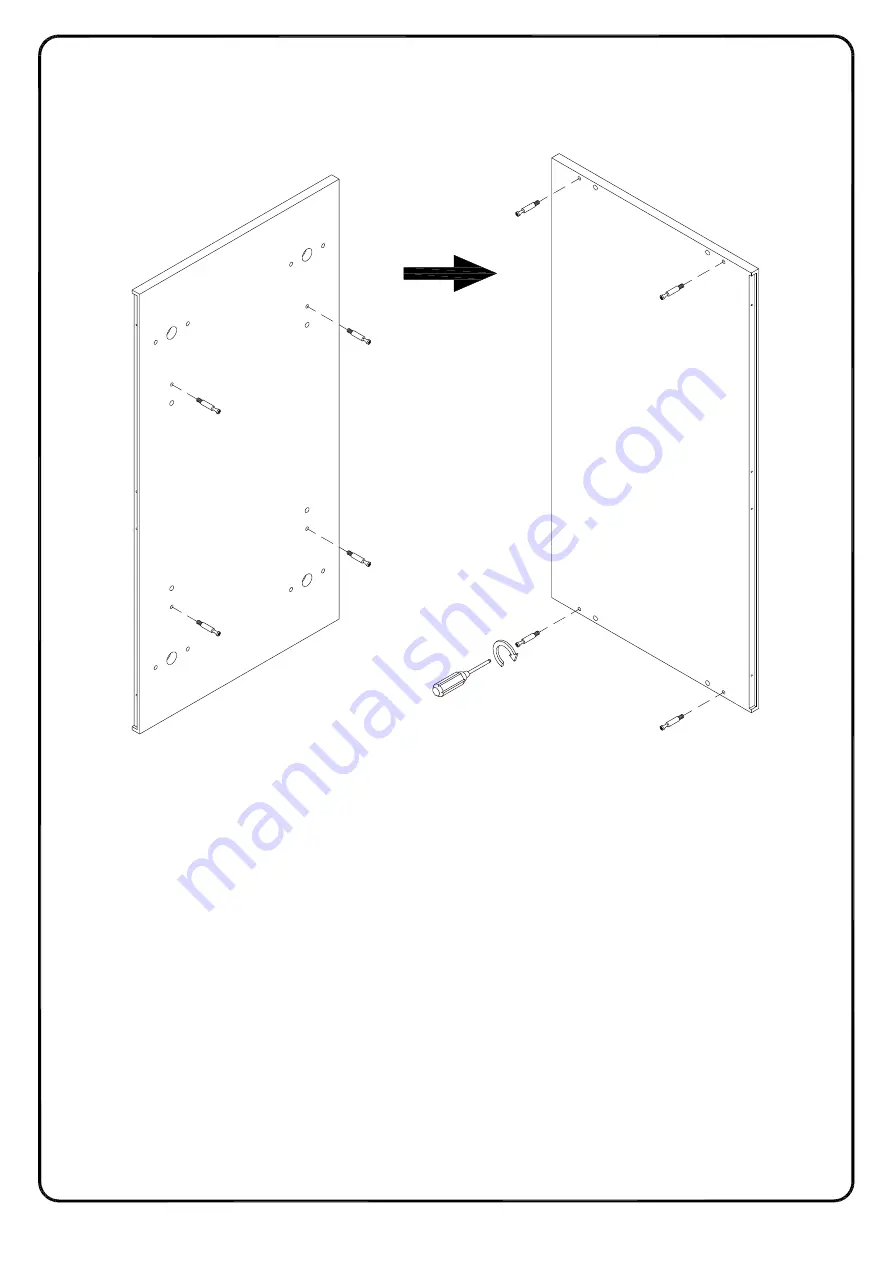
Step 1
3
B
Secure cam bolt (B) into part (3) with Philips head screwdriver as per diagram.
Page 1: ...Furniture Co LLC All rights reserved Please visit our website for the most current instructions assembly tips report damage or request parts www walkeredison com Revised 30 12 2019 E Walker Edison TM...
Page 2: ...riate hole for the dowel place a small amount of glue in the hole and insert the dowel Wipe away excess glue immediately In future assembly steps when dowels are necessary to attach assembly parts tog...
Page 3: ...P 3 Parts List Copyright 2019 by Walker Edison Furniture Co LLC All rights reserved 1 2 3 2 4 9 5 6 8 7 7...
Page 4: ...x30mm Wooden dowel A 12 pcs 6x32mm Cam bolt B 12 pcs 15x9 5mm Cam lock C 12 pcs Sticker D 12 pcs E F G H J K L M Shelf support pin N 4 pcs P Q R S 1 pc 4x18mm Handle Bolt 4 pcs Handle 2 pcs Europe hin...
Page 5: ...P 5 Copyright 2019 by Walker Edison Furniture Co LLC All rights reserved Step 1 3 3 B B B B B B B B Secure cam bolt B into part 3 with Philips head screwdriver as per diagram...
Page 6: ...Edison Furniture Co LLC All rights reserved Step 2 x 2 1 2 A A A A B B B B Q R Insert wooden dowel A into part 2 secure cam bolt B into part 1 using screw Q attach stopper R to part 1 with Philips hea...
Page 7: ...19 by Walker Edison Furniture Co LLC All rights reserved x 2 7 A A F F G G H H W X X Insert wooden dowel A to part 7 then using bolt F with lock washer H flat washer G secure plate X to part 7 with he...
Page 8: ...Step 4 P 8 Copyright 2019 by Walker Edison Furniture Co LLC All rights reserved 2 1 3 1 2 C C Using cam lock C secure part 2 to part 1 with Philips head screwdriver as per diagram...
Page 9: ...P 9 Copyright 2019 by Walker Edison Furniture Co LLC All rights reserved Step 5 2 1 3 1 2 C C Using cam lock C secure part 2 to part 1 with Philips head screwdriver as per diagram...
Page 10: ...P 10 Copyright 2019 by Walker Edison Furniture Co LLC All rights reserved Step 6 2 1 3 2 2 3 C C C C Using cam lock C secure part 3 to part 2 with Philips head screwdriver as per diagram...
Page 11: ...ep 7 2 1 3 3 7 7 C C C C D D E G H W X X X X Using cam lock C secure part 7 to part 3 with Philips head screwdriver and using bolt E with lock washer H flat washer G secure plate X to part 3 with hex...
Page 12: ...12 Copyright 2019 by Walker Edison Furniture Co LLC All rights reserved Step 8 1 2 2 3 5 9 P P P P P P P P P P Using screw P attach parts 5 9 to parts 1 2 with Philips head screwdriver as per diagram...
Page 13: ...Finished edge 2 2 4 J J J J J J Insert shelf support pin J into part 2 as per diagram Make sure you place the four shelf support pins J in the same level So the shelf is not titled Put part 4 into uni...
Page 14: ...dison Furniture Co LLC All rights reserved Step 10 K K K K L L M M M M N N N N 6 8 Using screw N attach Europe hinge M to parts 6 8 then using handle bolt K secure handle L to parts 6 8 with Philips h...
Page 15: ...P 15 Copyright 2019 by Walker Edison Furniture Co LLC All rights reserved Step 11 2 2 6 8 M N N N N Using screw N attach Europe hinge M to part 2 with Philips head screwdriver as per diagram...
Page 16: ...ison Furniture Co LLC All rights reserved Step 12 1 S U 9 Using screw S attach Velcro strap U into part 9 to part 1 with Philips head screwdriver as per diagram Open and close the doors if necessary a...
Page 17: ...ure from tipping over we recommend that it is permanently fixed to the wall Wall anchor and hardware are included with this product Please make sure hardware is suitable for your walls before installi...
Page 18: ...P 18 Copyright 2019 by Walker Edison Furniture Co LLC All rights reserved Step 14 Final Assembly...