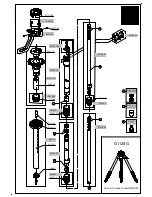
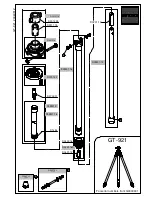
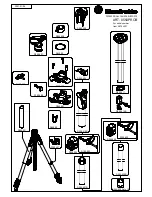
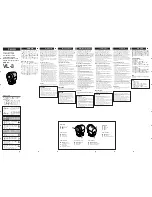
Mounting for horizontal shootings – only with handles
Step I
Screw off the holder on the joint of the floating head (F) for the
monopod (A) and exchange it with the handle (B).
Step II
Screw the standard handle (C) on the floating head (F). You can
furthermore fix the remote support with reflector (E) on the wheel
bolt of the floating head (F). The remote control from your camcorder
can be attached to the support.
Step III
Mount the camera on the quick-release plate and make sure, that it is
mounted firmly and securely on the floating head (F). Put the floating
head (F) with the rigid mount on the weight (D).
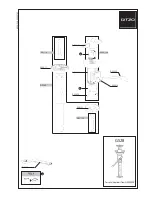
Mounting for ground near shootings
Step I
Screw the standard handle (C) on the floating head (F). You can
furthermore fix the remote support with reflector (E) on the
wheel bolt of the floating head (F). The remote control from
your camcorder can be attached to the support.
Step II
Insert the floating head (F) into the monopod (A) with the yoke.
Let it snap into place und tighten the butterfly screw firmly.
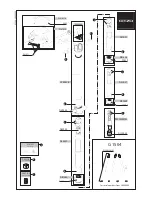
Step III
Put the weight (D) in the rigid mount on the floating head (F).
Let it snap into place und tighten the butterfly screw firmly.
Step IV
Mount the camera on the quick-release plate and make sure,
that it is mounted firmly and securely on the floating head (F).
Adjust the required height of the monopod. You can adjust the
smooth-running of the joint through the X/Y drag knobs.