background image

5

6

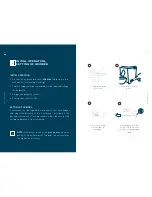
INITIAL OPERATION

1. Place mill on a ground surface. 

Attention:

 Never place the    

    mill on a hot surface (eg stovetop)

2. Check if supply voltage corresponds to the required voltage  
    for the device  

3. Plug power plug into socket.

4. Press power switch to ON.

SETTING OF GRINDER

Coarseness can be regulated continuously. Just turn hopper 
and adjust the distance of the 2 millstones according to the 
desired coarseness. A locking screw on the side assures the 
setting and prevents from loosening. 

INITIAL OPERATION, 
SETTING OF GRINDER

!

NOTE: 

Efficiency & result of the grinding depend on the 

quality of the mill material. The drier the mill material, 
the higher the efficiency. 

3

3. Release locking 

screw in order to 

urn hopper 

1

1. Plug power plug 

into socket

2

2. Press power switch 

to ON

4

4. urn hopper in the di-

rection of >MIKRO< until 

you hear a slight grinding 

sound.

0

MIKRO

20

10

fein

grob

MILL

 COMBI

 ST

AR

MILL

 COMBI

 ST

AR

Summary of Contents for COMBI STAR

Page 1: ...SHHH WE ARE GRINDING AND FLAKING USER GUIDE CERTIFICATE OF WARRANTY COMBI STAR...

Page 2: ...craft 100 made in Tyrol M I L L C O M B I S TA R GETREIDEM HLEN WALDNER BIOTECH GMBH K rntnerstra e 62 A 9900 Lienz Osttirol 43 0 4852 70 200 office waldner biotech at www waldner biotech at design ab...

Page 3: ...R KG Squeezer output Squeezer Hopper capacity flaker Volt Hertz Watt flaker 80 g min 2 rolls of stainless steel 120 g 230 50 240 2 M I L L C O M B I S TA R COMPONENTS 1 2 3 5 6 7 8 9 10 11 1 Cover hop...

Page 4: ...connected from the power supply The device may not be used by children Keep device and power cable away from children ATTENTION Misuse can cause injuries SAFETY Never immerse the device into water Onl...

Page 5: ...illstones according to the desired coarseness A locking screw on the side assures the setting and prevents from loosening INITIAL OPERATION SETTING OF GRINDER NOTE Efficiency result of the grinding de...

Page 6: ...red coarseness HELP Clean hopper and output see also chapter CLEANING Dry the mill material The flour output is blocked Device stops during grinding process REASON Overheating of the motor HELP The de...

Page 7: ...9 10 PASSION FOR DETAIL M I L L C O M B I S TA R M I L L C O M B I S TA R...

Page 8: ...ing the cover When closing make sure the cover is in place properly The device has a safety button When removing the cover the motor stops automatically children pro tection The device is free of serv...

Page 9: ...ice or corn or by using a brush Never use sharp items or chemicals for the clea ning of the housing Open the mill The device can be opened easily by removing the hopper When closing make sure the hopp...

Page 10: ...lstones misuse eg device not used properly sc arce care and cleaning nonobservance of the user guide damages during transport and droppage also excluded are damages due to non corresponding power supp...

Page 11: ...ly after purchase the conditions and functionality of the device and to re port possible defects immediately to vendor Only authorized customer service is allowed to render all type of services Proof...

Reviews: