


3.
Attaching Your Bicycle
Shift your bicycle chain to the smallest sprocket in the front and rear, release the brake caliper quick release (if
equipped), open the quick release skewer and remove the rear wheel. Place your rear wheel away from the area in
which you will be using your KICKR PowerTrainer to prevent damage to the equipment.
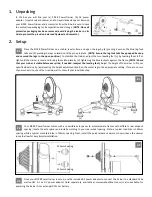
Check that the quick release skewer on your KICKR PowerTrainer is loose and in the open position. Align the bicycle so
the dropouts are over the trainer quick release and the cassette is inside the loop created by the chain (a). Ensure
that the chain is resting on the smallest sprocket before lowering the dropouts onto the axle (b).
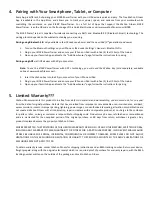
Ensure the dropouts are fully seated on the trainer axle before securing your bicycle by tightening the quick release
acorn nut and clamping the quick release lever shut. When the lever is ‘open’ it will curve away from the bicycle
frame (a); once the lever has been ‘closed’ it will curve towards the bicycle frame (b).
Be sure that the quick release skewer is completely tightened before riding the
KICKR PowerTrainer. The lever should require significant effort to close and
should leave a defined imprint on your hand. Failure to properly tighten the quick release may result
in property damage or personal injury. If you are unsure of the proper tension please consult your
local bike shop or contact Wahoo Fitness for assistance. DO NOT ride the KICKR PowerTrainer if you
believe your quick release skewer is not properly installed.
3.3
(a)
(b)
3.2
(a)
(b)
3.1
3.2
3.3
WARNING!