7
Plotter IP350
5. Operation
Once you have installed the VP 500 and connected the power supply and data cable you can
turn the plotter on.
IMPORTANT:
Before turning the device on, please ensure that there are no objects on the writing/plotting area
which might prevent the writing arm from moving freely.
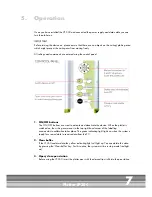
All settings and commands are entered using the control panel.
1. ON/OFF buttons
The ON/OFF buttons are used to activate and deactivate the device. When the plotter is
switched on, the writing arm moves to the top right-hand corner of the labelling
area and auto calibration takes place. The green indicating light lights up when the system is
ready for use and able to receive data from the PC.
2. Clear buffer
If the IP 350 contains data the yellow indicating light will light up. You can delete this data
by pressing the 'Clear buffer' key. For this action, the system must be in stop mode (red light
on).
3. Open/ close pen station
Before using the IP 350, insert the plotter pens with the desired tip width into the pen station.
Summary of Contents for IP 350
Page 1: ...Manual Plotter IP 350...


