background image

iOnBoost

 Slim by Wagan Tech

®

8

www.wagan.com

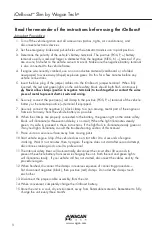
Read the remainder of the instructions before using the iOnBoost!

Jumpstart Procedure

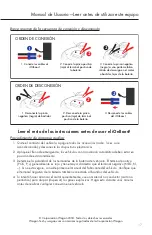
1.  Turn off the vehicle ignition and all accessories (radios, lights, air conditioners), and 

disconnect electronic devices. 

2.  Set the emergency brake and put vehicles with automatic transmission in park position. 
3.  Determine the polarity of the vehicle’s battery terminals. The positive (POS, P, +) battery 

terminal usually is red and larger in diameter than the negative (NEG, N, −) terminal. If you 

are unsure, first refer to the vehicle owner’s manual. Make sure the negative battery terminal 

is also connected to the vehicle frame.

4.  If engine was recently cranked, use a non conductive material (cardboard or a folded 

newspaper) to wave away (dispel) explosive gases. Do this for a few minutes before any 

vehicle connections.

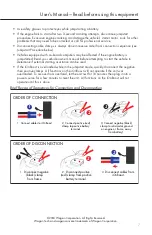
5.  Insert the blue plug of the jumper cables into the iOnBoost’s jumper terminal. When fully 

inserted, the red and green lights on the cable safety block should both flash continuously. 


Never allow clamps (positive & negative terminals) to touch together or contact the same 

piece of metal to prevent short-circuits and arcing�


6.  Securely connect the positive (+) red clamp to the positive (POS, P, +) terminal of the vehicle 

battery or the remote positive (+) terminal if equipped.

7.  Securely connect the negative (−) black clamp to a non-moving, metal part of the engine or 

frame as far away from the vehicle battery as possible.

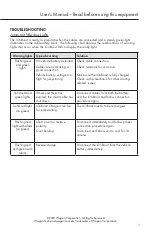
8.  When the clamps are properly connected to the battery, the green light on the cable safety 

block will illuminate (a three-second delay is normal). When the light illuminates steady 

green, it is safe to proceed in these instructions. If the light fails to illuminate steady green or 

if any red lights illuminate, consult the troubleshooting section of this manual.

9.  Place unit on a secure surface away from moving parts. 
10. Start vehicle engine. Stop if the vehicle does not start after 3 to 4 seconds of engine 

cranking. Wait 3 to 4 minutes, then try again. If engine does not start after second attempt, 

discontinue cranking and consult a professional.

11. The internal safety timer will automatically disconnect the circuit after 30 seconds to 

prevent the vehicle battery from reverse charging the unit. Both the red and green lights 

will illuminate steady.  If your vehicle still has not started, disconnect the cables and try the 

procedure again.

12. When finished, disconnect the clamps in reverse sequence of connecting procedure— 

first disconnect negative (black), then positive (red) clamps. Do not let the clamps touch  

each other.

13. Disconnect the jumper cable assembly from the unit. 
14. When convenient, completely charge the iOnBoost battery. 
15. Store the unit in a cool, dry environment, away from flammable materials. Remember to fully 

charge the unit every three months. 

Summary of Contents for iOnBoost SLIM

Page 1: ...ANC DE BATTERIE Item No Artículo No Article n 7504 User s Manual Manual de Usuario Guide d Utilisation Please visit our website for the latest information on this product Visite nuestro sitio web para obtener la información más reciente sobre este producto Veuillez visiter notre site Internet pour obtenir les dernières informations sur ce produit ...

Page 2: ...12 Especificaciones 13 Cuidado y Mantenimiento 13 Carga por USB 15 Verificación del estado de la batería 15 Arrancador Auxiliar 15 Solución de Problemas 19 Uso de la Conexión USB 20 Linterna LED 20 Eliminación Adecuada 20 TABLE DES MATIÈRES Information Importante 22 Avertissements Généraux 22 Fonctionnalités 23 Spécifications 23 Charger le USB 25 Vérifier l état de la pile 25 Batterie d Appoint 25...

Page 3: ...e appliance by a person responsible for their safety For proper and safe operation of any accessory outlet do not place anything in it except the plug of the accessory to be used Use only the charging adapters and jumpstarting clamps provided in this package Unauthorized parts may cause serious damage or injury Wear complete eye and clothing protection when jumpstarting a vehicle Do not touch eyes...

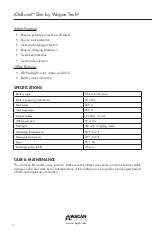
Page 4: ...thium ion Polymer Battery capacity watt hours 20 0 Wh Peak amps 300 A Cranking amps 200 A Jumper cables 10 AWG 13 inch USB power port 5V 2 0 A Flashlight LED with 3 lighting modes Operating temperatures 32 F 140 F Storage temperatures 32 F 140 F Input 5V 1 0A Recharging time USB 2 hours CARE MAINTENANCE This unit may be stored in any position Make sure the clamps are secure inside the booster cabl...

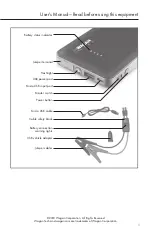
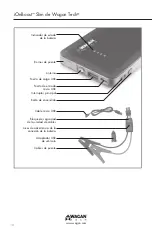
Page 5: ...f Wagan Corporation User s Manual Read before using this equipment 5 Battery status indicator Jumper terminal Flashlight USB power port Micro USB input port Master switch Power button Micro USB cable Cable safety block Battery connection warning lights USB vehicle adapter Jumper cables ...

Page 6: ...3 Press the Power button once 4 Turn off the master switch when finished JUMPSTARTER JUMPSTART WARNINGS Failure to follow these instructions may cause damage or explosion NOTE Cranking an engine produces an accumulation of explosive gas above and near the vehicle battery Before any attempt to jumpstart a vehicle battery make sure explosive gas is dispelled from the area Use a cardboard or newspape...

Page 7: ...al before attempting to start the vehicle to determine if external starting assistance can be used If the iOnBoost is overloaded while in the jumpstart mode quickly disconnect the negative then positive clamps All functions on the iOnBoost will not operate if the unit was overloaded To recover from overload let the unit rest for 10 minutes then plug it into a power source for a few minutes to rese...

Page 8: ...Securely connect the negative black clamp to a non moving metal part of the engine or frame as far away from the vehicle battery as possible 8 When the clamps are properly connected to the battery the green light on the cable safety block will illuminate a three second delay is normal When the light illuminates steady green it is safe to proceed in these instructions If the light fails to illumina...

Page 9: ...icle battery voltage too high for jumpstarting Check cable connection Check terminals for corrosion Make sure the iOnBoost is fully charged Check with a mechanic for other starting related issues Solid red and green lights 30 second timer has expired the smart cable has shut down Disconnect cables from both the battery and the iOnBoost and follow connection procedure again Solid red light no green...

Page 10: ...IGHT If the charge in the iOnBoost is low the light will shut off to prevent damage to the iOnBoost Recharge the iOnBoost as soon as convenient 1 Turn on the master switch 2 Hold down the Power button for 3 seconds to turn on the light 3 Short press to cycle through the lighting modes 1 strobe 2 S O S 3 off or long press to turn off from any mode 4 Turn off master switch when done 5 Recharge batte...

Page 11: ... liability in connection with the sale of our products There shall be no claims for defects or failure of performance or product failure under any theory of tort contract or commercial law including but not limited to negligence gross negligence strict liability breach of warranty and breach of contract Returns WAGAN Corp cannot refund products As a manufacturer we can only offer replacements for ...

Page 12: ...sona responsable de su seguridad Para la operación correcta y segura de cualquier toma para accesorios no coloque nada allí excepto el conector del accesorio a utilizar Utilice únicamente los adaptadores de carga y pinzas de puente suministradas con este paquete Las piezas no autorizadas pueden causar daños o lesiones graves Utilice protección para los ojos y para la ropa al puentear un vehículo N...

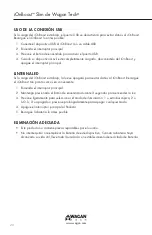
Page 13: ...ión de sobrecargas Otras Características Linterna LED luz permanente estroboscópica y S O S Indicadores de estado de la batería ESPECIFICACIONES Tipo de batería Polímero de iones de litio Capacidad de la batería vatios hora 20 0 Wh Amp pico 300 A Amperios de arranque 200 A Cables de puente 10 AWG 33 0 cm Puerto de carga USB 5 V 2 0 A Linterna LED con 3 modos de iluminación Temperatura de funcionam...

Page 14: ...atería Bornes de puente Linterna Puerto de carga USB Puerto de entrada micro USB Interruptor principal Botón de encendido Cable micro USB Bloque de seguridad de la unidad de cables Luces de advertencia de la conexión de la batería Adaptador USB de vehículo Cables de puente ...

Page 15: ...rgue completamente la unidad aproximadamente 2 horas La carga estará completa cuando las luces del indicador de estado de la batería permanezcan encendidas 4 Una vez completada la carga desconecte el cable USB VERIFICACIÓN DEL ESTADO DE LA BATERÍA 1 Encienda el interruptor principal 2 Espere 3 segundos 3 Presione una vez el botón de encendido 4 Apague el interruptor principal al finalizar ARRANCAD...

Page 16: ...car excesivamente puede dañar el motor de arranque del vehículo Podría ser necesario solucionar otros problemas solicite asistencia profesional La desconexión de las pinzas de los cables siempre se hace en forma inversa a la conexión consulte el Procedimiento de arranque auxiliar a continuación Los vehículos con computadora de abordo podrían sufrir daños si se puentea la batería Lea el manual del ...

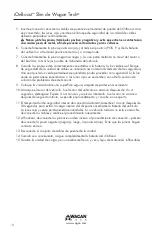
Page 17: ...trucciones antes de usar el iOnBoost Procedimiento de arranque auxiliar 1 Quite el contacto del vehículo apague todos los accesorios radio luces aire acondicionado y desconecte los dispositivos electrónicos 2 Aplique el freno de emergencia los vehículos con transmisión automática deben estar en posición de estacionamiento 3 Determine la polaridad de los terminales de la batería del vehículo El ter...

Page 18: ...manece encendida o si las luces rojas se encienden consulte la sección de solución de problemas de este manual 9 Coloque la unidad sobre una superficie segura alejada de partes en movimiento 10 Arranque el motor del vehículo Si el motor del vehículo no arranca después de 3 o 4 segundos deténgase Espere 3 o 4 minutos y vuelva a intentarlo Si el motor no arranca después del segundo intento suspenda ...

Page 19: ... de la batería del vehículo muy alto para puentear Verifique la conexión de los cables Verifique que no haya corrosión en los terminales Verifique que el iOnBoost tenga carga completa Por otros problemas con el arranque consulte a un mecánico Luz roja y verde permanecen encendidas Finalizaron los 30 segundos del temporizador el cable inteligente se desconectó Desconecte los cables de la batería y ...

Page 20: ...aja la luz se apagará para evitar daños al iOnBoost Recargue el iOnBoost tan pronto como sea conveniente 1 Encienda el interruptor principal 2 Mantenga presionado el Botón de encendido durante 3 segundos para encender la luz 3 Presione ligeramente para seleccionar el modo de iluminación 1 estroboscópica 2 S O S 3 apagado o presione prolongadamente para apagar cualquier modo 4 Apague el interruptor...

Page 21: ...o falla de funcionamiento o falla del producto bajo ninguna interpretación del derecho de responsabilidad civil contractual o comercial sin limitarse a negligencia negligencia grave responsabilidad objetiva violación de garantía y violación de contrato Devoluciones WAGAN Corp no puede hacer devoluciones de productos Como fabricante sólo podemos ofrecer cambios de unidades defectuosas que estén cub...

Page 22: ...rsonne responsable de leur sécurité ou qu ils elles aient reçu les instructions concernant l utilisation correcte et les avertissements concernant l appareil Pour un bon fonctionnement et une sécurité optimale de toute prise accessoire n insérez rien à l intérieur de celle ci à l exception de la fiche de l accessoire à être utilisé Utilisez uniquement les adaptateurs de charge et les pinces de dém...

Page 23: ...els que tablettes liseuses électroniques téléphones cellulaires et plus encore Caractéristiques de sécurité 2 ports d alimentation USB avec sortie 2 0 A chacun Protection contre les courts circuits Protection contre la décharge excessive Protection contre la charge inversée Protection contre la surchauffe Protection contre la surcharge Autres fonctionnalités Lampe torche à DEL fixe stroboscopique ...

Page 24: ...de raccordement Lampe torche Port d alimentation USB Port d entrée pour Micro USB Interrupteur principal Bouton de mise en marche Câble micro USB Bloc de sécurité du câble de l appareil Lumières d avertissement de la connexion de la batterie Adaptateur USB pour véhicule Câbles d appoint ...

Page 25: ...La charge est terminée lorsque les voyants lumineux indicateurs de l état de la pile s illumineront sans clignoter 4 Lorsque la charge est terminée débranchez le câble USB VÉRIFIER L ÉTAT DE LA PILE 1 Allumez l interrupteur principal 2 Attendez pendant 3 secondes 3 Appuyez une fois sur le bouton d alimentation 4 Éteignez le bouton d alimentation lorsque terminé BATTERIE D APPOINT AVERTISSEMENT POU...

Page 26: ...endommager le moteur du démarreur du véhicule Recherchez d autres problèmes devant être corrigés ou demandez une assistance professionnelle La déconnexion des pinces du câbles est toujours faite dans l ordre inverse de la séquence de connexion voir la procédure de démarrage de secours ci dessous Les véhicules équipés d ordinateurs de bord peuvent être affectés si la batterie du moteur subi un déma...

Page 27: ...ESTE DES INSTRUCTIONS AVANT D UTILISER LE IONBOOST Procédure de démarrage de secours 1 Coupez le contact du véhicule et de tous les accessoires radios feux climatiseurs et débranchez les appareils électroniques 2 Actionnez le frein d urgence et mettez les véhicules avec transmission automatique en position de stationnement 3 Déterminez la polarité des bornes de la batterie du véhicule La borne pos...

Page 28: ... est sécuritaire de poursuivre avec ces instructions Si le voyant ne s allume pas en vert constant consultez la section de dépannage de ce manuel 9 Placez l appareil sur une surface sécurisée à l écart des pièces mobiles 10 Allumez le moteur du véhicule Arrêtez si le véhicule ne démarre pas après 3 à 4 seconde de démarrage de secours Attendez 3 à 4 minutes puis essayez de nouveau Si le véhicule ne...

Page 29: ...La tension de la batterie du véhicule est trop élevée pour utiliser une batterie d appoint pour la faire démarrer Vérifier la connexion du câble Vérifier les bornes pour la corrosion S assurer que le iOnBoost est complètement chargé Vérifier auprès d un mécanicien pour d autres problèmes liés au démarrage Voyants rouge et vert fixes La minuterie de 30 secondes a expiré le câble intelligent s est a...

Page 30: ...tenir le bouton d alimentation pendant trois secondes pour allumer la lumière 3 Appuyer rapidement pour faire défiler les modes d éclairage 1 stroboscopique 2 SOS 3 arrêt ou appui long pour éteindre tout mode 4 Éteignez l interrupteur principal lorsque terminé 5 Recharger la batterie dès que possible ENTRETIEN ET MAINTENANCE Cet appareil peut être rangé dans n importe quelle position Assurez vous ...

Page 31: ... défaillance de fonctionnement ou la défaillance du produit sous tout autre principe de droit ou d équité contrat ou loi commerciale incluant mais non limité à la négligence grossière négligence responsabilité absolue bris de garantie et bris de contrat Retours WAGAN Corporation ne peut rembourser les produits En tant que fabricant nous pouvons uniquement offrir des remplacements pour les articles...

Page 32: ...oration All Rights Reserved Wagan Tech and wagan com are trademarks of Wagan Corporation Corporación Wagan 2018 Todos los derechos reservados Wagan Tech y wagan com son marcas registradas de la Corporación Wagan 2018 Wagan Corporation Tous droits réservés Wagan Tech et wagan com sont des marques de commerce utilisées par Wagan Corporation REV20180109 ESF ...

Reviews: