background image

EN

71

AirConServiceCenter

Overview of the AirConServiceCenter

6

Overview of the AirConServiceCenter

6.1

Front

1

Low pressure gauge

2

Red “Fill” lamp

3

Blue “Evacuate” lamp

4

Green “Suction” lamp

5

High pressure gauge

6

Display

7

Keypad

8

Front cover

9

Front wheels with wheel stops

10

Service hose for low pressure connection (blue)

13

12

3

4

5

9

8

7

6

2

16

15

11

10

14

1

Summary of Contents for AirConServiceCenter ASC1000G

Page 1: ...enungsanleitung EN 62 Air conditioning service unit Operating manual ES 120 Estación de mantenimiento de aire acondicionado Instrucciones de uso FR 180 Poste de service climatisation Notice d utilisation RU 240 Станция по обслуживанию кондиционеров Инструкция по эксплуатации ...

Page 2: ......

Page 3: ...triebnahme 14 7 1 Aufstellen und Einschalten 14 7 2 Stand by Menü 15 7 3 Sprachauswahl 15 7 4 Firmendaten eingeben 16 7 5 Datum und Uhrzeit eingeben 17 7 6 Vorgabewerte ändern 18 7 7 Behälter für Öle und UV Additiv einsetzen 19 7 8 Behältergröße eingeben nur für ASC2000G ASC3000G 20 7 9 Auffüllen des internen Kältemittelbehälters 21 8 Betrieb 23 8 1 Schnellstart 23 8 2 Benutzercodes 25 8 3 Persönl...

Page 4: ... 9 5 Vakuumpumpenöl wechseln 49 9 6 Zählerstände 51 9 7 Füllmengenkorrektur bei längeren Serviceschläuchen 53 9 8 Druckerpapier erneuern 53 9 9 Softwareupdate über USB durchführen 54 9 10 Reinigung und Pflege 55 10 Entsorgung 56 10 1 Entsorgung der rückgewonnenen Flüssigkeiten 56 10 2 Verpackungsmaterial entsorgen 56 10 3 Entsorgung des Altgerätes 56 11 Was tun wenn 57 12 Technische Daten 60 ...

Page 5: ...sen Sie diese Bedienungs anleitung aufmerksam durch Beachten Sie darüber hinaus auch Das Schulungshandbuch Fahrzeugklimatisierung Technische Grundlagen von Dometic WAECO Die Informationsbroschüre Fahrzeugklimatisierung Gesetzliche Grundlagen von Dometic WAECO Hinweise der Kältemittelhersteller Eventuell in Ihrem Betrieb vorhandene spezielle Hinweise zur Wartung von Fahrzeug Klimaanlagen Bewahren S...

Page 6: ... ENTER drücken Fett Displaymeldungen Schnellstart Text Text Aufzählung in beliebiger Reihenfolge Sicherheitsdruckwächter Überdruckventile 1 Text 2 Text 3 Text Handlungsschritte die in der dargestellten Reihenfolge durchgeführt werden müssen 1 Gerät anschließen 2 Gerät einschalten 3 Auswahltaste drücken Text Ergebnis eines Handlungs schritts Gerät ist betriebsbereit Text 1 Teile Nummern die sich au...

Page 7: ...ßlich das Kältemittel R 134a Wird das Kälte mittel mit anderen Kältemitteln gemischt kann dies zu Schäden am AirConServiceCenter beziehungsweise an der Fahrzeug Klimaanlage führen Verwenden Sie ausschließlich WAECO UV Additive Werden andere UV Additive eingesetzt kann dies zu Schäden am AirConServiceCenter führen Tragen Sie persönliche Schutzausrüstung Schutzbrille und Schutz handschuhe und vermei...

Page 8: ...n Sie immer den Hauptschalter des AirConServiceCenters zum Ein bzw Ausschalten Lassen Sie das Gerät nicht unbeaufsichtigt solange es eingeschaltet ist Stellen Sie vor dem Ausschalten des AirConServiceCenters sicher dass das gewählte Programm beendet ist und dass alle Ventile geschlossen sind Sonst kann Kältemittel austreten Füllen Sie keine Druckluft in die Kältemittelleitungen des AirConServiceCe...

Page 9: ...te Zubehör wurden vor dem Versand sorgfältig kontrolliert Kontrollieren Sie nach der Anlieferung ob alle unten genannten Teile vor handen und unbeschädigt sind Informieren Sie bei fehlenden oder beschädigten Teilen umgehend das für den Transport verantwortliche Unternehmen ASC1000G Art Nr 9103301843 Bezeichnung Flaschenventiladapter für WAECO Kältemittelflaschen Adapter für 500 ml Frischöl und UV ...

Page 10: ... 100 Ölflasche 500 ml Testflasche UV Additiv für ca 10 Anwendungen Geräteschutzhaube Schutzbrille Schutzhandschuhe Bedienungsanleitung Bezeichnung Flaschenventiladapter für WAECO Kältemittelflaschen Adapter für 500 ml Frischöl und UV Kontrastmittelflasche Geschlossener Altölbehälter 500 ml Behälter für Klimaanlagen Kompressoröl Behälter für UV Kontrastmittel Frischölbehälter für zweite Ölsorte Est...

Page 11: ...ezeichnung Artikel Nr PAG Frischölflasche ISO 46 500 ml 8887200013 PAG Frischölflasche ISO 100 500 ml 8887200014 UV Kontrastmittelflasche 500 ml TP 3820 500 Adapter für 500 ml Frischöl und UV Kontrastmittelflasche 4440600026 Ölbehälter für eine weitere Ölsorte 250 ml 4440600034 Altölbehälter 500 ml 4440600033 Ersatzfilter für Wartung 4440400009 Füllzylinder 4 4 kg als Kältemittelspeicher 888520000...

Page 12: ...6 1 Vorderseite 1 Niederdruckmanometer 2 Statusleuchte Rot Füllen 3 Statusleuchte Blau Evakuieren 4 Statusleuchte Grün Absaugen 5 Hochdruckmanometer 6 Display 7 Bedientastatur 8 Frontabdeckung 9 Feststellbare Vorderräder 10 Serviceschlauch Niederdruckanschluss blau 13 12 3 4 5 9 8 7 6 2 16 15 11 10 14 1 ...

Page 13: ...kanschluss rot 12 Servicekupplung für Hochdruckanschluss rot 13 Servicekupplung für Niederdruckanschluss blau 14 Drucker 15 USB Anschluss 16 Anzeigeeinheit 6 2 Rückseite 17 Frischöldose 500 ml 18 Behälter für UV Additiv 500 ml 19 Altölbehälter 20 Abdeckklappe 21 Hauptschalter 21 19 18 17 20 ...

Page 14: ...r SW Softwarestand DB Datenbank SN Seriennummer Anschließend läuft ein Software Test des AirConServiceCenters Zum Abschluss des Startvorgangs zeigt das AirConServiceCenter Folgendes ASC1000G ASC2000G ASC3000G HINWEIS Das Gerät muss während des Einsatzes fest auf einem waagerechten ebenen Untergrund stehen damit die Messungen korrekt durchgeführt werden können Dometic WAECO ASC2000G SW AS2k0046 DB ...

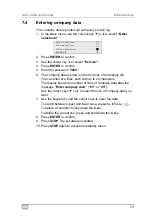
Page 15: ...itive Uhrzeit Datum 7 3 Sprachauswahl 1 Pfeiltasten oder drücken um ins Grundmenü zu gelangen 2 Im Grundmenü mit den Pfeiltasten oder Weitere Menues wählen 3 Zur Bestätigung ENTER drücken 4 Mit der Pfeiltaste Service wählen 5 Zur Bestätigung ENTER drücken 6 Passwort 5264 eingeben 7 Mit den Pfeiltasten oder die gewünschte Sprache wählen 8 Zur Bestätigung ENTER drücken 9 STOP drücken Die gewählte Sp...

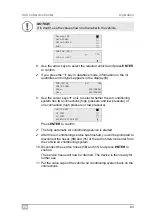
Page 16: ...rden Im Display erscheint die Zahl der angezeigten Firmendaten Zeile hinter der Meldung Firmendaten eingeben 01 bis 05 Mit den Pfeiltasten oder wird die gewünschte Firmendaten Zeile ausgewählt 7 Mit der Bedientastatur 7 und den Pfeiltasten die gewünschten Daten eingeben Zum Umschalten zwischen Groß oder Kleinbuchstaben die Info Taste drücken Zum Löschen einzelner Zeichen Taste C kurz drücken Zum L...

Page 17: ... mit den Pfeiltasten oder Weitere Menues wählen 2 Zur Bestätigung ENTER drücken 3 Mit der Pfeiltaste Service wählen 4 Zur Bestätigung ENTER drücken 5 Passwort 8463 eingeben 6 Mit der Bedientastatur und den Pfeiltasten die gewünschten Daten eingeben 7 Zur Bestätigung ENTER drücken 8 STOP drücken um in das Stand by Menü zu gelangen Schnellstart Einzelne Prozesse Weitere Menues ENTER OK ...

Page 18: ...er Weitere Menues wählen 2 Zur Bestätigung ENTER drücken 3 Mit der Pfeiltaste Service wählen 4 Zur Bestätigung ENTER drücken 5 Passwort 7388 eingeben 6 Mit der Bedientastatur und den Pfeiltasten die gewünschten Daten eingeben 7 Zur Bestätigung ENTER drücken 8 STOP drücken um in das Stand by Menü zu gelangen Parameter Vorgabe ab Werk Wartezeit für den Druckanstieg Min 5 Vakuumzeit Min 20 Vakuumkont...

Page 19: ...eigt 1 Abdeckklappe 20 an der linken Seite öffnen und Behälter an den Schnellverschlüssen aufstecken Behälter für frisches Öl 17 Behälter für UV Additiv 18 und Altölbehälter 19 2 Abdeckklappe 20 schließen 3 Behältergröße für Frischöl und UV Kontrastmittel eingeben siehe Kapitel Behältergröße eingeben nur für ASC2000G ASC3000G auf Seite 20 19 18 17 20 ...

Page 20: ...irConServiceCenter eingegeben werden 1 Im Grundmenü mit den Pfeiltasten oder Weitere Menues wählen 2 Zur Bestätigung ENTER drücken 3 Mit der Pfeiltaste Service wählen 4 Zur Bestätigung ENTER drücken 5 Passwort 2688 eingeben 6 Mit den Pfeiltasten die gewünschten Felder aktivieren die dunklen Felder sind aktiv 7 Zur Bestätigung ENTER drücken 8 STOP drücken um in das Stand by Menü zu gelangen Schnell...

Page 21: ...ttelflaschen mit Steigrohr Diese Kältemittelflaschen besitzen einen Anschluss Beim Befüllen des AirConServiceCenters muss sich der Anschluss oben befinden Flasche aufrecht stellen Kältemittelflaschen mit Steigrohr Diese Kältemittelflaschen besitzen zwei Anschlüsse Zum Befüllen des AirConServiceCenters wird der mit L liquid flüssig gekenn zeichnete Anschluss benutzt Beim Befüllen des AirConServiceC...

Page 22: ...ehälter wird befüllt Das Ende des Füllvorgangs wird durch ein akustisches Signal bestätigt Ventile schließen und mit ENTER bestätigen 6 Nach dem Befüllen wird die Menge des Kältemittels im internen Behälter angezeigt STOP drücken um das Menü zu verlassen Um in das Stand by Menü zu gelangen noch einmal STOP drücken Das Gerät ist nun betriebsbereit HD Schlauch mit ext Flasche verbinden und Ventile ö...

Page 23: ...nü Schnellstart wird ein vollautomatischer Klimaservice durchgeführt Es muss nur die Füllmenge nach dem Füllmengen aufkleber im Fahrzeug oder aus der Datenbank eingegeben werden Im Menü Schnellstart werden automatisch hintereinander ausge führt Absaugen des Kältemittels Recycling des Kältemittels Reinheit entspricht SAE J 2099 Prüfung des Druckanstiegs Ablassen des Altöls Evakuieren der Anlage Dic...

Page 24: ...hdruck oder Niederdruck Mit ENTER bestätigen Der vollautomatische Klimaservice wird gestartet Nachdem der Klimaservice beendet ist erscheint die Aufforderung die Serviceschläuche 10 und 11 des AirConServiceCenters von der Fahrzeug Klimaanlage abzukuppeln 10 Serviceschläuche 10 und 11 abkuppeln und zur Bestätigung ENTER drücken Die Serviceschläuche werden nun geleert Anschließend ist das Gerät für ...

Page 25: ...Bestätigung ENTER drücken 3 Mit der Pfeiltaste Service wählen und mit ENTER bestätigen 4 Passwort 9786 eingeben und mit ENTER bestätigen um ins Administratormenü ADM zu gelangen 5 Administratorcode 0000 Werkseinstellung eingeben und mit ENTER bestätigen I 6 Neuen Administratorcode eingeben Schnellstart Einzelne Prozesse Weitere Menues ENTER OK A C spülen Nullpunkt Waagen Service ENTER OK STOP EXIT...

Page 26: ...igen Benutzernamen eingeben und die Eingabe mit ENTER bestätigen I ADM AREA Confirm new code ADM AREA User number 1 ADM AREA User number 1 Insert new code ADM AREA User number 1 Confirm new code HINWEIS Mit der gelben Infotaste lässt sich zwischen Groß und Kleinschreibung umschalten ADM AREA User number 1 User name Max Mustermann ADM AREA User number 1 Max Mustermann HINWEIS Der User ist angelegt ...

Page 27: ...Benutzercodes angelegt so muss nun ein Code eingegeben werden um die Station freizugeben 1 Den jeweiligen Benutzercode eingeben Bei Eingabe eines falschen Benutzercodes wird folgende Fehler meldung angezeigt Nach erfolgreicher Eingabe wird die Station freigeschaltet und fährt hoch Der Name des Benutzers wird angezeigt ENTER USER CODE WRONG CODE Max Mustermann ...

Page 28: ...n Pfeiltasten oder Datenbank wählen und mit ENTER bestätigen 5 Personal DB wählen und mit ENTER bestätigen 6 In diese hier leere Datenbank mit den Pfeiltasten oder den jeweiligen Eintrag wählen und mit ENTER bestätigen 7 Zum Ändern der Einträge gelbe Taste Info drücken 8 In die freien Felder die Fahrzeugdaten Modell Typ eingeben und mit ENTER bestätigen Schnellstart Einzelne Prozesse Weitere Menue...

Page 29: ...lmenge eingeben und mit ENTER bestätigen Der Eintrag ist angelegt Sie können nun einen einen weiteren Eintrag anlegen mit den Pfeil tasten auswählen dann wie beschrieben oder mit der Taste STOP das Menü verlassen AUDI 0 A4 8E 2000 2004 g 500 AUDI 0 A4 8E 1 ...

Page 30: ...meldet die Station dass die gespeicherten Daten des vergangenen Jahres auf einen USB Stick übertragen werden sollen Wenn Sie die Jahresdaten auf einen USB Stick übertragen werden diese danach aus dem internen Speicher der Station gelöscht 1 Den USB Stick in den USB Anschluss 15 stecken 2 Den Displayanweisungen folgen HINWEIS Der USB Stick muss mit dem Dateisystem FAT32 formatiert sein HINWEIS Der ...

Page 31: ...tigung ENTER drücken 4 Mit der Pfeiltaste Service wählen und mit ENTER bestätigen 5 Passwort eingeben und mit ENTER bestätigen 4910 Monatsreport 4918 Jahresreport Falls kein USB Stick eingesteckt ist oder dieser nicht erkannt wird wird Error 52 angezeigt 6 Mit den Pfeiltasten oder den gewünschten Eintrag wählen und mit ENTER bestätigen 7 Den Displayanweisungen folgen 8 Mit STOP zur vorigen Auswahl...

Page 32: ...kt ausgedruckt werden 1 Im Grundmenü mit den Pfeiltasten oder Weitere Menues wählen 2 Zur Bestätigung ENTER drücken 3 Mit der Pfeiltaste Service wählen und mit ENTER bestätigen 4 Passwort 9051 eingeben und mit ENTER bestätigen 5 Mit den Pfeiltasten oder das gewünschte Jahr wählen und mit ENTER bestätigen Schnellstart Einzelne Prozesse Weitere Menues ENTER OK A C spülen Nullpunkt Waagen Service ENT...

Page 33: ...rch Drücken der Pfeiltaste wird die Monatsübersicht im Display dar gestellt Hier wurden im Januar 2015 insgesamt 2 400 g Kältemittel abgesaugt In der Monatsübersicht wird die eingefüllte und abgesaugte Menge immer im Wechsel angezeigt Die Übersicht lässt sich jederzeit durch Betätigen der Taste ENTER aus drucken Mit der Taste STOP wird die Übersicht beendet Von Klimaanlagen Total 2015 g 18650 PRIN...

Page 34: ...ltasten oder Weitere Menues wählen 5 Zur Bestätigung ENTER drücken 6 Mit den Pfeiltasten oder Klimaanlagentest wählen Es erscheint die Aufforderung die Klimaanlage zu kontrollieren 7 Hoch und Niederdruck der Klimaanlage gemäß den Hersteller angaben prüfen HINWEIS Der Klimaanlagentest kann nur bei Fahrzeugen durchgeführt werden die mit einem Niederdruck und einem Hochdruckanschluss bzw nur mit eine...

Page 35: ...isplaymeldungen werden angezeigt 10 Um den Klimaanlagentest zu beenden Taste STOP drücken HD Schnellkupplung der Klimaanlage entfernen ENTER OK HINWEIS Wenn Sie zum Entkoppeln der HD Schnellkupplung den Fahrzeug motor abgestellt haben so starten Sie diesen erneut und schalten Sie die Klimaanlage ein Warten Serviceschläuche werden geleert Programmende STOP EXIT ...

Page 36: ...zess wird ein Serviceprotokoll gedruckt 1 Die entsprechenden Anschlüsse des AirConServiceCenters zunächst mit der Fahrzeug Klimaanlage verbinden und öffnen 2 Im Grundmenü mit den Pfeiltasten oder Einzelne Prozesse wählen 3 Zur Bestätigung ENTER drücken 4 Fahrzeugdaten eingeben und mit ENTER bestätigen HINWEIS Mit dem Menü Einzelne Prozesse wird der Klimaservice Schritt für Schritt durchgeführt Es ...

Page 37: ...organg auf Seite 38 3 Mit der Pfeiltaste die gewünschte Vakuumkontrollzeit eingeben 4 Beide Einstellungen mit ENTER bestätigen I Klimaanlage Ja entleeren Nein ENTER OK STOP EXIT Wartezeit für den Druckanstieg min 5 ENTER OK STOP EXIT HINWEIS Durch die Wartezeit wird sichergestellt dass eventuell vorhandenes Restkältemittel verdampfen und danach abgesaugt werden kann Das verdampfende Restkältemitte...

Page 38: ...lungen mit ENTER bestätigen I Klimaanlage Ja befüllen Nein ENTER OK STOP EXIT Frischöl ml 5 UV Additive ml 7 Kältemittel g 500 ENTER OK STOP EXIT HINWEIS Wenn im gleichen Prozessablauf ein Absaugvorgang stattfindet zählt die Menge des Frischöls als Extra Füllmenge die zu der zuvor abgesaugten Altölmenge addiert wird Stellt man diesen Wert auf 0 wird exakt die Menge Öl die abgesaugt wurde auch wied...

Page 39: ...gänge mit ENTER starten 8 7 5 Nach Beendigung des Klimaservices Nachdem der Klimaservice beendet ist erscheint die Aufforderung die Serviceschläuche des AirConServiceCenters von der Fahrzeug Klimaanlage abzukuppeln 1 Serviceschläuche 10 und 11 abkuppeln und zur Bestätigung ENTER drücken Die Serviceschläuche werden nun geleert Anschließend ist das Gerät für weitere Einsätze betriebsbereit 2 Ventilk...

Page 40: ...inkt und zur Bestätigung ENTER drücken 8 Klimaanlage befüllen mit Nein abwählen gewählte Einstellung blinkt und zur Bestätigung ENTER drücken 9 Prozesse starten mit ENTER wählen 10 Nach Beendigung des Absaugvorgangs die Station vom Fahrzeug trennen HINWEIS Mit dem Menü A C Spülen wird die Fahrzeug Klimaanlage mit frischem Kältemittel gespült Das Spülen ist vor allem geeignet um altes Kompressoröl ...

Page 41: ...wünschten Daten eingeben und zur Bestätigung ENTER drücken Sollen keine Daten eingegeben werden ENTER drücken um zum nächsten Programmschritt zu wechseln 17 Mit den Pfeiltasten oder wählen ob die gesamte Klimaanlage oder eine einzelne Komponente gespült werden soll 18 Zur Bestätigung ENTER drücken 19 Zum weiteren Vorgehen den Hinweisen im Display folgen Nachdem das Spülen beendet ist wird das Grun...

Page 42: ...nstellung blinkt und zur Bestätigung ENTER drücken 27 Füllmenge für Kältemittel eingeben Ölfüllmenge des Kompressors beachten 28 Zum weiteren Vorgehen den Hinweisen im Display 6 folgen Die gewünschte Einstellung wählen gewählte Einstellung blinkt und zur Bestätigung ENTER drücken 29 Prozesse starten mit ENTER wählen Nachdem der Füllvorgang beendet ist erscheint die Aufforderung die Serviceschläuch...

Page 43: ...ekte Bemessung der Ölmengen und des UV Additivs ist es erforderlich dass die Nullpunkte der Waagen regelmäßig überprüft und gegebenenfalls neu festgesetzt werden Ein erneutes Festsetzen ist erforderlich falls die Menge eines Behälters um mehr als 10 ml vom Sollwert abweicht nach Erschütterungen des AirConServiceCenters z B Transport über holprige Strecken alle vier bis sechs Wochen Schnellstart Ei...

Page 44: ... Wenn die Waagen entlastet sind zur Bestätigung ENTER drücken Die Aufforderung die Behälter von der Waage zu nehmen blinkt Wenn das Festsetzen des Nullpunktes erfolgreich durchgeführt wurde erscheint wieder das Auswahlmenü für die Waagen 5 Behälter wieder in die Arbeitsposition bringen Behälter für die Öle 17 und 19 und das UV Additiv 18 wieder an den Schnellverschlüssen anschließen und Abdeckklap...

Page 45: ...ein abwählen Zur Bestätigung ENTER drücken 7 Klimaanlage befüllen mit Nein abwählen Zur Bestätigung ENTER drücken 8 Prozesse starten wählen Zur Bestätigung ENTER drücken Die Serviceschläuche werden nun geleert und das Grundmenü des AirConServiceCenters wird aktiviert Der Kompressor hat intern einen leichten Unterdruck erzeugt sodass der Filter mit geringstem Kältemittelverlust gewechselt werden ka...

Page 46: ...den Menüpunkt Int Flasche füllen ins Gerät nachgefüllt wurde HINWEIS Nach dem Erledigen der Servicearbeiten müssen Sie die jeweiligen Servicemeldungen löschen Zähler zurücksetzen Wechseln Sie hierzu in das Menü Weitere Menues Service und geben Sie hier den Code 7782 ein Mit den Pfeiltasten oder den gewünschten Eintrag wählen und mit ENTER bestätigen Den Displayanweisungen folgen und die ENTER Tast...

Page 47: ...imaanlagen eingefügt wurde Vakuumzeit gibt an wie lange die Vakuumpumpe seit der letzten Rückstellung siehe Datum in Betrieb war Service erledigt zeigt die Menge der Servicearbeiten an die seit der letzten Rückstellung siehe Datum mit dem Klimaservicegerät durchge führt wurden Eingefüllt in A C 07 03 14 g 1200 STOP EXIT Vakuumzeit 07 03 14 min 79 STOP EXIT Service erledigt 08 03 14 Anzahl 4 STOP E...

Page 48: ...Menü zu verlassen 9 Zwei Mal STOP drücken um in das Stand by Menü zu gelangen 10 Servicekupplungen 12 und 13 wieder auf die Serviceschläuche 10 und 11 handfest aufschrauben dabei die blauen und roten Kennzeichnungen von Servicekupplungen und Serviceschläuchen beachten HINWEIS Für korrekte Druckmessungen ist es erforderlich dass der Drucksensor richtig kalibriert ist Ein Kalibrieren ist erforderlic...

Page 49: ...nd Bedienfeld nach oben klappen Dann Schrauben E unten an der Frontabdeckung herausdrehen und Frontabdeckung abnehmen 3 Gefäß ausreichend für mindestens Liter unter das AirConServiceCenter stellen Das Öl aus der Vakuumpumpe fließt beim Ablassen durch die Öffnung I im Boden des Geräts 4 Öleinfüllschraube G herausdrehen WARNUNG Schalten Sie vor dem Öffnen des Gehäuses das AirConServiceCenter aus und...

Page 50: ...nkt Int Flasche füllen ins Gerät nachgefüllt wurde Eingefüllt in A C gibt an wie viel Gramm Kältemittel seit der letzten Rückstellung siehe Datum über den Menüpunkt Schnellstart oder auch Einzelne Prozesse in Klimaanlagen eingefüllt wurde HINWEIS Nach dem Erledigen der Servicearbeiten müssen Sie die jeweiligen Servicemeldungen löschen Zähler zurücksetzen Wechseln Sie hierzu in das Menü Weitere Men...

Page 51: ...er den Menü punkt Int Flasche füllen ins Gerät nachgefüllt wurde Vakuumzeit 07 03 14 min 79 STOP EXIT Service erledigt 07 03 14 Anzahl 4 STOP EXIT HINWEIS Das Gerät speichert verschiedene Zählerstände ab Um die Totalwerte abzurufen fortlaufend seitdem das Gerät produziert wurde gehen Sie in das Menü Weitere Menues Service und geben Sie hier den Code 7783 ein Mit den Pfeiltasten oder den gewünschte...

Page 52: ...se in Klimaanlagen eingefüllt wurde Vakuumzeit gibt an wie lange die Vakuumpumpe insgesamt in Betrieb war Service erledigt zeigt die Menge der Servicearbeiten an die mit dem Klimaservicegerät durchgeführt wurden Eingefüllt in A C Total 07 03 14 g 1200 STOP EXIT Vakuumzeit Total 07 03 14 min 79 STOP EXIT Service erledigt Total 08 03 14 Anzahl 4 STOP EXIT ...

Page 53: ...erpapier erneuern 1 Zum Erneuern der Papierrolle des Druckers 14 Klappe K öffnen 2 Neue Papierrolle einlegen und Klappe K schließen HINWEIS Sollen längere oder kürzere Serviceschläuche für das Gerät einge setzt werden ist es erforderlich die Füllmengen den neuen Schlauchlängen anzupassen Der Serviceschlauch für die Hochdruckseite und der Service schlauch für die Niederdruckseite müssen immer gleic...

Page 54: ...ualisieren 1 Aktuelle Software auf den USB Stick kopieren 2 Den USB Stick in den USB Anschluss 15 stecken und das Gerät einschalten Die Station durchsucht den USB Stick nach einer neueren Version Wenn die Software auf dem USB Stick aktueller ist wird folgendes Menü angezeigt Wenn die Datenbank auf dem USB Stick aktueller ist wird folgendes Menü angezeigt Die aktuelle Version wird in der untersten ...

Page 55: ...snehmen Die Station ist betriebsbereit 9 10 Reinigung und Pflege Reinigen Sie das Gehäuse bei Bedarf mit einem feuchten Tuch Nehmen Sie gegebenenfalls zusätzlich etwas Geschirrspülmittel Verwenden Sie keine Lösungsmittel oder scheuernde Reinigungs mittel Überprüfen Sie regelmässig die Serviceschläuche 10 und 11 und Servicekupplungen 12 und 13 auf Beschädigungen Nehmen Sie das AirConServiceCenter n...

Page 56: ...rgung des Altgerätes Wenn Sie das AirConServiceCenter endgültig außer Betrieb neh men entleeren Sie das Gerät zunächst von allen Flüssigkeiten und entsorgen Sie die Flüssigkeiten umweltgerecht M Bringen Sie das Altgerät dann zum nächsten Recyclingcenter oder wenden Sie sich an den Kundendienst HINWEIS Verbrauchtes Öl ist Sondermüll Mischen Sie verbrauchtes Öl nicht mit anderen Flüssigkeiten Bewahr...

Page 57: ...ährend des Vakuumprozesses wenn der Druck in der Klimaanlage nach 8 Minuten noch mehr als 50 mbar beträgt Klimaanlage auf Leck über prüfen bzw Anschlüsse des AirConServiceCenters an die Klimaanlage überprüfen Im Display erscheint A C undicht Fortfahren Meldung am Ende des Vakuumprozesses Die Klimaanlage hat einen Vakuumverlust von mehr als 120 mbar innerhalb der Kontrollzeit Klimaanlage auf Leck ü...

Page 58: ...nte Prüfen ob im externen Kältemittelbehälter noch ausreichend Kältemittel vor handen ist bzw prüfen ob Ventile am externen Kältemittelbehälter geöffnet sind Im Display erscheint Internen Filter wechseln Fortfahren Meldung beim Einschalten des AirConServiceCenters Möglichst bald internen Filter wechseln Kapitel Trockner Filter wechseln auf Seite 45 Zum Übergehen 3 Sekunden ENTER drücken Im Display...

Page 59: ...derdruckschlauch an den Spülbehälter anschließen und Ventil öffnen Im Display erscheint Error 10 Während des Software Tests konnte der interne Druck durch den Kompressor nicht weit genug reduziert werden Restdruck auf den Mano metern Drucksensorkalibrierung überprüfen Internen Flaschendruck überprüfen Funktion des Kompressors und der entsprechenden Magnetventile prüfen Im Display erscheint Error 1...

Page 60: ...rror 61 Druckanstieg beim Hybrid Service Sind die Serviceschläuche am Hybridspülbehälter ange schlossen Ist der Hybridspülhälter rich tig herum montiert Sind die Servicekupplungen geöffnet AirConServiceCenter ASC1000G Maße Breite x Höhe x Tiefe 560 mm x 1300 mm x 650 mm Gewicht 95 kg Stromversorgung 230 V 240 V 50 Hz 60 Hz Absaugmenge des Kältemittels 18 kg Std Vakuumpumpenleistung 4 Kfz Std Leist...

Page 61: ... Waage für Alt Frischöl 1 g Genauigkeit der elektronischen Waage für UV Additiv 1 g Betriebstemperaturbereich 5 C bis 45 C AirConServiceCenter ASC3000G Maße Breite x Höhe x Tiefe 560 mm x 1300 mm x 650 mm Gewicht 105 kg Stromversorgung 230 V 240 V 50 Hz 60 Hz Absaugmenge des Kältemittels 30 kg Std Vakuumpumpenleistung 192 l Std Leistung des hermetischen Verdichters 0 6 kW Trockenfilterleistung 150...

Page 62: ... menu 74 7 3 Language selection 74 7 4 Entering company data 75 7 5 Entering the date and time 76 7 6 Editing default values 77 7 7 Inserting the containers for oil and UV additive 78 7 8 Entering the container size for ASC2000G ASC3000G only 79 7 9 Filling up the internal refrigerant container 80 8 Operation 82 8 1 Short selection 82 8 2 User codes 84 8 3 Creating a personal database 87 8 4 Trans...

Page 63: ...cer 107 9 5 Changing the vacuum pump oil 108 9 6 Meter readings 110 9 7 Correcting the filling quantity for long service hoses 111 9 8 Replacing the printer paper 112 9 9 Updating the software via USB 112 9 10 Cleaning and maintenance 113 10 Disposal 114 10 1 Disposing of used fluids 114 10 2 Disposing of packaging material 114 10 3 Scrapping the old unit 114 11 Troubleshooting 115 12 Technical da...

Page 64: ...ly before putting the device into operation for the first time Also observe the following The Dometic WAECO training manual Technical Specifications Vehicle Air Conditioning The Dometic WAECO information brochure Legal Specifications Vehicle Air Conditioning Information from the refrigerant manufacturer Any specific instructions on servicing vehicle air conditioning systems which apply at your com...

Page 65: ...Designations used on the device Press ENTER to confirm Bold Display messages Short selection Text Text List in any order Pressure monitor Pressure relief valves 1 Text 2 Text 3 Text Actions to be carried out in the order shown 1 Connect the device 2 Switch on the device 3 Press the selection button Text Result of an action Device is ready for operation Text 1 Part numbers referring to the overview...

Page 66: ...y equipment safety goggles and protective gloves and avoid coming into contact with the refrigerant Contact with the refrig erant draws out body heat and the affected areas can freeze Do not inhale refrigerant vapour Although the vapour is non toxic it dis places the oxygen you need to breathe Do not make modifications to the AirConServiceCenter Each time you start up the device or top up the AirC...

Page 67: ...erant can be flammable or explosive 2 2 Warnings on the AirConServiceCenter Warning Observe the operating manual Only connect the device to a 230 V 50 Hz AC socket Protect the device against rain Wear gloves when handling refrigerants Wear goggles when handling refrigerants 2 3 Safety devices Pressure monitor switches the compressor off if the normal operating pressure is exceeded Pressure relief ...

Page 68: ...e adapter for WAECO refrigerant bottles Adapter for 500 ml fresh oil and UV contrast agent bottle Closed drained oil container 500 ml PAG ISO 46 oil bottle 500 ml PAG ISO 100 oil bottle 500 ml UV additive test bottle for approx 10 applications Goggles gloves Operating manual Description Bottle valve adapter for WAECO refrigerant bottles Adapter for 500 ml fresh oil and UV contrast agent bottle Clo...

Page 69: ...O refrigerant bottles Adapter for 500 ml fresh oil and UV contrast agent bottle Closed drained oil container 500 ml Container for air conditioning compressor oil Container for UV contrast agent Fresh oil container for second type of oil Ester SE 55 oil 500 ml Protective device cover Goggles gloves Operating manual ...

Page 70: ...tem number PAG fresh oil bottle ISO 46 500 ml 8887200013 PAG fresh oil bottle ISO 100 500 ml 8887200014 UV contrast agent bottle 500 ml TP 3820 500 Adapter for 500 ml fresh oil and UV contrast agent bottle 4440600026 Oil container for additional oil type 250 ml 4440600034 Drained oil container 500 ml 4440600033 Spare filter for maintenance 4440400009 Filling cylinder 4 4 kg as refrigerant storage ...

Page 71: ...irConServiceCenter 6 1 Front 1 Low pressure gauge 2 Red Fill lamp 3 Blue Evacuate lamp 4 Green Suction lamp 5 High pressure gauge 6 Display 7 Keypad 8 Front cover 9 Front wheels with wheel stops 10 Service hose for low pressure connection blue 13 12 3 4 5 9 8 7 6 2 16 15 11 10 14 1 ...

Page 72: ...connection red 12 Service coupling for high pressure connection red 13 Service coupling for low pressure connection blue 14 Printer 15 USB port 16 Display unit 6 2 Rear 17 Fresh oil can 500 ml 18 Container for UV additive 500 ml 19 Drained oil receptacle 20 Cover flap 21 Main switch 21 19 18 17 20 ...

Page 73: ...veral seconds SW Software status DB Database SN Series number The AirConServiceCenter then runs a software test When the start up procedure is complete the AirConServiceCenter displays the following ASC1000G ASC2000G ASC3000G NOTE During operation the device must be on a horizontal flat surface so that measurements can be made correctly Dometic WAECO ASC2000G SW AS2k0046 DB lhd10028 SN 000020 Soft...

Page 74: ...ve quantity Time Date 7 3 Language selection 1 Press the cursor keys or to access the basic menu 2 In the basic menu use the cursor keys or to select Other selections 3 Press ENTER to confirm 4 Use the cursor key to select Service 5 Press ENTER to confirm 6 Enter the password 5264 7 Use the cursor keys or to select the preferred language 8 Press ENTER to confirm 9 Press STOP The language chosen is...

Page 75: ...e lines each with up to 20 characters The display shows the number of lines of company data after the message Enter company data 01 to 05 Use the cursor keys or to select the line of company data you want 7 Use the keypad 7 and the cursor keys to enter the data To switch between upper and lower case press the Info key To delete a character briefly press the C key To delete the current line press a...

Page 76: ...the basic menu use the cursor keys or to select Other selections 2 Press ENTER to confirm 3 Use the cursor key to select Service 4 Press ENTER to confirm 5 Enter the password 8463 6 Use the keypad and the cursor keys to enter the information 7 Press ENTER to confirm 8 Press STOP to access the standby menu Short selection Free selection Other selections ENTER OK ...

Page 77: ... keys or to select Other selections 2 Press ENTER to confirm 3 Use the cursor key to select Service 4 Press ENTER to confirm 5 Enter the password 7388 6 Use the keypad and the cursor keys to enter the information 7 Press ENTER to confirm 8 Press STOP to access the standby menu Parameter Default value Pressure increase test time min 5 Vacuum time min 20 Leak test min 4 PAG oil ml additional quantit...

Page 78: ... menu 1 Open the cover flap 20 on the left side and push the containers into the snap locks Container for fresh oil 17 Container for UV additive 18 and Drained oil receptacle 19 2 Close the cover flap 20 3 Enter the container size for fresh oil and UV contrast agent see chapter Entering the container size for ASC2000G ASC3000G only on page 79 19 18 17 20 ...

Page 79: ...ze in the AirConServiceCenter 1 In the basic menu use the cursor keys or to select Other selections 2 Press ENTER to confirm 3 Use the cursor key to select Service 4 Press ENTER to confirm 5 Enter the password 2688 6 Use the cursor keys to activate any fields you need dark fields are activated 7 Press ENTER to confirm 8 Press STOP to access the standby menu Short selection Free selection Other sel...

Page 80: ...upside down Refrigerant bottles with rising pipe These refrigerant bottles have one connection When filling the AirConServiceCenter the connection must be at the top place the bottle upright Refrigerant bottles with rising pipe These refrigerant bottles have two connections To top up the AirConServiceCenter use the connection marked with L liquid When filling the AirConServiceCenter the connection...

Page 81: ...ant container is filled When the filling process is finished this will be confirmed by an acoustic signal Close the valves and press ENTER to confirm 6 After filling the quantity of refrigerant in the internal container is dis played Press STOP to exit the menu Press STOP again to access the standby menu The device is now ready for operation Connect the HP hose to the external tank then open the v...

Page 82: ...he air conditioning is being serviced the engine and the air conditioning must be switched off NOTE A fully automatic air conditioning service is started using the Short selection menu You only have to enter the filling quantity as shown on the label in the vehicle or as found in the database The following actions are performed automatically in succession in the Short selection menu Extraction of ...

Page 83: ...ice is started After the air conditioning service has finished you will be prompted to disconnect the hoses 10 and 11 of the AirConServiceCenter from the vehicle air conditioning system 10 Disconnect the service hoses 10 and 11 and press ENTER to confirm The service hoses will now be drained The device is then ready for further use 11 Put the valve caps of the vehicle air conditioning system back ...

Page 84: ...er selections 2 Press ENTER to confirm 3 Use the cursor key to select Service and press ENTER to confirm 4 To access the ADM administrator menu enter the password 9786 and press ENTER to confirm 5 Enter the administrator code 0000 default setting and press ENTER to confirm I 6 Enter the new administrator code Short selection Free selection Other selections ENTER OK Flushing Reset scales Service EN...

Page 85: ... the correct user name and then press ENTER to confirm I ADM AREA Confirm new code ADM AREA User number 1 ADM AREA User number 1 Insert new code ADM AREA User number 1 Confirm new code NOTE Use the yellow information key to switch between upper and lower case ADM AREA User number 1 User name John Citizen ADM AREA User number 1 John Citizen NOTE The user is created and the menu changes back to the ...

Page 86: ...s in the display If a user code has been created the same code must be used to enable the station 1 Enter the correct user code If you enter an incorrect user code the following error message appears Once the correct code is entered the station is enabled and it starts up The user s name is displayed ENTER USER CODE WRONG CODE John Citizen ...

Page 87: ...se the cursor keys or to select Database and press ENTER to confirm 5 Select Personal DB and press ENTER to confirm 6 In this empty database use the cursor keys or to select the respective entry and press ENTER to confirm 7 To change the item press the yellow Info key 8 Enter the vehicle data model type in the blank field and press ENTER to confirm Short selection Free selection Other selections E...

Page 88: ...r the refrigerant quantity and press ENTER to confirm The entry has been created You can now create another entry use the cursor keys to select and proceed as described or press STOP to exit the menu AUDI 0 A4 8E 2000 2004 g 500 AUDI 0 A4 8E 1 ...

Page 89: ...r has changed the station indicates that the data stored from the previous year should be transferred to a USB stick When you transfer the annual data onto a USB stick it is then deleted from the station s inter nal memory 1 Insert the USB stick in the USB port 15 2 The instructions appear on the display NOTE The USB stick must be formatted with the FAT32 file system NOTE The report may contain a ...

Page 90: ...m 4 Use the cursor key to select Service and press ENTER to con firm 5 Enter the password and press ENTER to confirm 4910 Monthly report 4918 Annual report If a USB stick has not been inserted or is not recognised the Error 52 message appears 6 Use the cursor keys or to select the required entry and press ENTER to confirm 7 The instructions appear on the display 8 Switch back to the previous selec...

Page 91: ...thly overview 1 In the basic menu use the cursor keys or to select Other selections 2 Press ENTER to confirm 3 Use the cursor key to select Service and press ENTER to confirm 4 Enter the password 9051 and press ENTER to confirm 5 Use the cursor keys or to select the year and press ENTER to confirm Short selection Free selection Other selections ENTER OK Flushing Reset scales Service ENTER OK STOP ...

Page 92: ...hat year Press the cursor key to view the display for the monthly overview Here a total of 2 400 g of refrigerant was extracted in January 2015 In the monthly overview the filled and extracted amount is always displayed alternately Press ENTER to print out the overview at any time Press STOP to exit the overview R134a from system Total 2015 g 18650 PRINT STOP EXIT R134a to system Total 2015 g 9000...

Page 93: ...the basic menu use the cursor keys or to select Other selections 5 Press ENTER to confirm 6 Use the cursor keys or to select A C system test A prompt appears asking you to check the air conditioning system 7 Check the high and low pressure of the air conditioning system in accordance with the manufacturer s specifications NOTE The air conditioning can only be tested on vehicles with a low pressure...

Page 94: ...ystem I The following display messages appear 10 To end the air conditioning test press the STOP button Disconnect the HP service hose from the A C system ENTER OK NOTE If you have turned off the vehicle engine to uncouple the HP quick con nector restart the engine and turn on the air conditioning Wait Recovery from the service hoses Process completed STOP EXIT ...

Page 95: ... each process has been performed a service report is printed 1 Start by fitting the connections of the AirConServiceCenter to the vehicle air conditioning system and opening them 2 In the basic menu use the cursor keys or to select Free selection 3 Press ENTER to confirm 4 Enter the vehicle data and press ENTER to confirm NOTE The Free selection menu is used to perform air conditioning servic ing ...

Page 96: ...otherwise continue with chapter Filling process on page 97 3 Use the cursor key to enter the vacuum phase time 4 Press ENTER to confirm both settings I Rec Recycling Yes phase No ENTER OK STOP EXIT Pressure increase Test time min 5 ENTER OK STOP EXIT NOTE The waiting time ensures that any residual refrigerant vaporises and can then be extracted The vaporising residual refrigerant triggers an incre...

Page 97: ...confirm all settings I Filling phase Yes No ENTER OK STOP EXIT PAG oil ml 5 UV tracer ml 7 Refrigerant g 500 ENTER OK STOP EXIT NOTE If extraction is taking place in the same process sequence the quantity of fresh oil is counted as an additional filling quantity and is added to the drained oil quantity extracted beforehand If this value is set to 0 exactly the quantity of oil which was extracted w...

Page 98: ...confirm 3 Once all settings have been entered press ENTER to start the process 8 7 5 After ending the air conditioning service After the air conditioning service has finished you will be prompted to disconnect the hoses of the AirConServiceCenter from the vehicle air conditioning system 1 Disconnect the service hoses 10 and 11 and press ENTER to confirm The service hoses will now be drained The de...

Page 99: ...art by pressing ENTER 10 After the extraction process is complete disconnect the station from the vehicle 11 Disconnect the system components which cannot be flushed from the refrigerant circuit These components include Compressor Line filter Fixed choke Collection containers Filter drying units Expansion valve NOTE The Flushing menu is used to flush the vehicle air conditioning system with fresh ...

Page 100: ...ual components 18 Press ENTER to confirm 19 Follow the instructions in the display After flushing is completed the basic menu for the AirConServiceCenter appears 20 If necessary remove the adapter from the flushing circuit and recon nect all the components to the refrigerant circuit Fit the connections of the AirConServiceCenter to the vehicle air conditioning system and open them 21 In the basic ...

Page 101: ...f the compressor 28 Then follow the instructions on the display 6 Select the setting which then flashes and press ENTER to confirm 29 Select Process start by pressing ENTER After filling is complete you will be prompted to disconnect the hoses of the AirConServiceCenter from the vehicle air conditioning system 30 Disconnect the service hoses 10 and 11 and press ENTER to confirm The service hoses a...

Page 102: ...order for the oil quantities and the UV additive to be measured correctly the zero point of the scales must be checked regularly and reset if necessary Resetting is necessary If the quantity in a container deviates by more than 10 ml from the target value If the AirConServiceCenter has been shaken for example during transport on bumpy roads Every four to six weeks Short selection Free selection Ot...

Page 103: ... Drained oil receptacle 19 When the scales are relieved press ENTER to confirm The prompt to remove the containers from the scale will flash Once you have set the zero point the selection menu for the scales appears again 5 Return the containers to the operating positions Reattach the containers for oil 17 and 19 and for the UV additive 18 to the snap locks and close the cover 20 6 Press STOP twic...

Page 104: ...elect Vacuum phase using No Press ENTER to confirm 7 Deselect Filling phase using No Press ENTER to confirm 8 Select Process start Press ENTER to confirm The service hoses will now be drained and the AirConServiceCenter basic menu will be activated The compressor has produced a slight internal vacuum so that the filter can be replaced with minimal refrig erant loss 9 Unscrew the screw D from the h...

Page 105: ...ast reset see date NOTE After finishing the service tasks you must delete the respective service messages counter reset To do this switch to the Other selections Service menu and enter the code 7782 Use the cursor keys or to select the required entry and press ENTER to confirm Follow the display instructions and press and hold the ENTER button for 3 seconds Switch back to the previous selection us...

Page 106: ...g systems using the menu item Short selec tion or Free selection since the last reset see date Vacuum time indicates how long the vacuum pump has operated since the last reset see date Service completed displays the amount of service work performed using the air conditioning service unit since the last reset see date R134a from tank 07 03 14 g 3395 STOP EXIT R134a to system 07 03 14 g 1200 STOP EX...

Page 107: ...t the menu 9 Press STOP twice to access the standby menu 10 Screw the service couplings 12 and 13 hand tight onto the service hoses 10 and 11 taking care not to mix up the red and blue mark ings on the couplings and hoses NOTE The pressure transducer has to be correctly calibrated in order to make accurate pressure measurements Calibration is required Every four weeks If the AirConServiceCenter ha...

Page 108: ...up Then undo the screws E on the bottom of the front panel and take it off 3 Place a receptacle with a capacity of at least a litre under the AirConServiceCenter The oil from the vacuum pump flows through the opening I in the base of the device 4 Unscrew the oil filling plug G 5 To drain the oil unscrew the oil drain plug J WARNING Switch off the AirConServiceCenter and unplug it from the power su...

Page 109: ...indicates how many grams of refrigerant have been filled into air conditioning systems using the menu item Short selec tion or Free selection since the last reset see date Vacuum time indicates how long the vacuum pump has operated since the last reset see date NOTE After finishing the service tasks you must delete the respective service messages counter reset To do this switch to the Other select...

Page 110: ...rigerant have been filled into air conditioning systems using the menu item Short selec tion or Free selection Service completed 07 03 14 Total 4 STOP EXIT NOTE The device saves various counter readings To access the total values consecutively since the device was produced enter the menu Other selections Service and enter the code 7783 Use the cursor keys or to select a particular entry These coun...

Page 111: ...vice 4 Press ENTER to confirm 5 Enter the password 7732 6 Enter the hose length in centimetres 7 Press ENTER to confirm Vacuum time Total 07 03 14 min 79 STOP EXIT Service completed Total 08 03 14 Total 4 STOP EXIT NOTE If longer or shorter service hoses are required for the device you need to adjust the filling quantities to the new hose lengths The service hoses for the high and low pressure sid...

Page 112: ...dating the software the following data is stored in the internal memory of the station the current software of the AirConServiceCenter the current database with all the common vehicle types and corre sponding filling quantities You can update the software and the database separately 1 Copy the current software on the USB stick 2 Insert the USB stick in the USB port 15 and switch on the device NOTE...

Page 113: ...ult settings The station then restarts and the standby menu appears 4 Remove the USB stick The station is ready for operation 9 10 Cleaning and maintenance Clean the exterior of the device with a damp cloth as required If necessary use a small amount of dishwashing detergent Do not use solvents or scouring agents Check the service hoses 10 and 11 and the service couplings 12 and 13 for damage regu...

Page 114: ...uld be added to other recyclable waste 10 3 Scrapping the old unit If you wish to scrap the AirConServiceCenter first completely drain it of all liquids and dispose of them in an environmentally responsible manner M Take the old device to your nearest recycling centre or contact the customer service NOTE Used oil is hazardous waste Do not mix used oil with other fluids Keep used oil in suitable co...

Page 115: ...f the pressure in the air condition ing system after 8 minutes is still more than 50 mbar Check the air conditioning system or the connections between it and the AirConServiceCenter for leaks The display shows A C system leakage Carry on Message at the end of the vacuum process The air conditioning system shows a vacuum loss of more than 120 mbar during the check ing time Check the air conditionin...

Page 116: ...container still contains enough refrigerant or if the valves of the external refrig erant container are open The display shows Change the equipment drier filter Go on This message appears when you switch on the AirConServiceCenter Change the internal filter as soon as possible chapter Changing the dryer filter on page 104 To skip this press ENTER for 3 seconds The display shows Change the vacuum p...

Page 117: ...t low pressure hose to the flush container and open valve The display shows Error 10 During the software test the compressor failed to reduce the internal pressure suffi ciently Residual pressure on the pressure gauges Check pressure transducer calibration Check internal bottle pres sure Check the compressor and the corresponding solenoid valves The display shows Error 11 It was not possible to dr...

Page 118: ...Error 61 Pressure increase during the hybrid service Are the service hoses con nected to the hybrid flush container Is the hybrid flush container fitted the right way round Are the service couplings open AirConServiceCenter ASC1000G Dimensions width x height x depth 560 mm x 1300 mm x 650 mm Weight 95 kg Power supply 230 V 240 V 50 Hz 60 Hz Refrigerant extraction rate 18 kg h Vacuum pump output 4 ...

Page 119: ...e electronic scale for old new oil 1 g Accuracy of the electronic scale for UV additive 1 g Operating temperature 5 C 45 C AirConServiceCenter ASC3000G Dimensions width x height x depth 560 mm x 1300 mm x 650 mm Weight 105 kg Power supply 230 V 240 V 50 Hz 60 Hz Refrigerant extraction rate 30 kg h Vacuum pump output 192 l h Hermetic compressor output 0 6 kW Drier filter output 150 kg Filling cylin...

Page 120: ... Menú Stand by 132 7 3 Selección de idioma 132 7 4 Introducir los datos de la empresa 133 7 5 Introducir la fecha y la hora 134 7 6 Modificar los valores por defecto 135 7 7 Uso de los recipientes para aceites y aditivo UV 136 7 8 Introducir el tamaño de los recipientes solo para ASC2000G ASC3000G 137 7 9 Llenar el recipiente interno de refrigerante 138 8 Funcionamiento 140 8 1 Selección automátic...

Page 121: ...5 Cambiar el aceite de la bomba de vacío 166 9 6 Estados de los contadores 168 9 7 Corregir la cantidad de llenado para mangueras de servicio largas 170 9 8 Cambiar el papel de impresión 171 9 9 Actualizar el software vía USB 171 9 10 Limpieza y mantenimiento 172 10 Gestión de residuos 173 10 1 Gestión de los líquidos recuperados 173 10 2 Gestión del material de embalaje 173 10 3 Gestión del apara...

Page 122: ...e acondicionado Antes de poner el aparato en servicio por primera vez lea detenidamente estas instrucciones de uso Tenga en cuenta además El manual de formación Climatización del vehículo bases técnicas de Dometic WAECO El folleto informativo Climatización del vehículo bases legales de Dometic WAECO Indicaciones del fabricante del refrigerante En caso de haberlas las indicaciones específicas de su...

Page 123: ...o Pulse la tecla ENTER Negrita Mensajes en pantalla Selec automática Texto Texto Listado en orden arbitrario Presostato de seguridad Válvulas de sobrepresión 1 Texto 2 Texto 3 Texto Pasos que deben realizarse en el orden indicado 1 Conecte el aparato 2 Encienda el aparato 3 Pulse la tecla de selección Texto Resultado de un paso realizado El equipo está listo para el funcionamiento Texto 1 Números ...

Page 124: ...erviceCenter Lleve equipo de protección personal gafas y guantes de protección y evite el contacto con el refrigerante Si el cuerpo entra en contacto con el refrigerante éste le sustrae el calor corporal lo que puede producir con gelaciones en las partes del cuerpo afectadas No inhale los vapores de refrigerante Estos vapores no son tóxicos pero expulsan el oxígeno necesario para la respiración No...

Page 125: ...ezcla de are comprimido y refrigerante puede ser inflamable o explosiva 2 2 Indicaciones de advertencia en el AirConServiceCenter Atención Tenga en cuenta las instrucciones de uso Conecte el aparato únicamente a una caja de enchufe con corriente alterna de 230 V 50 Hz Proteja el aparato de la lluvia Para manipular refrigerantes lleve guantes Para manipular refrigerantes lleve gafas de protección 2...

Page 126: ...tador para botella de 500 ml de aceite nuevo y de medio de contraste UV Recipiente cerrado para aceite usado 500 ml Botella de aceite PAG ISO 46 500 ml Botella de aceite PAG ISO 100 500 ml Botella de prueba de aditivo UV para aprox 10 aplicaciones Gafas de protección guantes de protección Instrucciones de uso Denominación Adaptador de válvula para botellas de refrigerante de WAECO Adaptador para b...

Page 127: ...0 ml de aceite nuevo y de medio de contraste UV Recipiente cerrado para aceite usado 500 ml Recipiente de aceite para compresor de equipos de aire acondicionado Recipiente para medio de contraste UV Recipiente de aceite nuevo para un segundo tipo de aceite Aceite Ester SE 55 500 ml Funda de protección para los aparatos Gafas de protección guantes de protección Instrucciones de uso ...

Page 128: ... Botella de aceite nuevo PAG ISO 100 500 ml 8887200014 Botella de medio de contraste UV 500 ml TP 3820 500 Adaptador para botella de 500 ml de aceite nuevo y de medio de contraste UV 4440600026 Recipiente de aceite para otro tipo de aceite 250 ml 4440600034 Recipiente para aceite usado 500 ml 4440600033 Filtro de repuesto para mantenimiento 4440400009 Cilindro de llenado de 4 4 kg como acumulador ...

Page 129: ...etro de baja presión 2 Piloto de estado rojo Rellenar 3 Piloto de estado azul Evacuar 4 Piloto de estado verde Recuperar 5 Manómetro de alta presión 6 Pantalla 7 Teclado de mando 8 Cubierta frontal 9 Ruedas delanteras inmovilizables 10 Manguera de servicio para la conexión de baja presión azul 13 12 3 4 5 9 8 7 6 2 16 15 11 10 14 1 ...

Page 130: ...or de mantenimiento para la conexión de alta presión rojo 13 Racor de mantenimiento para la conexión de baja presión azul 14 Impresora 15 Conexión USB 16 Unidad indicadora 6 2 Parte trasera 17 Lata de aceite nuevo 500 ml 18 Recipiente para aditivo UV 500 ml 19 Recipiente de aceite usado 20 Tapa 21 Interruptor principal 21 19 18 17 20 ...

Page 131: ...ware SW versión de software DB base de datos SN número de serie A continuación se realiza una comprobación del software del AirConServiceCenter Para concluir el proceso de arranque el AirConServiceCenter muestra la siguiente pantalla ASC1000G ASC2000G ASC3000G NOTA Durante el funcionamiento el aparato debe estar colocado sobre una base horizontal y plana para que las mediciones puedan efectuarse c...

Page 132: ...echa 7 3 Selección de idioma 1 Pulse las teclas de dirección o para llegar al menú básico 2 Con las teclas de dirección o seleccione en el menú básico Otras selecciones 3 Para confirmar pulse la tecla ENTER 4 Con la tecla de dirección seleccione Servicio 5 Para confirmar pulse la tecla ENTER 6 Introduzca la contraseña 5264 7 Con las teclas de dirección o seleccione el idioma que desee 8 Para confi...

Page 133: ...racteres cada una En pantalla aparece el número de líneas con datos de la empresa mostradas detrás del mensaje Introducir datos de la empresa de 01 a 05 Con las teclas de dirección o se selecciona una línea de datos de la empresa 7 Con el teclado de mando 7 y las teclas de dirección introduzca los datos que desee Para cambiar entre mayúsculas y minúsculas pulse la tecla de infor mación Para borrar...

Page 134: ...cione en el menú básico Otras selecciones 2 Para confirmar pulse la tecla ENTER 3 Con la tecla de dirección seleccione Servicio 4 Para confirmar pulse la tecla ENTER 5 Introduzca la contraseña 8463 6 Introduzca los datos que desee con el teclado de mando y las teclas de dirección 7 Para confirmar pulse la tecla ENTER 8 Pulse STOP para acceder al menú Stand by Selec automática Selección libre Otras...

Page 135: ...básico Otras selecciones 2 Para confirmar pulse la tecla ENTER 3 Con la tecla de dirección seleccione Servicio 4 Para confirmar pulse la tecla ENTER 5 Introduzca la contraseña 7388 6 Introduzca los datos que desee con el teclado de mando y las teclas de dirección 7 Para confirmar pulse la tecla ENTER 8 Pulse STOP para acceder al menú Stand by Parámetro Valor por defecto de fábrica Aumento de presi...

Page 136: ...tapa 20 del lado izquierdo y acople los recipientes a los cierres rápidos recipiente para aceite nuevo 17 recipiente para aditivo UV 18 y recipiente para aceite usado 19 2 Cierre la tapa 20 3 Especifique el tamaño de los recipientes para aceite nuevo y medio de contraste UV capítulo Introducir el tamaño de los recipientes solo para ASC2000G ASC3000G en la página 137 19 18 17 20 ...

Page 137: ...l AirConServiceCenter 1 Con las teclas de dirección o seleccione en el menú básico Otras selecciones 2 Para confirmar pulse la tecla ENTER 3 Con la tecla de dirección seleccione Servicio 4 Para confirmar pulse la tecla ENTER 5 Introduzca la contraseña 2688 6 Con las teclas de dirección active el campo que desee los campos activos son los oscuros 7 Para confirmar pulse la tecla ENTER 8 Pulse STOP p...

Page 138: ...enar el AirConServiceCenter la boca de conexión debe estar arriba ponga la botella boca arriba Botellas de refrigerante con tubo ascendente Estas botellas de refrigerante están dotadas de dos bocas de cone xión Para llenar el AirConServiceCenter se utilizará la boca marcada con una L líquido Al rellenar el AirConServiceCenter la boca de conexión debe estar arriba ponga la botella boca arriba 1 Con...

Page 139: ...NTER Se llena el recipiente de refrigerante El final del proceso de llenado se confirma con una señal acústica Cierre las válvulas y confirme con ENTER 6 Tras el rellenado se mostrará la cantidad de refrigerante que hay en el recipiente interno Para salir del menú pulse STOP Para acceder al menú Stand by pulse de nuevo STOP El aparato está listo para funcionar Ponga la cantidad luego confirme g 13...

Page 140: ...nto el motor como el equipo de aire acondicionado deben estar para dos NOTA Con la opción Selec automática tiene lugar un modo de manteni miento plenamente automático Sólo tiene que introducirse la cantidad de llenado que puede consultar en la etiqueta pegada en el vehículo o en la base de datos En el menú Selec automática se ejecutan automáticamente los siguientes procesos Recuperación del refrig...

Page 141: ...esión Confirme con ENTER Se inicia el mantenimiento plenamente automático Cuando concluye el servicio de mantenimiento del aire acondicio nado aparece un mensaje exhortándole a desconectar las mangue ras de servicio 10 y 11 del AirConServiceCenter del equipo de aire acondicionado del vehículo 10 Desconecte las mangueras de servicio 10 y 11 y pulse ENTER para confirmar Se vacían las mangueras de se...

Page 142: ...s selecciones 2 Para confirmar pulse la tecla ENTER 3 Con la tecla de dirección seleccione Servicio y confirme con ENTER 4 Introduzca la contraseña 9786 y confirme con ENTER para acce der al menú de administrador ADM 5 Introduzca el código de administrador 0000 ajuste de fábrica y confirme con ENTER I 6 Para introducir un nuevo código de administrador Selec automática Selección libre Otras selecci...

Page 143: ...e en marcha con dicho código 10 Para confirmar un nuevo código de usuario I 11 Introduzca los nombres de usuario correspondientes y confirme con ENTER ADM AREA Insert new code ADM AREA Confirm new code ADM AREA User number 1 ADM AREA User number 1 Insert new code ADM AREA User number 1 Confirm new code NOTA Con la tecla de información amarilla se puede cambiar entre mayúscu las y minúsculas ADM AR...

Page 144: ...ducir uno para desbloquear la estación 1 Introduzca el código de usuario correspondiente Si introduce un código de usuario erróneo aparecerá el siguiente mensaje de error Si lo introduce correctamente la estación de desbloquea y se eleva Aparece el nombre del usuario NOTA Se ha creado el usuario y el menú vuelve a cambiar a la selección de usuario Ahora podrá crear otro usuario o salir del menú co...

Page 145: ...as de flecha o seleccione Base de datos y con firme con ENTER 5 Seleccione Personal DB y confirme con ENTER 6 En esta base de datos vacía seleccione con las teclas de dirección o la entrada correspondiente y confirme con ENTER 7 Para modificar los datos introducidos pulse la tecla amarilla Info 8 Introduzca en los campos vacíos los datos del vehículo modelo tipo y confirme con ENTER Selec automáti...

Page 146: ...idad de llenado de refrigerante y confirme con ENTER Se ha creado la entrada Ahora podrá crear otra entrada seleccione con las flechas de direc ción y después proceda según lo descrito o salir del menú con la tecla STOP AUDI 0 A4 8E 2000 2004 g 500 AUDI 0 A4 8E 1 ...

Page 147: ...ión comunica que se deben transferir los datos guardados del año anterior a un lápiz USB Si se transfieren los datos del año a un lápiz USB éstos se borran de la memoria interna de la estación 1 Inserte el lápiz USB en la conexión USB 15 2 Siga las instrucciones que aparecen en la pantalla NOTA El lápiz USB debe estar formateado con el sistema de archivos FAT32 NOTA El informe puede contener un lo...

Page 148: ... la tecla ENTER 4 Con la tecla de flecha seleccione Mantenimiento y confirme con ENTER 5 Introduzca la contraseña y confirme con ENTER 4910 informe mensual 4918 informe anual Si no se ha insertado ningún lápiz USB o si éste no se detecta se visualiza Error 52 6 Con las teclas de flecha o seleccione la entrada que desee y confirme con ENTER 7 Siga las instrucciones que aparecen en la pantalla 8 Vue...

Page 149: ...tecla ENTER 3 Con la tecla de dirección seleccione Servicio y confirme con ENTER 4 Introduzca la contraseña 9051 y confirme con ENTER 5 Con las teclas de dirección o seleccione el año que desee y confirme con ENTER Ejemplo 134a desde sistema indica la cantidad de refrigerante recuperado En este ejemplo se recuperaron en 2015 un total de 650 g de refrigerante con la estación Selec automática Selecc...

Page 150: ...talla la vista mensual En este ejemplo se purgaron en enero de 2015 un total de 2400 g de refrigerante En la vista mensual se muestra alternativamente la cantidad llenada y la recuperada La vista general puede imprimirse en cualquier momento pulsando la tecla ENTER Con la tecla STOP se finaliza la vista general 134a a sistema Total 2015 g 9000 PRINT STOP EXIT 134a desde sistema 01 2015 g 2400 PRIN...

Page 151: ...o 4 Con las teclas de dirección o seleccione en el menú básico Otras selecciones 5 Para confirmar pulse la tecla ENTER 6 Con las teclas de dirección o seleccione Prueba pres A C Aparece un mensaje requiriendo que controle el equipo de aire acon dicionado NOTA La prueba del equipo de aire acondicionado sólo puede realizarse en vehículos equipados con una conexión para baja presión y una para alta p...

Page 152: ... rápido HD alta presión y retírelo del equipo de aire acondicionado I Aparecen los siguientes mensajes en pantalla 10 Para finalizar el control del equipo de aire acondicionado pulse la tecla STOP Desconectar la manguera AP del equipo de A C ENTER OK NOTA Si ha apagado el motor del vehículo para retirar el acoplamiento rápido HD vuelva a encenderlo y encienda también el aire acondicionado Espere R...

Page 153: ... presión Al concluir cada proceso se imprime un informe de servicio 1 Una las conexiones correspondientes del AirConServiceCenter con el equipo de aire acondicionado del vehículo y ábralas 2 Con las teclas de dirección o seleccione en el menú básico Selección libre 3 Para confirmar pulse la tecla ENTER 4 Introduzca los datos del vehículo y confirme con ENTER NOTA Con el menú Selección libre se rea...

Page 154: ...tulo Pro ceso de llenado en la página 155 3 Con la tecla de dirección introduzca el tiempo de verificación de fuga que desee 4 Confirme los dos ajustes con ENTER I Recup Reciclado Sí fase No ENTER OK STOP EXIT Aumento de presión Test tiempo min 5 ENTER OK STOP EXIT NOTA El tiempo de espera garantiza que el refrigerante residual se evapore y se pueda entonces recuperar La evaporación del refrigeran...

Page 155: ...os los ajustes con ENTER I Fase rellenado Sí No ENTER OK STOP EXIT Aceite PAG ml 5 Aditivo UV ml 7 Refrigerante g 500 ENTER OK STOP EXIT NOTA Si durante el desarrollo del proceso tiene lugar también un proceso de recuperación la cantidad de aceite nuevo se considera cantidad de llenado extra que se añade a la cantidad de aceite usado previa mente recuperado Si se ajusta este valor a 0 se vuelve a ...

Page 156: ...odos los ajustes inicie los procesos con ENTER 8 7 5 Tras finalizar el mantenimiento del equipo de aire acondicionado Cuando se termina el servicio de mantenimiento del aire acondicio nado aparece un mensaje exhortándole a desconectar las mangue ras de servicio del AirConServiceCenter del equipo de aire acondicionado del vehículo 1 Desconecte las mangueras de servicio 10 y 11 y pulse ENTER para co...

Page 157: ...seleccio nada parpadea y pulse ENTER para confirmar 8 Deseleccione Fase rellenado con No la configuración seleccio nada parpadea y pulse ENTER para confirmar 9 Seleccione Arrancar el proceso con ENTER 10 Una vez finalizado el proceso de absorción desconecte la estación del vehículo NOTA Con el menú Flushing se limpia el equipo de aire acondicionado del vehículo con refrigerante nuevo Esta limpieza...

Page 158: ...uando proceda introduzca los datos que desee con el teclado de mando 7 y pulse ENTER para confirmar Si no hace falta introducir ningún valor pulse ENTER para ir al siguiente paso del programa 17 Seleccione mediante las teclas de dirección o si debe limpiarse todo el equipo de aire acondicionado o sólo componentes sueltos 18 Para confirmar pulse la tecla ENTER 19 Para continuar proceda según las in...

Page 159: ...mar 27 Introduzca la cantidad de llenado para el refrigerante tenga en cuenta la cantidad de llenado de aceite del compresor 28 Para continuar proceda según las indicaciones en pantalla 6 seleccione la configuración que desee la configuración seleccio nada parpadea y pulse ENTER para confirmar 29 Seleccione Arrancar el proceso con ENTER Cuando se termina el proceso de llenado aparece un mensaje ex...

Page 160: ...e la báscula NOTA Para un cálculo correcto de las cantidades de aceite y de aditivo UV es necesario comprobar regularmente la calibración de las básculas y corregirla en caso necesario Es necesario corregirla cuando la cantidad contenida en un recipiente difiera en más de 10 ml del valor nominal el AirConServiceCenter haya sufrido sacudidas p ej durante el transporte por caminos de suelo irregular...

Page 161: ... usado 19 Cuando se haya descargado las básculas pulse ENTER para confir mar El mensaje exhortándole a retirar los recipientes de la báscula parpadea Cuando se haya concluido correctamente la calibración aparece de nuevo el menú de selección de básculas 5 Vuelva a poner los recipientes en la posición de trabajo Vuelva a acoplar los recipientes para aceites 17 y 19 y para el aditivo UV 18 en los ci...

Page 162: ...pulse ENTER 6 Deseleccione Fase de vacío con No Para confirmar pulse ENTER 7 Deseleccione Fase rellenado con No Para confirmar pulse ENTER 8 Seleccione Arrancar el proceso Para confirmar pulse ENTER Se vacían entonces las mangueras de servicio y se activa el menú básico del AirConServiceCenter El compresor ha generado interna mente una ligera subpresión de tal forma que se puede cambiar el filtro ...

Page 163: ...o en el equipo desde la última puesta a cero ver fecha por medio de la opción de menú Rellenado tanque NOTA Después de realizar trabajos de mantenimiento debe borrar el mensaje de servicio correspondiente poner el contador a cero Para ello cam bie al menú Otras selecciones Servicio e introduzca aquí el código 7782 Con las teclas de dirección o seleccione la entrada que desee y confirme con ENTER S...

Page 164: ...re acondicionado desde la última puesta a cero ver fecha 9 4 Calibrar el sensor de presión I 1 Con las teclas de dirección o seleccione en el menú básico Otras selecciones 2 Para confirmar pulse la tecla ENTER 134a a sistema 07 03 14 g 1200 STOP EXIT Tiempo de vacío 07 03 14 min 79 STOP EXIT Servicio completado 08 03 14 Total 4 STOP EXIT NOTA Para poder realizar mediciones correctas es necesario q...

Page 165: ...rica que haya en la localidad y pulse ENTER para confirmar I 8 Cuando se haya concluido correctamente el calibrado pulse ENTER para salir del menú 9 Pulse dos veces STOP para acceder al menú Stand by 10 Vuelva a enroscar firmemente los acoplamientos de servicio 12 y 13 a las mangueras de servicio 10 y 11 Al hacerlo tenga en cuenta las marcas azules y rojas de los acoplamientos y las man gueras de ...

Page 166: ...ontal desenrosque los tornillos D del panel de mando y abata éste hacia arriba Desenrosque entonces los tornillos E abajo en la cubierta frontal y retírela 3 Coloque un recipiente con al menos litro de capacidad bajo el AirConServiceCenter Al vaciar el aceite de la bomba de vacío éste fluye a través de la abertura I situada en la base del aparato ADVERTENCIA Antes de abrir la carcasa del AirConSer...

Page 167: ...e que se han llenado en el equipo desde la última puesta a cero ver fecha por medio de la opción de menú Rellenado tanque 134a a sistema indica la cantidad de gramos de refrigerante que se ha llenado en los equipos de aire acondicionado desde la última puesta a cero ver fecha por medio de la opción de menú Selec automática o también Selección libre NOTA Después de realizar trabajos de mantenimient...

Page 168: ... gramos de refrigerante que se han llenado en el equipo por medio de la opción de menú Rellenado tanque Tiempo de vacío 07 03 14 min 79 STOP EXIT Servicio completado 07 03 14 Total 4 STOP EXIT NOTA El aparato guarda distintos estados del contador Para consultar los valores totales de forma ininterrumpida desde la fabricación del apa rato vaya al menú Otras selecciones Servicio e introduzca aquí el...

Page 169: ...e menú Selec automática o también Selección libre Tiempo de vacío indica cuánto tiempo ha estado la bomba de vacío en funcionamiento Servicio completado indica la cantidad de trabajos de mantenimiento realizados en el equipo de aire acondicionado 134a a sistema Total 07 03 14 g 1200 STOP EXIT Tiempo de vacío Total 07 03 14 min 79 STOP EXIT Servicio completado Total 08 03 14 Total 4 STOP EXIT ...

Page 170: ...aseña 7732 6 Introduzca la longitud de la manguera en centímetros 7 Para confirmar pulse la tecla ENTER NOTA Si se utilizan mangueras más largas o más cortas de lo previsto con el aparato es necesario adecuar las cantidades de llenado a las lon gitudes de manguera La manguera de servicio para el lado de alta presión y la del lado de baja presión deben ser siempre de la misma longitud de lo contrar...

Page 171: ... se guardan los siguientes datos en la memoria interna de la estación el software actual del AirConServiceCenter la base de datos actual con todos los tipos de vehículo convenciona les y las cantidades de llenado correspondientes para el equipo de aire acondicionado El software y la base de datos se pueden actualizar por separado 1 Copie el software actual en el lápiz USB 2 Inserte el lápiz USB en...

Page 172: ...ajustes por defecto Seguidamente se reinicia la estación y se visualiza el menú Stand by 4 Extraiga el lápiz USB La estación está lista para el funcionamiento 9 10 Limpieza y mantenimiento Limpie la carcasa con un paño húmedo cuando sea necesario Si es necesario utilice también un poco de lavavajillas No utilice disolven tes ni productos de limpieza abrasivos Compruebe periódicamente que ni las ma...

Page 173: ...tenedor amarillo 10 3 Gestión del aparato usado Cuando vaya a desechar definitivamente el AirConServiceCenter vacíe primero todos los líquidos del aparato y gestiónelos respetando el medio ambiente M Lleve el aparato al punto limpio más cercano o contacte con el servi cio de atención al cliente NOTA El aceite usado es un residuo especial No mezcle el aceite usado con otros líquidos Guarde el aceit...

Page 174: ...je durante el proceso de vacío cuando la presión en el equipo de aire acondi cionado sigue siendo supe rior a 50 mbares tras 8 minutos Compruebe si el equipo de aire acondicionado tiene fugas o bien compruebe las conexiones del AirConServiceCenter con el equipo de aire acondicio nado En pantalla aparece Fuga en el sistema Desea continuar Mensaje al final del proceso de vacío El equipo de aire acon...

Page 175: ... aparece Botella ext vacía o válvula cerrada Compruébelo Mensaje al principio o durante el llenado del reci piente interior de refrige rante cuando la cantidad de refrigerante ajustada no se puede alcanzar Compruebe si aún hay bas tante refrigerante disponible en el recipiente externo de refrigerante compruebe si las válvulas del recipiente externo de refrigerante están abiertas En pantalla aparec...

Page 176: ...icionado y las uniones en busca de fugas estrecha mientos y materia congelada Compruebe la calibración del sensor de presión En pantalla aparece Error 09 Durante el proceso de barrido no se ha podido detectar presión en la cone xión ND del equipo de man tenimiento de aire acondicionado Una la manguera de baja presión al recipiente de barrido y abra la válvula En pantalla aparece Error 10 Durante l...

Page 177: ...que la memoria USB haya sido formateada con el sistema de archivos FAT32 En pantalla aparece Error 60 En el funcionamiento híbrido barrido de las mangueras de servicio con aceite híbrido no se ha podido obtener vacío Están conectadas las mangueras de servicio al depósito de barrido híbrido Está correctamente montado el depósito de barrido híbrido Revise si las uniones presentan fugas En pantalla a...

Page 178: ...ectrónica para el aceite usado nuevo aditivo UV 1 g Rango de temperatura de funcionamiento 5 C hasta 45 C AirConServiceCenter ASC2000G Dimensiones anchura x altura x profundidad 560 mm x 1300 mm x 650 mm Peso 100 kg Alimentación de corriente 230 V 240 V 50 Hz 60 Hz Cantidad de refrigerante recuperado 18 kg hora Potencia de la bomba de vacío 5 autom hora Potencia del compresor hermético 0 32 kW Pot...

Page 179: ...tencia de la bomba de vacío 192 l hora Potencia del compresor hermético 0 6 kW Potencia del filtro de secado 150 kg Capacidad útil del depósito del cilindro de llenado 25 0 l 22 0 kg Emisiones de ruido 55 5 dB A Precisión de la báscula electrónica para el refrigerante 10 g Precisión de la báscula electrónica para el aceite usado nuevo 1 g Precisión de la báscula electrónica para el aditivo UV 1 g ...

Page 180: ...e 191 7 2 Menu de mode veille 192 7 3 Sélection de la langue 192 7 4 Entrer les données 193 7 5 Saisie de la date et de l heure 194 7 6 Modification des valeurs présaisies 195 7 7 Mise en place des bouteilles d huile et de traceur 196 7 8 Saisie de la taille de bouteille uniquement pour ASC2000G ASC3000G 197 7 9 Remplissage de la bouteille interne de réfrigérant 198 8 Fonctionnement 200 8 1 Sélect...

Page 181: ...ent de l huile de la pompe à vide 226 9 6 Statuts du compteur 228 9 7 Ajustement de la capacité des flexibles de longueur supérieure 230 9 8 Remplacement du papier de l imprimante 231 9 9 Mise à jour du logiciel à l aide de la clé USB 231 9 10 Entretien et nettoyage 233 10 Elimination 233 10 1 Elimination des liquides récupérés 233 10 2 Recyclage des emballages 233 10 3 Recyclage de l appareil usa...

Page 182: ...d utilisation Veuillez également tenir compte du manuel de formation de Dometic WAECO Climatisation des véhicules bases techniques de la brochure d information de Dometic WAECO Climatisation des véhicules bases juridiques des indications du fabricant de réfrigérant d éventuelles indications spécifiques de votre entreprise concernant l entretien des climatisations de véhicules Conservez ce manuel d...

Page 183: ...r l appareil Appuyer sur ENTER Gras Affichages à l écran Sélection courte Texte Texte Enumération dans un ordre quelconque Dispositif de surveillance de la pression Soupapes de sécurité 1 Texte 2 Texte 3 Texte Actions à effectuer dans l ordre indiqué 1 Raccorder l appareil 2 Mettre l appareil en marche 3 Appuyer sur la touche de sélection Texte Résultat d une manipulation L appareil est prêt à l e...

Page 184: ...onnelle lunettes et gants de protection et évitez tout contact corporel avec le réfrigérant Lors d un contact avec le réfrigérant le corps perd de sa chaleur ce qui peut pro voquer des gelures aux endroits concernés Ne respirez pas les vapeurs du réfrigérant Les vapeurs de réfrigérant ne sont certes pas nocives mais elles repoussent l oxygène nécessaire à la respiration Ne procédez à aucun travail...

Page 185: ...é et de réfrigérant peut être inflammable ou explosif 2 2 Avertissements se trouvant sur l AirConServiceCenter Attention Respectez les consignes du manuel d utilisation Raccordez l appareil uniquement à une prise de courant alternatif 230 V 50 Hz Protégez l appareil de la pluie Portez des gants lorsque vous manipulez le réfrigérant Portez des lunettes de protection lorsque vous manipulez le réfrig...

Page 186: ...r pour bouteille d huile et bouteille de colorant de détection UV de 500 ml Récipient fermé pour huile usagée 500 ml Bouteille d huile PAG ISO 46 500 ml Bouteille d huile PAG ISO 100 500 ml Bouteille de test additif UV pour environ 10 utilisations Lunettes de protection gants de protection Notice d utilisation Désignation Adaptateur de valve pour bouteilles de réfrigérant WAECO Adaptateur pour bou...

Page 187: ...teur pour bouteille d huile et bouteille de colorant de détection UV de 500 ml Récipient fermé pour huile usagée 500 ml Bouteille d huile de compresseur pour climatisations Bouteille de traceur Bouteille d huile neuve de deuxième type Huile Ester SE 55 500 ml Housse de protection pour l appareil Lunettes de protection gants de protection Notice d utilisation ...

Page 188: ...013 Bouteille huile neuve PAG ISO 100 500 ml 8887200014 Bouteille de colorant de détection UV 500 ml TP 3820 500 Adaptateur pour bouteille d huile et bouteille de colorant de détection UV de 500 ml 4440600026 Récipient d huile pour une autre sorte d huile 250 ml 4440600034 Récipient d huile usagée 500 ml 4440600033 Filtre de remplacement pour entretien 4440400009 Réservoir de fluide frigorigène de...

Page 189: ... de l AirConServiceCenter 6 1 Face avant 1 Manomètre basse pression 2 Voyant d état rouge Remplir 3 Voyant d état bleu Evacuer 4 Voyant d état vert Aspirer 5 Manomètre haute pression 6 Affichage 7 Clavier 8 Plaque avant 9 Roues avant avec freins 13 12 3 4 5 9 8 7 6 2 16 15 11 10 14 1 ...

Page 190: ...ression rouge 12 Connecteur d entretien pour raccord haute pression rouge 13 Connecteur d entretien pour raccord basse pression bleu 14 Imprimante 15 Port USB 16 Unité d affichage 6 2 Face arrière 17 Pulvérisateur d huile neuve 500 ml 18 Bouteille pour traceur 500 ml 19 Réservoir d huile usagée 20 Volet de protection 21 Interrupteur principal 21 19 18 17 20 ...

Page 191: ...elques secondes SW statut du logiciel DB base de données SN numéro de série L AirConServiceCenter effectue ensuite un test logiciel Pour terminer le processus de démarrage l AirConServiceCenter affiche les données suivantes ASC1000G ASC2000G ASC3000G REMARQUE Pendant l utilisation l appareil doit reposer sur une surface plane et horizontale afin que les mesures puissent être effectuées correctemen...

Page 192: ...eur heure date 7 3 Sélection de la langue 1 Appuyez sur les touches fléchées ou pour accéder au menu de base 2 Dans le menu de base sélectionner Autres menus à l aide de la touche fléchée ou 3 Confirmer en appuyant sur ENTER 4 Sélectionner Service avec la touche fléchée 5 Confirmer en appuyant sur ENTER 6 Entrer le mot de passe 5264 7 Sélectionner une langue avec la touche fléchée ou 8 Confirmer e...

Page 193: ...e lignes des données affichées apparaît à l écran après le message Entrez données 01 à 05 Les touches fléchées ou permettent de sélectionner la ligne souhaitée dans les données 7 Saisir les données souhaitées à l aide du clavier 7 et des touches fléchées Appuyer sur la touche d information afin de passer des majus cules aux minuscules et inversement Pour effacer les caractères appuyer brièvement s...

Page 194: ...onner Autres menus à l aide de la touche fléchée ou 2 Confirmer en appuyant sur ENTER 3 Sélectionner Service avec la touche fléchée 4 Confirmer en appuyant sur ENTER 5 Entrer le mot de passe 8463 6 Saisir les données souhaitées à l aide du clavier et des touches fléchées 7 Confirmer en appuyant sur ENTER 8 Appuyer sur STOP pour accéder au menu de mode veille Sélection courte Sélection libre Autres...

Page 195: ... Autres menus à l aide de la touche fléchée ou 2 Confirmer en appuyant sur ENTER 3 Sélectionner Service avec la touche fléchée 4 Confirmer en appuyant sur ENTER 5 Entrer le mot de passe 7388 6 Saisir les données souhaitées à l aide du clavier et des touches flé chées 7 Confirmer en appuyant sur ENTER 8 Appuyer sur STOP pour accéder au menu de mode veille Paramètres Valeur présaisie en usine Temps ...

Page 196: ...uvrir le volet de protection 20 sur le côté gauche et placer les récipients sur les raccords rapides bouteille pour huile neuve 17 bouteille pour traceur 18 et bouteille d huile ancienne 19 2 Fermer le volet de protection 20 3 Saisir la taille de la bouteille d huile neuve et de traceur UV voir cha pitre Saisie de la taille de bouteille uniquement pour ASC2000G ASC3000G page 197 19 18 17 20 ...

Page 197: ...l AirConServiceCenter 1 Dans le menu de base sélectionner Autres menus à l aide de la touche fléchée ou 2 Confirmer en appuyant sur ENTER 3 Sélectionner Service avec la touche fléchée 4 Confirmer en appuyant sur ENTER 5 Entrer le mot de passe 2688 6 Activer les champs souhaités à l aide des touches fléchées les champs noircis sont activés 7 Confirmer en appuyant sur ENTER 8 Appuyer sur STOP pour a...

Page 198: ...nies d un raccord Lors du remplissage de l AirConServiceCenter le raccord doit se trouver en haut placer la bouteille verticalement Bouteilles de réfrigérant avec tuyau de refoulement Ces bouteilles disposent de deux raccords Pour remplir l AirConServiceCenter on utilise le raccord marqué L liquide Lors du remplissage de l AirConServiceCenter le raccord doit se trouver en haut placer la bouteille ...

Page 199: ...e interne de réfrigérant est remplie La fin du processus de remplissage est confirmée par un signal sonore Fermer les vannes et confirmer en appuyant sur ENTER 6 Après le remplissage la quantité de réfrigérant présente dans la bouteille interne s affiche Appuyer sur STOP pour quitter le menu Appuyer une nouvelle fois sur STOP pour accéder au menu de mode veille L appareil est alors prêt à fonction...

Page 200: ...EMARQUE Le menu Sélection courte permet d exécuter des travaux d entre tien de la climatisation en mode complètement automatique Il suffit d indiquer le niveau de remplissage figurant sur l autocollant placé dans le véhicule ou indiqué par la base de données Dans le menu Sélection courte les étapes suivantes sont exécu tées automatiquement les unes après les autres aspiration du réfrigérant recycl...

Page 201: ... pression Confirmer en appuyant sur ENTER L entretien automatique de la climatisation est lancé Une fois que l entretien de la climatisation est terminé l écran affiche un message demandant de déconnecter les flexibles d entretien 10 et 11 de l AirConServiceCenter de la climatisation du véhicule 10 Déconnecter les flexibles 10 et 11 et appuyer sur ENTER pour valider Les flexibles d entretien sont ...

Page 202: ... menus à l aide de la touche fléchée ou 2 Confirmer en appuyant sur ENTER 3 Sélectionner Service avec la touche fléchée et confirmer en appuyant sur ENTER 4 Saisir le mot de passe 9786 et confirmer en appuyant sur ENTER pour accéder au menu administrateur ADM 5 Saisir le code administrateur 0000 réglage en usine et confir mer en appuyant sur ENTER I Sélection courte Sélection libre Autres menus EN...

Page 203: ...ient obligatoire pour mettre l appa reil en marche 10 Confirmer le nouveau code utilisateur I 11 Saisir le nom d utilisateur correspondant et confirmer la saisie en appuyant sur ENTER ADM AREA Insert new code ADM AREA Confirm new code ADM AREA User number 1 ADM AREA User number 1 Insert new code ADM AREA User number 1 Confirm new code REMARQUE La touche info jaune permet de commuter entre les maju...

Page 204: ...r activer le poste 1 Saisir le code utilisateur correspondant En cas de saisie d un code utilisateur incorrect le message d erreur suivant s affiche Lorsque la saisie est correcte le poste est activé et démarre Le nom de l utilisateur s affiche REMARQUE L utilisateur est configuré et le menu repasse en sélection utilisateur Vous pouvez maintenant configurer un autre utilisateur ou quitter le menu ...

Page 205: ...r en appuyant sur ENTER 4 À l aide des touches fléchées ou sélectionner Base de données et confirmer en appuyant sur ENTRÉE 5 Sélectionner Personal DB et confirmer en appuyant sur ENTER 6 Sélectionner l entrée correspondante dans la base de données vide avec la touche fléchée ou et confirmer en appuyant sur ENTER 7 Pour modifier les entrées appuyer sur la touche jaune Info 8 Dans les champs libres...

Page 206: ...ur ENTER L entrée est configurée Vous pouvez maintenant configurer une autre entrée sélectionner avec les touches fléchées puis poursuivre selon les indications ou bien quitter le menu en appuyant sur STOP ____________ 0 ___________________ ____________ g ___ 0 AUDI 0 A4 8E 2000 2004 g 500 AUDI 0 A4 8E 1 ...

Page 207: ...gement d année Après un changement d année le poste signale que les données mémo risées pour l année précédente doivent être transférées sur une clé USB Si vous transférez les données annuelles sur une clé USB celles ci sont ensuite supprimées de la mémoire interne du poste 1 Enficher la clé USB dans le port USB 15 2 Suivre les indications à l écran REMARQUE La clé USB doit être formatée pour le s...

Page 208: ...ER 4 À l aide de la touche fléchée sélectionner Service et confir mer en appuyant sur ENTER 5 Saisir le mot de passe et confirmer en appuyant sur ENTER 4910 rapport mensuel 4918 rapport annuel Si aucune clé USB n est enfichée ou si elle n est pas reconnue Error 52 s affiche 6 À l aide des touches fléchées ou sélectionner l entrée souhai tée et confirmer en appuyant sur ENTER 7 Suivre les indicatio...

Page 209: ...sur ENTER 3 Sélectionner Service avec la touche fléchée et confirmer en appuyant sur ENTER 4 Saisir le mot de passe 9051 et confirmer en appuyant sur ENTER 5 A l aide des touches fléchées ou sélectionner l année souhai tée et confirmer en appuyant sur ENTER Exemple R134a du système indique la quantité de réfrigérant aspiré Dans cet exemple 18 650 g de fluide frigorigène ont été aspirés par la stat...

Page 210: ...che à l écran Dans cet exemple 2 400 g de fluide frigorigène ont été aspirés en janvier 2015 Dans la vue mensuelle la quantité remplie et la quantité aspirée s affichent alternativement Il est à tout moment possible d imprimer la vue d ensemble en appuyant sur la touche ENTER Vous pouvez quitter la vue d ensemble en appuyant sur la touche STOP R1234 vers A C Total 2015 g 9000 PRINT STOP EXIT R134a...

Page 211: ...e sélectionner Autres menus à l aide de la touche fléchée ou 5 Confirmer en appuyant sur ENTER 6 Sélectionner Test système A C à l aide de la touche fléchée ou Le message vous invitant à contrôler le climatiseur apparaît 7 Contrôler que la basse pression et la haute pression du climatiseur sont conformes aux données du fabricant REMARQUE Le test système A C ne peut être effectué que sur des véhicu...

Page 212: ...limatiseur I Les messages suivants s affichent 10 Pour terminer le test système A C appuyer sur STOP Déconnectez le flexible HP du système A C ENTER OK REMARQUE Si vous avez arrêté le moteur du véhicule pour débrancher le flexible HP redémarrez le et mettez le climatiseur en marche Attendez Vidange des flexibles Program terminé STOP EXIT ...

Page 213: ...cessus 1 Connecter les raccords correspondants de l AirConServiceCenter au système de climatisation du véhicule et les ouvrir 2 Dans le menu de base sélectionner Sélection courte à l aide de la touche fléchée ou 3 Confirmer en appuyant sur ENTER 4 Saisir les données de véhicules et confirmer en appuyant sur ENTER REMARQUE Le menu Sélection libre permet d effectuer l entretien de la climati sation ...

Page 214: ...n sélectionne Phase de vide saisir le temps de vide que l on souhaite standard 20 min ou sinon poursuivre avec chapitre Phase de charge page 215 3 Saisir à l aide de la touche fléchée la durée de test de fuite de votre choix 4 Confirmer les deux réglages en appuyant sur ENTER Phase de Oui recyclage Non ENTER OK STOP EXIT Temps pour la diff de pression min 5 ENTER OK STOP EXIT REMARQUE Le temps d a...

Page 215: ... étrangers ou humidité éventuels et à préparar le système pour la phase de charge Les résidus de réfrigérant aspirés encore mélangés à l huile réfrigérante sont collectés et recyclés par l AirConServiceCenter Phase de charge Oui Non ENTER OK STOP EXIT Huile réfr ml 5 Traceur ml 7 Réfrigérant g 500 ENTER OK STOP EXIT REMARQUE Si un processus d aspiration a lieu dans le même cycle de proces sus la q...

Page 216: ...fectués lancer les processus en appuyant sur ENTER 8 7 5 Après que l entretien de la climatisation est terminé Une fois que l entretien de la climatisation est terminé l écran affiche un message demandant de déconnecter les flexibles d entretien de l AirConServiceCenter de la climatisation du véhicule 1 Déconnecter les flexibles de service 10 et 11 et appuyer sur ENTER pour valider Les flexibles d...

Page 217: ...ionné clignote et appuyer sur ENTER pour valider 8 Désactiver Phase de charge en appuyant sur Non le réglage sélectionné clignote et appuyer sur ENTER pour valider 9 Sélectionner Démarrer processus à l aide de la touche ENTER 10 Une fois terminé le processus d aspiration déconnecter le poste du véhicule REMARQUE Le menu Rinçage A C permet de rincer la climatisation du véhicule avec un réfrigérant ...

Page 218: ...s échéant les données souhaitées à l aide du clavier 7 et appuyer sur ENTER pour confirmer S il n est pas nécessaire de saisir de données appuyer sur ENTER pour passer à l étape suivante du programme 17 A l aide des touches fléchées ou déterminer si toute la climati sation doit être rincée ou seulement certains composants 18 Confirmer en appuyant sur ENTER 19 Pour poursuivre suivre les indications...

Page 219: ... clignote et appuyer sur ENTER pour valider 27 Saisir la quantité de réfrigérant tenir compte de la capacité en huile du compresseur 28 Pour poursuivre suivre les indications affichées à l écran 6 sélectionner le réglage souhaité le réglage sélectionné clignote et appuyer sur ENTER pour confirmer 29 Sélectionner Démarrer processus à l aide de la touche ENTER Une fois la phase de charge terminée l ...

Page 220: ...essaire de contrôler régulièrement les points zéro des balances ou de procéder le cas échéant à un nouveau réglage afin de pouvoir mesurer correctement les quantités d huile et de traceur Un nouveau réglage est nécessaire si la quantité d un récipient présente une différence de plus de 10 ml par rapport à la valeur de consigne si l AirConServiceCenter a subi des chocs par ex transport sur des traj...

Page 221: ...enne 19 Une fois les balances déchargées confirmer en appuyant sur ENTER Le message demandant d enlever les récipients de la balance clignote Une fois effectué le réglage du point zéro le menu de sélection pour les balances réapparaît 5 Replacer les bouteilles en position de travail remettre les récipients pour huile 17 et 19 et pour traceur 18 sur les raccords rapides et refermer le volet 20 6 Ap...

Page 222: ... 6 Désactiver Phase de vide avec Non Valider en appuyant sur ENTER 7 Désactiver Phase de charge avec Non Valider en appuyant sur ENTER 8 Sélectionner Démarrer processus Valider en appuyant sur ENTER Les flexibles de service sont alors vidangés et le menu de base de l AirConServiceCenter est activé Le compresseur a créé une légère sous pression interne si bien que le filtre peut être changé avec tr...

Page 223: ...zéro voir date au moyen de l entrée de menu Remplir bout int REMARQUE Une fois que les travaux d entretien sont terminés vous devez effacer les messages de service correspondants remise à zéro du compteur Passez pour ce faire à Autres menus Service et entrez le mot de passe 7782 A l aide des touches fléchées ou sélectionner la saisie et confirmer en appuyant sur ENTER Suivre les instructions sur l...

Page 224: ...e à zéro voir date 9 4 Calibrage du capteur de pression I 1 Dans le menu de base sélectionner Autres menus à l aide de la touche fléchée ou 2 Confirmer en appuyant sur ENTER R134a vers A C 07 03 14 g 1200 STOP EXIT Temps de vide 07 03 14 min 79 STOP EXIT Service terminé 08 03 14 Nombre 4 STOP EXIT REMARQUE Pour que les mesures de pression soient correctes il est nécessaire que le capteur de pressi...

Page 225: ...le à l aide du clavier 7 et appuyer sur ENTER pour confirmer I 8 Lorsque le calibrage a été effectué appuyer sur ENTER pour quitter le menu 9 Appuyer deux fois sur STOP pour accéder au menu de mode veille 10 Revisser fermement les connecteurs 12 et 13 sur les flexibles de service 10 et 11 en tenant compte des marquages bleus et rouges des connecteurs et flexibles Remplir bout int Rinçage A C Remis...

Page 226: ...du tableau de commande et rabattre le tableau de commande vers le haut Ensuite dévisser les vis E en bas de la plaque avant et retirer la plaque avant 3 Placer un récipient d une capacité minimale d litre sous l AirConServiceCenter La vidange de la pompe à vide s effectue par l orifice I du fond de l appareil 4 Dévisser la vis de remplissage d huile G AVERTISSEMENT Eteindre l AirConServiceCenter e...

Page 227: ... zéro voir date au moyen de l entrée de menu Remplir bout int R134a vers A C indique combien de grammes de réfrigérant ont été ajoutés dans les climatiseurs depuis la dernière remise à zéro voir date au moyen de l entrée de menu Sélection courte ou Sélection libre REMARQUE Une fois les travaux d entretien terminés vous devez effacer les mes sages de service correspondants remise à zéro du compteur...

Page 228: ...ajoutés dans l appareil au moyen de l entrée de menu Remplir bout int Temps de vide 07 03 14 min 79 STOP EXIT Service terminé 07 03 14 Nombre 4 STOP EXIT REMARQUE L appareil mémorise différents statuts du compteur Afin d appeler les valeurs totales consécutivement depuis que l appreil a été produit rendez vous au menu Autres menus Service et saisissez y le code 7783 Sélectionner la saisie que vous...

Page 229: ...ction courte ou Sélection libre Temps de vide indique combien de temps la pompe à vide a fonc tionné en tout Service terminé indique la quantité de travaux d entretien ayant été effectués par l appareil d entretien de la climatisation R134a vers A C Total 07 03 14 g 1200 STOP EXIT Temps de vide Total 07 03 14 min 79 STOP EXIT Service terminé Total 08 03 14 Nombre 4 STOP EXIT ...

Page 230: ...er la longueur de flexible en centimètres 7 Confirmer en appuyant sur ENTER REMARQUE Si des flexibles plus longs ou plus courts doivent être utilisés pour l appareil il est nécessaire d adapter les quantités de remplissage aux nouvelles longueurs des flexibles Le flexible de service pour le côté haute pression et celui pour le côté basse pression doivent toujours être de même longueur sinon les qu...

Page 231: ... aide d une clé USB ILors de la mise à jour du logiciel les données suivantes sont enregistrées dans la mémoire interne du poste le logiciel actuel de l AirConServiceCenter une base de données actuelle avec tous les types de véhicules cou rants et les niveaux de remplissage correspondants pour la climatisa tion Vous pouvez actualiser le logiciel et la base de données indépendam ment l un de l autr...

Page 232: ...lle s affiche sur fond noir à la ligne tout en bas 3 Pour actualiser le logiciel ou la base de données appuyer sur ENTER Le poste affiche la progression de l actualisation Après l actualisation le poste règle les paramètres par défaut Ensuite le poste redémarre et le menu de veille s affiche 4 Retirer la clé USB Le poste est prêt à fonctionner New firmware release found ENTER upgrade STOP EXIT AS2...

Page 233: ... Jetez les emballages dans le container pour vieux papiers Jetez le matériel d emballage plastique dans le container adéquat 10 3 Recyclage de l appareil usagé Lorsque vous mettrez votre AirConServiceCenter définitivement hors service vidangez d abord l appareil pour éliminer tous les liquides et recyclez les liquides en tenant compte des directives relatives à la protection de l environnement M R...

Page 234: ...s sus de vide lorsque la pres sion dans le système de climatisation est encore supérieure à 50 mbars au bout de 8 minutes Vérifier que le système de cli matisation ne fuit pas et véri fier les raccordements de l AirConServiceCenter avec le système de climatisation Affichage à l écran Sys A C non étanche Continuer Message à la fin du proces sus de vide Le système de climatisation a une perte de vid...

Page 235: ...ssible d ajouter la quantité de réfri gérant déterminée Vérifier que le liquide peut s écouler dans les raccords de l AirConServiceCenter Affichage à l écran Bouteille ext vide ou vanne fermée Contrôlez Message au début du rem plissage ou pendant le rem plissage de la bouteille interne de réfrigérant si la quantité prédéterminée de réfrigérant n a pu être atteinte Vérifier qu il y a encore suffi s...

Page 236: ...e du cap teur de pression Affichage à l écran Erreur 03 Aucune valeur ne peut être obtenue de la balance de fri gorigène Vérifier que la balance fonc tionne Affichage à l écran Erreur 04 Lors du rinçage la pression ne peut pas être réduite Vérifier si la climatisation et les raccords manquent d étanchéité sont rétrécis ou oxydés Vérifier le calibrage du cap teur de pression Affichage à l écran Err...

Page 237: ...vanne RE La température ambiante est elle inférieure à 10 C Affichage à l écran Erreur 52 Aucune clé USB n a été trouvée détectée Connecter la clé USB S assurer que la clé USB est formatée pour le système de fichiers FAT32 Affichage à l écran Erreur 60 Le vide n a pas pu être atteint lors du service hybride rin çage des flexibles de service avec de l huile hybride Les flexibles de service sont ils...

Page 238: ...n de la balance électronique pour huile ancienne neuve traceur 1 g Plage de température de fonctionnement de 5 C à 45 C AirConServiceCenter ASC2000G Dimensions largeur x hauteur x profondeur 560 mm x 1300 mm x 650 mm Poids 100 kg Alimentation 230 V 240 V 50 Hz 60 Hz Débit d aspiration du réfrigérant 18 kg h Puissance de la pompe à vide 5 véhic h Puissance du compresseur hermétique 0 32 kW Puissanc...

Page 239: ... kg h Puissance de la pompe à vide 192 l h Puissance du compresseur hermétique 0 6 kW Puissance du filtre sec 150 kg Capacité utile du réservoir du cylindre de charge 25 0 l 22 0 kg Emission sonore 55 5 dB A Précision de la balance électronique pour réfrigérant 10 g Précision de la balance électronique pour huile ancienne neuve 1 g Précision de la balance électronique pour traceur 1 g Plage de tem...

Page 240: ... в эксплуатацию 251 7 1 Установка и включение 251 7 2 Меню режима готовности 252 7 3 Выбор языка 252 7 4 Ввод данных о компании 253 7 5 Ввод даты и времени 254 7 6 Изменение заданных значений 255 7 7 Установка емкостей для масел и УФ присадки 256 7 8 Ввод размеров емкостей только для ASC2000G ASC3000G 257 7 9 Заполнение внутренней емкости хладагентом 258 8 Эксплуатация 260 8 1 Быстрый пуск 260 8 2...

Page 241: ...сла вакуумного насоса 286 9 6 Показания счетчиков 288 9 7 Коррекция заливаемого объема для длинных сервисных шлангов 289 9 8 Замена бумаги для принтера 290 9 9 Выполнение обновления программы через USB 291 9 10 Чистка и уход 292 10 Утилизация 293 10 1 Утилизация собранных жидкостей 293 10 2 Утилизация упаковочного материала 293 10 3 Утилизация отслужившего свой срок прибора 293 11 Что делать если ...

Page 242: ... в первый раз ввести прибор в эксплуатацию внимательно прочтите данную инструкцию Кроме того соблюдайте Руководство по обучению Кондиционирование воздуха в авто мобилях Технические основы компании Dometic WAECO Информационная брошюра Кондиционирование воздуха в автомобилях Юридические основы компании Dometic WAECO Указания изготовителя хладагента Возможно имеющиеся на Вашем предприятии особые указ...

Page 243: ... при боре Нажать ENTER Жирный шрифт Сообщения на дисплее Short selection Текст Текст Перечни в любой последова тельности Защитное реле давления Предохранительные кла паны 1 Текст 2 Текст 3 Текст Операции которые должны быть выполнены в указанной последовательности 1 Присоединить прибор 2 Включить прибор 3 Нажать кнопку выбора Текст Результат действия Прибор готов к эксплуата ции Текст 1 Номера дет...

Page 244: ...те данный прибор только для указанных целей Используйте только хладагент R 134a Смешивание хладагента с другими хладагентами может приводить к повреждению AirConServiceCenter и автомобильного кондиционера Используйте только УФ присадки WAECO Использование других УФ присадок может приводить к повреждениям AirConServiceCenter Носите средства индивидуальной защиты защитные очки и защит ные рукавицы и...

Page 245: ... лакирования Для включения и выключения всегда используйте главный выключа тель AirConServiceCenter Не оставляйте включенный прибор без присмотра Перед выключением AirConServiceCenter убедитесь в том что выбранная программа закончена и все клапаны закрыты В противном случае может выливаться хладагент Не подавайте сжатый воздух в линии хладагента AirConServiceCenter или автомобильного кондиционера ...

Page 246: ...жности были тщательно проверены перед отправкой После поставки проверьте имеются ли и не повреждены ли все ниженазванные детали В случае отсутствия или повреждения деталей проинформируйте ответственное за транспортировку предприятие ASC1000G Арт 9103301843 Наименование Адаптер балонного вентиля для баллонов с хладагентом WAECO Адаптер для 500 мл баллона со свежим маслом и УФ контрастным средством ...

Page 247: ... мл Пробная бутылка с УФ присадкой приблизительно для 10 применений Защитный кожух Защитные очки защитные рукавицы Инструкция по эксплуатации Наименование Адаптер балонного вентиля для баллонов с хладагентом WAECO Адаптер для 500 мл баллона со свежим маслом и УФ контрастным средством Закрытая емкость для отработавшего масла 500 мл Емкость для компрессорного масла Емкость для УФ контрастного средст...

Page 248: ...200013 Баллон со свежим маслом PAG полиалкиленгликоль ISO 100 500 мл 8887200014 Баллон с УФ контрастным средством 500 мл TP 3820 500 Адаптер для 500 мл баллона со свежим маслом и УФ контрастным средством 4440600026 Емкость для масла другого сорта 250 мл 4440600034 Емкость для отработавшего масла 500 мл 4440600033 Запасной фильтр для технического обслуживания 4440400009 Заполнительный цилиндр 4 4 к...

Page 249: ...кого давления 2 Красная лампа состояния Заполнение 3 Синяя лампа состояния Вакуумирование 4 Зеленая лампа состояния Отсос 5 Манометр высокого давления 6 Дисплей 7 Клавиатура управления 8 Лицевая панель 9 Фиксируемые передние колеса 10 Сервисный шланг подключения низкого давления синий 13 12 3 4 5 9 8 7 6 2 16 15 11 10 14 1 ...

Page 250: ...ная муфта для подключения высокого давления крас ная 13 Сервисная муфта для подключения низкого давления синяя 14 Принтер 15 USB порт 16 Блок индикации 6 2 Задняя сторона 17 Емкость со свежим маслом 500 мл 18 Емкость для УФ присадки 500 мл 19 Емкость для отработавшего масла 20 Заслонка 21 Главный выключатель 21 19 18 17 20 ...

Page 251: ...сии программного обеспечения SW версия программного обеспечения DB база данных SN серийный номер Затем выполняется программная проверка AirConServiceCenter В заключение процедуры пуска станция AirConServiceCenter показывает следующее ASC1000G ASC2000G ASC3000G УКАЗАНИЕ Для правильного проведения измерений прибор во время работы должен прочно стоять на ровном горизонтальном полу Dometic WAECO ASC20...

Page 252: ... количество УФ присадки Время Дата 7 3 Выбор языка 1 Для входа в базовое меню нажать кнопки со стрелками или 2 В базовом меню кнопками со стрелками или выбрать Other selections 3 Для подтверждения нажать ENTER 4 Кнопкой со стрелкой выбрать Service 5 Для подтверждения нажать ENTER 6 Ввести пароль 5264 7 Кнопками со стрелками или выбрать требуемый язык 8 Для подтверждения нажать ENTER 9 Нажать STOP ...

Page 253: ... На дисплее появляется число показываемых строк с данными о компании под сообщением Enter company data 01 05 Кнопками со стрелками или выбирается требуемая строка с данными о компании 7 С клавиатуры управления 7 и кнопками со стрелками ввести требуемые данные Для переключения между заглавными или строчными буквами нажать информационную кнопку Для стирания отдельных символов коротко нажать кнопку C...

Page 254: ...опками со стрелками или выбрать Other selections 2 Для подтверждения нажать ENTER 3 Кнопкой со стрелкой выбрать Service 4 Для подтверждения нажать ENTER 5 Ввести пароль 8463 6 С клавиатуры управления и кнопками со стрелками ввести тре буемые данные 7 Для подтверждения нажать ENTER 8 Для возврата в меню режима готовности нажать STOP Short selection Free selection Other selections ENTER OK ...

Page 255: ...ать Other selections 2 Для подтверждения нажать ENTER 3 Кнопкой со стрелкой выбрать Service 4 Для подтверждения нажать ENTER 5 Ввести пароль 7388 6 С клавиатуры управления и кнопками со стрелками ввести тре буемые данные 7 Для подтверждения нажать ENTER 8 Для возврата в меню режима готовности нажать STOP Параметры Значение заводской настройки Время ожидания роста давл мин 5 Время вакуума мин 20 Вр...

Page 256: ...сти 1 Открыть заслонку 20 на левой стороне и установить емкости на быстродействующие муфты емкость для свежего масла 17 емкость для УФ присадки 18 и емкость для отработавшего масла 19 2 Закрыть заслонку 20 3 Ввести размеры емкостей для свежего масла и УФ контрастного средства см гл Ввод размеров емкостей только для ASC2000G ASC3000G на стр 257 19 18 17 20 ...

Page 257: ...ть введены в AirConServiceCenter 1 В базовом меню кнопками со стрелками или выбрать Other selections 2 Для подтверждения нажать ENTER 3 Кнопкой со стрелкой выбрать Service 4 Для подтверждения нажать ENTER 5 Ввести пароль 2688 6 Кнопками со стрелками активировать требуемые поля темные поля активны 7 Для подтверждения нажать ENTER 8 Для возврата в меню режима готовности нажать STOP Short selection F...

Page 258: ...enters штуцер должен нахо диться вверху баллон расположить вертикально Баллоны с хладагентом с напорной трубкой Эти баллоны имеют два штуцера Для заполнения AirConServiceCenter используется штуцер обозначенный бук вой L liquid жидкость При заполнении AirConServiceCenters штуцер должен нахо диться вверху баллон расположить вертикально 1 В базовом меню кнопками со стрелками или выбрать Other selecti...

Page 259: ...нутренняя емкость для хладагента заполняется Окончание процесса заполнения подтверждается акустическим сигналом Закрыть клапаны и подтвердить нажатием ENTER 6 После заполнения указывается количество хладагента во вну тренней емкости Для выхода из меню нажать STOP Для возврата в меню режима готовности еще раз нажать STOP Теперь прибор готов к работе Set the quantity then confirm g 13620 ENTER OK ST...

Page 260: ...ыключены УКАЗАНИЕ С помощью меню Short selection проводится автоматическое обслуживание кондиционера Необходимо лишь ввести заливае мое количество согласно наклейке в автомобиле или из базы данных В меню Short selection автоматически друг за другом выполня ются следующие операции Отсос хладагента Рисайклинг хладагента чистота соответствует SAE J 2099 Проверка роста давления Слив отработавшего масл...

Page 261: ...ько один штуцер высокое или низкое давление Подтвердить нажатием ENTER Запускается автоматическое обслуживание кондиционера После того как обслуживание кондиционера закончено появля ется требование отсоединить сервисные шланги 10 и 11 при бора AirConServiceCenter от автомобильного кондиционера 10 Отсоединить сервисные шланги 10 и 11 и подтвердить нажа тием ENTER Сервисные шланги опорожняются После...

Page 262: ...опками со стрелками или выбрать Other selections 2 Для подтверждения нажать ENTER 3 Кнопкой со стрелкой выбрать Service и подтвердить нажа тием ENTER 4 Ввести пароль 9786 и подтвердить нажатием ENTER чтобы попасть в меню администратора ADM 5 Ввести код администратора 0000 заводская настройка и под твердить нажатием ENTER I Short selection Free selection Other selections ENTER OK Flushing Reset sca...

Page 263: ...ибор можно ввести в работу только с этим кодом 10 Подтвердить новый код пользователя I11 Ввести соответствующие имена пользователей и подтвердить нажатием ENTER ADM AREA Insert new code ADM AREA Confirm new code ADM AREA User number 1 ADM AREA User number 1 Insert new code ADM AREA User number 1 Confirm new code УКАЗАНИЕ Желтой кнопкой Информация можно переключать регистры ADM AREA User number 1 U...

Page 264: ...разблокировать стан цию 1 Ввести соответствующий код пользователя При вводе неверного кода пользователя появляется следующее сообщение об ошибке После успешного ввода станция деблокируется и запускается На дисплее появляется имя пользователя УКАЗАНИЕ Пользователь создан и меню снова переходит к выбору пользова телей Вы можете создать следующего пользователя или выйти из меню нажатием STOP ENTER US...

Page 265: ...нажатием ENTER 4 С помощью кнопок со стрелками или выберите Database и подтвердите нажатием ENTER 5 Выбрать Personal DB и подтвердить нажатием ENTER 6 В этой пустой здесь базе данных выбрать кнопками со стрел ками или соответствующую запись и подтвердить нажа тием ENTER 7 Для изменения записей нажать желтую кнопку Информация 8 В свободные поля ввести данные автомобилей модель тип и подтвердить наж...

Page 266: ...а и подтвердить нажа тием ENTER Запись создана Теперь Вы можете создать следующую запись выбрать кноп ками со стрелками затем как описано выше или выйти из меню нажатием кнопки STOP ____________ 0 ___________________ ____________ g ___ 0 AUDI 0 A4 8E 2000 2004 g 500 AUDI 0 A4 8E 1 ...

Page 267: ...о года станция сообщает что сохраненные дан ные прошедшего года должны быть переданы на USB накопитель После передачи годичных данных на USB накопитель они удаля ются из внутренней памяти станции 1 Вставить USB накопитель в USB порт 15 2 Следовать указаниям появляющимся на дисплее УКАЗАНИЕ USB накопитель должен быть отформатирован с файловой систе мой FAT32 УКАЗАНИЕ Отчет может содержать собственн...

Page 268: ...жать ENTER 4 Кнопкой со стрелкой выбрать Сервис и подтвердить нажа тием ENTER 5 Ввести пароль и подтвердить нажатием ENTER 4910 месячный отчет 4918 годовой отчет Если USB накопитель не вставлен или не распознается то появляется Error 52 6 Кнопками со стрелками или выбрать требуемую запись и подтвердить нажатием ENTER 7 Следовать указаниям появляющимся на дисплее 8 Нажатием STOP вернуться к предыду...

Page 269: ...нажать ENTER 3 Кнопкой со стрелкой выбрать Service и подтвердить нажа тием ENTER 4 Ввести пароль 9051 и подтвердить нажатием ENTER 5 Кнопками со стрелками или выбрать требуемый год и под твердить нажатием ENTER Пример Запись R134a from system указывает количество отсосанного хладагента В данном примере в 2015 году станция отсосала 18650 г хладагента Short selection Free selection Other selections ...

Page 270: ...ется месяч ный протокол В данном примере в январе 2015 года было отсосано 2400 г хлада гента В месячном протоколе залитое и отсосанное количество всегда ука зываются попеременно Протокол можно в любой момент распечатать нажимая кнопку ENTER После нажатия кнопки STOP показ протокола заканчива ется R1234 to system Total 2015 g 9000 PRINT STOP EXIT R1234 from system 01 2015 g 2400 PRINT STOP EXIT ...

Page 271: ...пками со стрелками или выбрать Other selections 5 Для подтверждения нажать ENTER 6 Кнопками со стрелками или выбрать A C system test Появляется требование проверить кондиционер 7 Проверить высокое и низкое давление в кондиционере согласно данным изготовителя УКАЗАНИЕ Проверка кондиционера может быть выполнена только в автомо билях которые оснащены одним штуцером низкого и одним штуце ром высокого ...

Page 272: ...ндиционера I На дисплее появляются следующие сообщения 10 Для окончания проверки кондиционера нажать кнопку STOP Disconnect the HP service hose from the A C system ENTER OK УКАЗАНИЕ Если для отсоединения муфты ВД Вы выключили двигатель авто мобиля то запустите его снова и включите кондиционер Wait Recovery from the service hoses Process completed STOP EXIT ...

Page 273: ...ключение каждого проведенного процесса распечатывается протокол обслуживания 1 Соответствующие штуцеры AirConServiceCenter вначале соеди нить с автомобильным кондиционером и открыть их 2 В базовом меню кнопками со стрелками или выбрать Free selection 3 Для подтверждения нажать ENTER 4 Ввести данные автомобиля и подтвердить нажатием ENTER УКАЗАНИЕ С помощью меню Free selection обслуживание кондицио...

Page 274: ... в остальных слу чаях продолжить с гл Процесс заполнения на стр 275 3 Копкой со стрелкой ввести требуемое время контроля вакуума 4 Обе настройки подтвердить нажатием ENTER I Rec Recycling Yes phase No ENTER OK STOP EXIT Pressure increase Test time min 5 ENTER OK STOP EXIT УКАЗАНИЕ Благодаря времени ожидания обеспечивается что возможно име ющиеся остатки хладагента может испариться а затем быть отс...

Page 275: ...ием ENTER I Filling phase Yes No ENTER OK STOP EXIT PAG oil ml 5 UV tracer ml 7 Refrigerant g 500 ENTER OK STOP EXIT УКАЗАНИЕ Если в ходе того же процесса происходит процесс отсоса то количество свежего масла считается дополнительным количе ством которое добавляется к ранее отсосанному количеству отработавшего масла Если установить это значение на 0 но заливается ровно такое же количество масла ко...

Page 276: ...ER 3 Когда выполнены все настройки начать процессы нажатием ENTER 8 7 5 После окончания обслуживания кондиционера После того как обслуживание кондиционера закончено появля ется требование отсоединить сервисные шланги прибора AirConServiceCenter от автомобильного кондиционера 1 Отсоединить сервисные шланги 10 и 11 и подтвердить нажа тием ENTER Сервисные шланги опорожняются После этого прибор снова ...

Page 277: ...o выбранная настройка мигает и подвердить нажатием ENTER 8 Отменить выбор Filling phase посредством No выбранная настройка мигает и подвердить нажатием ENTER 9 Выбрать Process start нажатием ENTER 10 После окончания процесса отсоса отсоединить станцию от авто мобиля УКАЗАНИЕ С помощью меню Flushing автомобильный кондиционер промы вается свежим хладагентом Промывка прежде всего служит для замены ст...

Page 278: ...ing 16 При необходимости с клавиатуры управления 7 ввести требуе мые данные и подтвердить нажатием ENTER Если данные не должны быть введены нажать ENTER чтобы перейти к следующему шагу программы 17 Кнопками со стрелками или выбрать должен ли быть про мыт весь кондиционер или один компонент 18 Для подтверждения нажать ENTER 19 Следовать указаниям на дисплее После окончания промывки появляется базов...

Page 279: ...lling phase выбранная настройка мигает и под вердить нажатием ENTER 27 Ввести заливаемое количество хладагента учитывать заливае мое количество компрессорного масла 28 Следовать указаниям на дисплее 6 Выбрать требуемую настройку выбранная настройка мигает и подвердить нажатием ENTER 29 Выбрать Process start нажатием ENTER После того как процесс заполнения закончен появляется требо вание отсоединит...

Page 280: ...АНИЕ Для правильного измерения количества масла и УФ присадки требуется регулярная проверка нулей весов и при необходимости подрегулировка Подрегулировка требуется если количество в емкости более чем на 10 мл отличается от заданного значения после встрясок прибора AirConServiceCenter например после транспортировки по неровному участку каждые четыре шесть недель Short selection Free selection Other...

Page 281: ...ть для отработавшего масла 19 Когда весы разгружены для подтверждения нажать ENTER Мигает требование снять емкость с весов Если подрегулировка нуля успешно проведена снова появля ется меню выбора для весов 5 Установить емкость обратно в рабочее положение Емкости для масла 17 и 19 и УФ присадки 18 присоединить к быстродейстьвующим муфтам и закрыть заслонку 20 6 Для возврата в меню режима готовности...

Page 282: ... Vacuum phase посредством No Для подтверждения нажать ENTER 7 Отменить выбор Filling phase посредством No Для подтверждения нажать ENTER 8 Выбрать Process start Для подтверждения нажать ENTER Сервисные шланги опорожняются и активируется базовое меню AirConServiceCenter Компрессор создает небольшое внутрен нее разрежение благодаря чему фильтр можно заменить с минимальными потерями хладагента 9 Выви...

Page 283: ... долито в прибор с момента последнего сброса см дату через пункт меню Int vessel filling УКАЗАНИЕ После выполнения сервисных работ Вы должны удалить сервис ные сообщения сбросить счетчик на нуль Для этого перейдите в меню Other selections Service и введите код 7782 Кноп ками со стрелками или выбрать требуемую запись и подтвер дить нажатием ENTER Следовать указаниям на дисплее и удерживать кнопку E...

Page 284: ...та последнего сброса см дату 9 4 Калибровка датчика давления I 1 В базовом меню кнопками со стрелками или выбрать Other selections 2 Для подтверждения нажать ENTER R134a to system 07 03 14 g 1200 STOP EXIT Vacuum time 07 03 14 min 79 STOP EXIT Service completed 08 03 14 Number 4 STOP EXIT УКАЗАНИЕ Для правильного измерения давления требуется правильная кали бровка датчика давления Калибровка требу...

Page 285: ... значение атмосферного давления и подтвердить нажатием ENTER I 8 После успешного выполнения калибровки нажать ENTER чтобы выйти из меню 9 Для возврата в меню режима готовности два раза нажать STOP 10 Сервисные муфты 12 и 13 навинтить руками на сервисные шланги 10 и 11 при этом учитывать маркировку синего и красного цвета на сервисных муфтах и шлангах Int vessel filling Flushing Reset scales Servic...

Page 286: ...анель Вывинтить винты D панели управления и откинуть ее верх Затем вывинтить винты E под лицевой панелью и снять ее 3 Емкость объемом не менее л установить под AirConServiceCenter Масло из вакуумного насоса сливается через отверстие I в основании прибора 4 Вывинтить пробку маслоналивного отверстия G ПРЕДУПРЕЖДЕНИЕ Перед открытием корпуса выключите AirConServiceCenter и выта щите сетевую вилку из р...

Page 287: ...роса см дату через пункт меню Int vessel filling R134a to system указывает сколько граммов хладагента было залито в кондиционеры с момента последнего сброса см дату через пункт меню Short selection или также Free selection УКАЗАНИЕ После выполнения сервисных работ Вы должны удалить сервис ные сообщения сбросить счетчик на нуль Для этого перейдите в меню Other selections Service и введите код 7782 ...

Page 288: ...ню Short selection или также Free selection Service completed 07 03 14 Number 4 STOP EXIT УКАЗАНИЕ Прибор сохраняет различные показания счетчиков Для вызова суммарных значений текущих с момента производства прибора перейдите в меню Other selections Service и введите код 7783 Кнопками со стрелками или выбрать требуемую запись Эти показания счетчиков не возможно сбросить на нуль Для доступа к сбрасы...

Page 289: ...ра 9 7 Коррекция заливаемого объема для длинных сервисных шлангов I 1 В базовом меню кнопками со стрелками или выбрать Other selections 2 Для подтверждения нажать ENTER R134a to system Total 07 03 14 g 1200 STOP EXIT Vacuum time Total 07 03 14 min 79 STOP EXIT Service completed Total 08 03 14 Number 4 STOP EXIT УКАЗАНИЕ Если для прибора используются длинные или короткие сервис ные шланги то необхо...

Page 290: ...верждения нажать ENTER 5 Ввести пароль 7732 6 Ввести длину шланга в сантиметрах 7 Для подтверждения нажать ENTER 9 8 Замена бумаги для принтера 1 Для замены рулона бумаги в принтере 14 открыть крышку K 2 Уложить новый рулон бумаги и закрыть крышку K Int vessel filling Flushing Reset scales Service K ...

Page 291: ...ожете обновить программу и базу данных независимо друг от друга 1 Скопировать текущую версию программы на USB накопитель 2 Вставить USB накопитель в USB порт 15 и включите устрой ство Станция ищет на USB накопителе новую версию Если про грамма на USB накопителе более новая то появляется следую щее меню Если база данных на USB накопителе более новая то появля ется следующее меню УКАЗАНИЕ USB накопи...

Page 292: ...ся меню режима ожидания 4 Вынуть USB накопитель Станция готова к работе 9 10 Чистка и уход При необходимости очистите корпус влажной тряпкой Если тре буется можно добавить немного средства для мытья посуды Не используйте растворители или абразивные чистящие средства Регулярно проверяйте сервисные шланги 10 и 11 и сервисные муфты 12 и 13 на предмет повреждений В случае поврежде ний не вводите AirCo...

Page 293: ...3 Утилизация отслужившего свой срок прибора Если Вы окончательно выводите прибор AirConServiceCenter из эксплуатации вначале опорожните его от всех жидкостей и ути лизируйте их должным образом M Сдайте прибор в ближайший пункт приема вторсырья или обра титесь в сервисный центр УКАЗАНИЕ Отработавшее масло является специальными отходами Не смешивайте отработавшее масло с другими жидкостями До утилиз...

Page 294: ...нере имеется давление Никаких мер не требуется Процесс автоматически продолжается На дисплее появляется Not enough vacuum Carry on Сообщение во время про цесса вакуумизации если давление в кондиционере через 8 минут составляет более 50 мбар Проверить кондиционер на предмет утечек и соедине ния AirConServiceCenter на кондиционере На дисплее появляется A C system leakage Carry on Сообщение в конце п...

Page 295: ...ь залито уста новленное количество хла дагента Проверить свободный про ход штуцеров AirConServiceCenter На дисплее появляется External tank empty or closed valve Check Сообщение в начале или во время наполнения вну тренней емкости для хла дагента если установленное количество хладагента не может быть достигнуто Проверить имеется ли во внешней емкости еще достаточно хладагента или проверить открыты...

Page 296: ...сужений и обледенения Проверить калибровку дат чика давления На дисплее появляется Error 03 От весов хладагента не поступает сигналов Проверить работу весов На дисплее появляется Error 04 При промывке не может быть стравлено давление Проверить кондиционер и соединения на предмет негерметичности сужений и обледенения Проверить калибровку дат чика давления На дисплее появляется Error 09 Во время про...

Page 297: ...ить редукционный клапан Окружающая температура ниже 10 C На дисплее появляется Error 51 Не был найден распознан USB накопитель Вставить USB накопитель Убедиться в том что USB накопитель был отформа тирован с файловой систе мой FAT32 На дисплее появляется Error 60 При гибридном обслужива нии промывке сервисных шлангов гибридным мас лом не удалось достичь вакуума Присоединены ли сервис ные шланги к ...

Page 298: ...очность электронных весов для отработавшего свежего масла УФ присадки 1 г Диапазон рабочих температур от 5 C до 45 C AirConServiceCenter ASC2000G Размеры ширина x высота x глубина 560 мм x 1300 мм x 650 мм Вес 100 кг Электропитание 230 В 240 В 50 Гц 60 Гц Отсос хладагента 18 кг ч Производительность вакуумного насоса 5 авт ч Мощность герметичного компрессора 0 32 кВт Производительность сухого фильт...

Page 299: ...оизводительность вакуумного насоса 192 л ч Мощность герметичного компрессора 0 6 кВт Производительность сухого фильтра 150 кг Полезный объем накопителя заполнительного цилиндра 25 0 л 22 0 кг Уровень шума 55 5 дБ A Точность электронных весов для хладагента 10 г Точность электронных весов для отработавшего свежего масла 1 г Точность электронных весов для УФ присадки 1 г Диапазон рабочих температур ...

Page 300: ...ite E The Gate 373 Neilson Street Penrose 1061 Auckland 64 9 622 1490 64 9 622 1573 Mail customerservices dometic co nz NORWAY Dometic Norway AS Østerøyveien 46 3236 Sandefjord 47 33428450 47 33428459 Mail firmapost dometic no POLAND Dometic Poland Sp z o o Ul Puławska 435A 02 801 Warszawa 48 22 414 32 00 48 22 414 32 01 Mail info dometic pl PORTUGAL Dometic Spain S L Branch Office em Portugal Rot...

Reviews: