background image

15 Fehlersuche und Fehlerbehebung


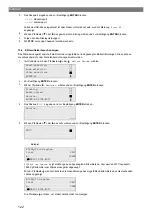
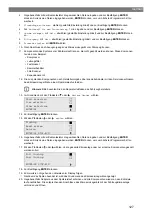
4. Zum Aktualisieren der Software oder Datenbank 

ENTER

 drücken.

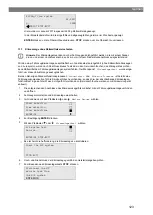
Das Klimaservicegerät zeigt den Fortschritt der Aktualisierung an:

Wait...
Erase flash... Erased!
Writing

1

63488

7%

762751

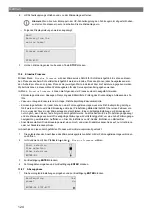
Nach der Aktualisierung stellt das Klimaservicegerät die Standardeinstellungen ein:

Wait!
loading default
parameters

Das Klimaservicegerät wird dann neu gestartet und das Standby-Menü wird angezeigt.

5. USB-Stick herausnehmen.

Das Klimaservicegerät ist betriebsbereit.

14.11 Reinigung und Inspektion

• Reinigen Sie das Klimaservicegerät außen bei Bedarf mit einem feuchten Tuch. Nehmen Sie gegebenenfalls

zusätzlich etwas Geschirrspülmittel. Verwenden Sie keine Lösungsmittel oder scheuernde Reinigungsmittel.

• Prüfen Sie die Serviceschläuche und Servicekupplungen regelmäßig auf Beschädigung. Wenn das Klimaser-

vicegerät beschädigt ist, darf es nicht in Betrieb genommen werden.

15 Fehlersuche und Fehlerbehebung

Problem

Mögliche Ursache

Lösungsvorschlag

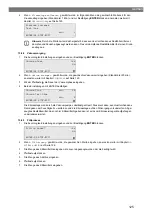
Im Display erscheint 

 Warnung! Max.

Druck in der internen Flasche! 

.

Normale Meldung während des Recy-

clingprozesses.

Zum Fortfahren ENTER für drei Sekun-

den betätigen. Falls die Meldung

wiederholt erscheint, Service be-

nachrichtigen.

Im Display erscheint 

 Warnung! In-

terne Flasche voll.

Der interne Kältemittelbehälter ist zu

voll, um die abzusaugende Menge

aufnehmen zu können.

Inhalt des internen Kältemittelbehälters

fachgerecht entleeren.

Im Display erscheint 

 Warnung! Noch

Druck im A/C-System Absaugung
gestartet!

Normale Meldung zu Beginn des Vaku-

umprozesses. Es ist noch Druck in der

Klimaanlage vorhanden.

Es sind keine Maßnahmen erforderlich.

Der Prozess läuft automatisch weiter.

Im Display erscheint 

 Warnung! Druck

im A/C-System!

Meldung während des Vakuumprozess-

es. Es ist Druck in der Klimaanlage

vorhanden.

Es sind keine Maßnahmen erforderlich.

Der Prozess läuft automatisch weiter.

Im Display erscheint 

 Vakuum nicht

erreicht! Fortfahren?

Meldung während des Vakuumprozess-

es, wenn der Druck in der Klimaanlage

nach 8 min noch mehr als 50 mbar be-

trägt.

Klimaanlage auf Leck überprüfen bzw.

Anschlüsse des Klimaservicegeräts zur

Klimaanlage auf Leck überprüfen.

Im Display erscheint 

 A/C undicht!

Fortfahren?

Meldung am Ende des Vaku-

umprozesses. Die Klimaanlage hat

einen Vakuumverlust von mehr als

120 mbar innerhalb der Kontrollzeit.

Klimaanlage auf Leck überprüfen bzw.

Anschlüsse des Klimaservicegeräts zur

Klimaanlage auf Leck überprüfen.

Im Display erscheint 

 Altölbehälter

leeren!

Meldung während des Absaug- oder

Recyclingprozesses, wenn sich mehr

als 150 ml Altöl im Behälter befinden.

Inhalt des Altöl-Behälters umwelt-

gerecht entsorgen.

Im Display erscheint 

 Warnung! Kein

Vakuum für Öl oder UV Füllung!

Meldung während des Auffüllprozess-

es, wenn das Vakuum in der Klimaan-

lage nicht ausreicht, um den #Prozess

zu beenden.

Klimaanlage auf Leck überprüfen bzw.

Anschlüsse des Klimaservicegeräts zur

Klimaanlage auf Leck überprüfen.

Im Display erscheint 

 Menge zu groß.

Interne Flasche auffüllen!

Meldung während der Prozesseingabe,

wenn die Kältemittelmenge des inter-

Internen Kältemittelbehälter auffüllen.

136

Summary of Contents for AirCon Service 6300G

Page 1: ...A C service unit Operating manual 1 FR Poste de service climatisation Manuel d utilisation 50 DE Klimaserviceger t Bedienungsanleitung 101 RU 151 ES Estaci n de mantenimiento de aire acondicionado Ins...

Page 2: ...this manual is protected by copyright and de sign law The underlying technical design and the products contained herein may be protected by design patent or be patent pending The trademarks mentioned...

Page 3: ...in accordance with all applicable laws and regulations A failure to read and follow the instructions and warnings set forth herein may result in an injury to yourself and others damage to your produc...

Page 4: ...e for its intended purpose CAUTION Failure to obey these cautions could result in minor or moderate injury Do not make modifications to the A C service unit Risk of injury from bursting components if...

Page 5: ...brake lever on the front wheels to secure the A C service unit from rolling away 6 2 Handling the refrigerant safely WARNING Failure to obey these warnings could result in death or serious injury Do...

Page 6: ...ch a way that they cannot be damaged when the A C service unit is used 7 Scope of Delivery The A C service unit was tested for leaks before shipping After delivery check that all the parts listed belo...

Page 7: ...r than those described in this manual Dometic reserves the right to change product appearance and product specifications 10 Technical description 10 1 Warnings on the A C service unit Observe the oper...

Page 8: ...en 6 High pressure gauge 7 Display 8 Keypad 9 Front cover 10 Front wheels with wheel stops 11 Service hose for low pressure connection blue not included inth scope of delivery 12 Service hose for high...

Page 9: ...English 16 USB port 7...

Page 10: ...hoses Setting the length of the service hoses on page 10 4 Connect the A C service unit to the power supply 5 To switch the A C service unit on set the main switch to I The switch on delay runs for 35...

Page 11: ...m Wait The service hoses are evacuated 6 Wait until the service hoses are evacuated 7 Press ENTER to confirm the displayed refrigerant ENTER OK R 513A Usage only with WARNING The A C service unit runs...

Page 12: ...732 6 Enter the hose length in centimetres 7 Press ENTER to confirm 12 4 Selecting the language 1 Press the cursor keys or 2 In the basic menu use the cursor keys or to select Other selections Short s...

Page 13: ...ction Other selections ENTER OK 3 Press ENTER to confirm 4 Use the cursor key to select Service 5 Press ENTER to confirm 6 Enter the password 2899 PAR Buzzer Loud Quiet ENTER OK 7 Use the cursor keys...

Page 14: ...ired for logging of the service procedures The date and the time are printed along with the company data on every service log 1 In the basic menu use the cursor keys or to select Other selections Shor...

Page 15: ...eypad and the cursor keys to enter the information 7 Press ENTER to confirm 8 Press STOP The standby menu is displayed 12 10 Inserting the containers for oil and UV additive NOTICE Damage hazard Only...

Page 16: ...3 Use the cursor key to select Service Refrigerant Test Hybrid service Service ENTER OK STOP EXIT 4 Press ENTER to confirm 5 Enter the password 2688 6 Use the cursor keys to activate any fields you ne...

Page 17: ...ection Free selection Other selections ENTER OK 4 Press ENTER to confirm 5 Use the cursor keys or to select Int vessel filling Int vessel filling Flushing Reset scales Service 6 Press ENTER to confirm...

Page 18: ...ty Filling with UV additive Filling of refrigerant After each process has been performed a service report is printed Subsequent actions are only initiated once the preceding action has been completed...

Page 19: ...selection Other selections ENTER OK 2 Press ENTER to confirm 3 Use the cursor key to select Service and press ENTER to confirm Flushing Reset scales Service ENTER OK STOP EXIT 4 To acces the ADM admin...

Page 20: ...tizen ADM AREA User number 1 John Citizen The user is created and the menu changes again to the user selection 12 Proceed as follows Create another user by using the cursor keys to select Database and...

Page 21: ...s ENTER OK 2 Press ENTER to confirm 3 Enter the vehicle license plate number this can also be left blank and press ENTER to confirm CAR DATA PLATE NR 4 Use the cursor keys or to select Database and pr...

Page 22: ...a graphic is copied to the USB flash drive that meets the following requirements File format JPEG format File name logo jpg each letter in lower case Screen size 370 x 50 pixels The company address i...

Page 23: ...or keys or to select Other selections Short selection Free selection Other selections ENTER OK 2 Press ENTER to confirm 3 Use the cursor key to select Service and press ENTER to confirm Flushing Reset...

Page 24: ...existing standard function processes Short selection and Free selection already have a compensation function for service hoses which means the final air conditioning function test can be carried out i...

Page 25: ...phase Before working on the vehicle air conditioner a leak inspection must be carried out The air con ditioner is filled with a sample of refrigerant The pressure in the air conditioner must remain co...

Page 26: ...the cursor key to enter the vacuum phase time 4 Press ENTER to confirm both settings Vacuum time min 20 Vacuum test time min 4 ENTER OK STOP EXIT The air conditioning system is drained completely by t...

Page 27: ...r ending the air conditioning service After the air conditioning service has finished you are prompted to disconnect the hoses of the A C service unit from the vehicle air conditioning system 1 Discon...

Page 28: ...to form a flushing circuit Note Observe the guidelines on repairs from the vehicle manufacturer 13 In the basic menu use the cursor keys or to select Other selections Short selection Free selection Ot...

Page 29: ...ice unit is then ready for further use 32 Put the valve caps of the vehicle air conditioning system back on the connections 14 Service tasks 14 1 Leak test Check the A C service semiannual for leaks i...

Page 30: ...rder for the oil quantities and the UV additive to be measured correctly the zero point of the scales must be checked regularly and reset if necessary Resetting is necessary If the quantity in a conta...

Page 31: ...the containers to the operating positions Reattach the containers for oil 10 and 12 and for the UV additive 11 to the snap locks and close the cover 13 7 Press STOP twice to access the standby menu 1...

Page 32: ...m the holder and pull the dryer filter straight out 16 Replace the O rings E Moisten new O rings with refrigerant oil before installing 17 Insert the new dryer and tighten the screw to max 15 Nm 18 Re...

Page 33: ...Press ENTER to confirm The device equalizes with the ambient pressure 10 Screw the service couplings and hand tight onto the service hoses 7 and 8 taking care not to mix up the red and blue markings...

Page 34: ...e opening I in the base of the A C service unit 4 Unscrew the oil filling plug G 5 To drain the oil unscrew the oil drain plug J 6 Once the oil has been completely drained from the pump housing screw...

Page 35: ...age 29 R1234 from system Total 07 03 17 g 1455 STOP EXIT R1234yf from system indicates how many grams of refrigerant have been extracted from air conditioning systems using the menu item Short selecti...

Page 36: ...rent database with all the common vehicle types and corresponding filling quantities You can update the software and the database separately 1 Copy the current software to the USB flash drive 2 Insert...

Page 37: ...esent in the air condi tioning system No action is required The process con tinues automatically The display shows Warning Pres sure inside the A C system Message during the vacuum process There is pr...

Page 38: ...ice unit Change the vacuum pump oil as soon as possible Changing the vacuum pump oil on page 31 To skip this press ENTER for 3 seconds The display shows Printer not in line Carry on Message indicates...

Page 39: ...electrical sources of interference such as mobile phones or welding equipment away from the device The display shows Error 00003 Calibration with the ambient air failed Ensure the device is adequatel...

Page 40: ...Accuracy of the electronic scale for refrigerant 10 g Accuracy of the electronic scale for old new oil 1 g Accuracy of the electronic scale for UV additive 1 g Maximum permissible pressure 1 bar 20 ba...

Page 41: ...l approved by manufacturer Maximum permissible operating temperature 5 C 40 C Storage temperature range 25 C 50 C In accordance with DIN EN ISO 3746 the workplace related emission value LpA of an A C...

Page 42: ...English 17 1 Flowchart ASC6300 G Legend 40...

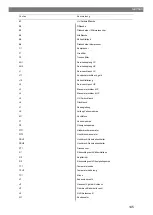
Page 43: ...ice hose HP L3 Manometer hose LP L4 Manometer hose HP L5 UV dye hose L6 Oil hose L7 Recovery line L9 Vacuum pump line M1 Valve manifold P1 Vacuum pump PIT1 LP manometer PIT2 HP manometer PSH2 High pre...

Page 44: ...English Item Description X23 Solenoid valve DO X3 Solenoid valve UV X4 Solenoid valve oil X5 Solenoid valve Z2 X6 Solenoid valve Z2 X7 Solenoid valve HP X8 Solenoid valve HP X9 Solenoid valve RE 42...

Page 45: ...English 17 2 Flowchart ASC6400 G Legend 43...

Page 46: ...ose HP L3 Manometer hose LP L4 Manometer hose HP L5 UV dye hose L6 Oil hose L7 Recovery line L9 Vacuum pump line M1 Valve manifold P1 Vacuum pump P2 Liquid pump PIT1 LP manometer PIT2 HP manometer PSH...

Page 47: ...lenoid valve VC X16 Solenoid valve CY X2 Solenoid valve LP X23 Solenoid valve DO X3 Solenoid valve UV X4 Solenoid valve oil X5 Solenoid valve Z2 X6 Solenoid valve Z2 X7 Solenoid valve HP X8 Solenoid v...

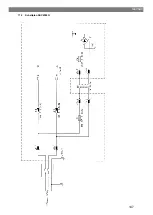
Page 48: ...English 17 3 Circuit diagram ASC6300 G 46...

Page 49: ...English 47...

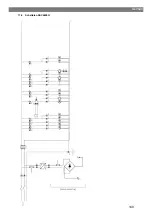
Page 50: ...English 17 4 Circuit diagram ASC6400 G 48...

Page 51: ...English 49...

Page 52: ...and warnings set forth herein may result in an injury to yourself and others damage to your product or damage to other property in the vicinity This product manual including the instructions guidelin...

Page 53: ...rde peut entra ner des blessures l g res ou de gravit mod r e N apportez aucune modification au poste d entretien pour climatisations Risques de blessures dues l clatement de composants en cas de d pa...

Page 54: ...z uniquement le fluide frigorig ne que vous avez d fini sur le poste d entretien pour climatisa tions Le m lange de diff rents fluides frigorig nes peut endommager le poste d entretien pour climati sa...

Page 55: ...oncernant la manipulation de gaz sous pression Mesures de sant publique concernant la manipulation de gaz sous pression Utilisation et op rations de maintenance sur le poste d entretien pour climatisa...

Page 56: ...roper operating or maintenance will result in unsatisfactory performance and a possible fail ure The manufacturer accepts no liability for any injury or damage to the product resulting from Incorrect...

Page 57: ...ion Surveillance du ventilateur Contr le le fonctionnement des ventilateurs au d marrage 10 3 Menu de mode veille Le menu de veille affiche les informations suivantes Quantit de fluide frigorig ne Qua...

Page 58: ...m rique 9 Capot avant 10 Roues avant avec freins 11 Flexible de service pour raccord basse pression bleu non inclus dans le contenu de la livraison 12 Flexible de service pour raccord haute pression r...

Page 59: ...obtenir des mesures correctes le poste d entretien pour climatisations doit tre plac sur une surface plane pendant le fonctionnement Ignorez les codes d erreur survenant lors de la pre mi re mise en s...

Page 60: ...2 S lection du fluide frigorig ne Lors du d marrage initial le poste d entretien pour climatisations affiche le menu de s lection du fluide frigorig ne 1 Dans le menu de s lection du fluide frigorig n...

Page 61: ...te des flexibles de service plus longs ou plus courts vous devez r gler les quantit s de remplissage en fonction des nouvelles longueurs de flexible Les flexibles de service pour le c t haute pression...

Page 62: ...Autres s lections Short selection Free selection Other selections ENTER OK 3 Appuyez sur ENTER pour confirmer 4 Utilisez la touche fl ch e pour s lectionner Utilisation 5 Appuyez sur ENTER pour confir...

Page 63: ...r s lectionner la ligne souhait e dans les donn es d entreprise 6 Saisissez les donn es souhait es l aide du pav num rique et des touches fl ch es Pour basculer entre majuscules et minuscules appuyez...

Page 64: ...500 Afficher le logo Oui 1 Dans le menu de base utilisez la touche fl ch e ou pour s lectionner Autres s lections Short selection Free selection Other selections ENTER OK 2 Appuyez sur ENTER pour conf...

Page 65: ...Conteneur d huile usag e 19 2 Fermez le volet de protection 20 3 Saisissez la taille de bouteille pour l huile neuve et le traceur UV Saisie de la taille de bouteille la page 63 12 11 Saisie de la ta...

Page 66: ...touches fl ch es les champs sombres sont activ s Oil bottle 150ml 250ml 500ml UV bottle 150ml 250ml 500ml 7 Appuyez sur ENTER pour confirmer 8 Appuyez sur STOP pour acc der au menu de veille 12 12 Rem...

Page 67: ...ouche fl ch e ou pour s lectionner Autres s lections Short selection Free selection Other selections ENTER OK 4 Appuyez sur ENTER pour confirmer 5 Utilisez la touche fl ch e ou pour s lectionner Charg...

Page 68: ...rme la norme SAE J 2099 Contr le de l augmentation de pression Vidange de l huile usag e Purge du syst me Test d tanch it contr le du vide Rajout d huile neuve en quantit n cessaire Remplissage du tra...

Page 69: ...e cr er des comptes utilisa teurs l aide du code administrateur 13 3 1 Cr ation de codes utilisateur 1 Dans le menu de base utilisez la touche fl ch e ou pour s lectionner Autres s lections Short sele...

Page 70: ...les majuscules et les minuscules utilisez la touche Info jaune 11 Saisissez le nom d utilisateur et appuyez sur ENTER pour confirmer ADM AREA User number 1 User name John Citizen ADM AREA User number...

Page 71: ...sur la carte m moire flash Elles restent donc disponibles apr s une mise jour du logiciel Les entr es sont enregistr es par ordre chronologique et non par ordre alphanum rique 1 Dans le menu de base u...

Page 72: ...haque fois qu une proc dure d aspiration ou de remplissage proc dure seule ou enti rement automatis e est termin e le poste d entretien pour climatisations enregistre toutes les donn es correspondante...

Page 73: ...ur ENTER pour confirmer 4910 rapport mensuel 4918 rapport annuel Si aucune cl USB n est ins r e ou reconnue le message Erreur 52 s affiche 6 l aide de la touche fl ch e ou s lectionnez l entr e souhai...

Page 74: ...uip s d une entr e basse pression et d une entr e haute pression ou uniquement d une entr e basse pression Si vous testez uniquement le fonctionnement du syst me de climatisation d un v hicule sans as...

Page 75: ...r individuellement l aide du pav num rique les valeurs correspondantes pour chaque processus Ce menu permet galement de saisir les donn es du v hicule pour le rapport de service Les quatre processus s...

Page 76: ...R OK STOP EXIT Remarque Le temps d attente garantit que les ventuels r sidus de fluide frigorig ne peuvent s vaporer puis tre extraits L vaporation des r sidus de fluide frigorig ne entra ne une augme...

Page 77: ...e de processus Si aucune phase de vide n est effectu e seul le r frig rant se trouve dans le menu de s lection 13 8 4 S lection des raccords 1 S lectionnez les param tres en fonction des raccords du s...

Page 78: ...S lectionnez Phase de recyclage le r glage s lectionn clignote et appuyez sur ENTER pour valider 6 Pour Temps pour la diff de pression min saisissez 1 min et appuyez sur ENTER pour confirmer 7 D sact...

Page 79: ...clignote et appuyez sur ENTER pour valider 26 Si n cessaire utilisez le pav num rique pour saisir les donn es et appuyez sur ENTER pour confirmer S il n est pas n cessaire de saisir de donn es appuye...

Page 80: ...T R1234yf de bouteille indique le nombre de grammes de fluide frigorig ne ajout s au poste d entretien pour climatisations via l option de menu Charge de bout inter depuis la derni re r initialisation...

Page 81: ...a valeur de con signe si le poste d entretien pour climatisations a subi des chocs p ex transport sur des trajets cahoteux toutes les quatre six semaines 1 Dans le menu de base utilisez la touche fl c...

Page 82: ...n de fonctionnement Refixez les conteneurs d huile 10 et 12 et de traceur UV 11 sur les raccords rapides et fermez le capot 13 7 Appuyez deux fois sur STOP pour acc der au menu de veille 14 4 Changeme...

Page 83: ...vis D du support et retirer le filtre du s cheur 16 Remplacer les joints toriques E Humecter les nouveaux joints toriques avec de l huile r frig rante avant le montage 17 Placez un nouveau s cheur et...

Page 84: ...onfirmer L appareil s aligne sur la pression ambiante 10 Vissez les raccords de service et serrez les la main sur les flexibles de service 7 et 8 en veillant ne pas confondre les rep res rouges et ble...

Page 85: ...du poste d entretien pour climatisa tions 4 D vissez la vis de remplissage d huile G 5 Pour vidanger l huile d vissez le bouchon de vidange d huile J 6 Lorsque l huile s est compl tement coul e du b t...

Page 86: ...ir galement Changement de l huile de la pompe vide la page 82 ou Changement du filtre du s cheur la page 80 R1234 from system Total 07 03 17 g 1455 STOP EXIT R1234yf du syst me indique combien de gram...

Page 87: ...Le logiciel actuel du poste d entretien pour climatisations La base de donn es actuelle avec tous les types de v hicules courants et les niveaux de remplissage corre spondants Vous pouvez actualiser l...

Page 88: ...A C Start r cup ra tion Message normal au d but du proces sus de vide Il y a encore de la pression dans le syst me de climatisation Aucun d pannage n cessaire Le processus continue automatiquement L...

Page 89: ...s que possi ble Changement du filtre du s cheur la page 80 Pour ignorer le mes sage appuyez 3 secondes sur ENTER L cran affiche Changez huile pompe vacuum Continuer Ce message s affiche lorsque vous a...

Page 90: ...ts L cran affiche Erreur G1 La connexion au module d analyse n a pu tre tablie Contr lez le raccordement DEL activ es sur le module L cran affiche Erreur 00001 Valeurs de mesure instables loignez les...

Page 91: ...ticle 9103303105 Dimensions largeur x hauteur x profondeur 560 mm 1300 mm 650 mm Poids 110 kg Alimentation 230 V 240 V 50 Hz 60 Hz Imp dance maximale autoris e Zmax pour l alimentation 0 431 D bit d a...

Page 92: ...le us ag e neuve 1 g Pr cision de la balance lectronique pour traceur 1 g Pression maximale admissible 1 bar 20 bar Fluide frigorig ne R134a R1234yf R513A Huile utilisable Huile agr e par le fabricant...

Page 93: ...French 17 1 Organigramme ASC6300 G L gende 91...

Page 94: ...rvice HP L3 Flexible de manom tre BP L4 Flexible de manom tre HP L5 Flexible de traceur UV L6 Flexible d huile L7 Conduite de r cup ration L9 Conduite de la pompe vide M1 Collecteur de soupape P1 Pomp...

Page 95: ...French l ment Description X23 lectrovanne DO X3 lectrovanne UV X4 Huile d lectrovanne X5 lectrovanne Z2 X6 lectrovanne Z2 X7 lectrovanne HP X8 lectrovanne HP X9 lectrovanne RE 93...

Page 96: ...French 17 2 Organigramme ASC6400 G L gende 94...

Page 97: ...manom tre BP L4 Flexible de manom tre HP L5 Flexible de traceur UV L6 Flexible d huile L7 Conduite de r cup ration L9 Conduite de la pompe vide M1 Collecteur de soupape P1 Pompe vide P2 Pompe liquide...

Page 98: ...cription X10 lectrovanne VC X16 lectrovanne CY X2 lectrovanne LP X23 lectrovanne DO X3 lectrovanne UV X4 Huile d lectrovanne X5 lectrovanne Z2 X6 lectrovanne Z2 X7 lectrovanne HP X8 lectrovanne HP X9...

Page 99: ...French 17 3 Sch ma lectrique ASC6300 G 97...

Page 100: ...French 98...

Page 101: ...French 17 4 Sch ma lectrique ASC6400 G 99...

Page 102: ...French 100...

Page 103: ...icable laws and regulations A failure to read and follow the instructions and warnings set forth herein may result in an injury to yourself and others damage to your product or damage to other propert...

Page 104: ...t werden das von Dometic au torisiert wurde Benutzen Sie dieses Ger t nur f r den angegebenen Verwendungszweck VORSICHT Nichtbeachtung dieser Hinweise kann zu leichten bis mittelschweren Verletzungen...

Page 105: ...cht Verwenden Sie nur das K ltemittel das Sie im Klimaserviceger t eingestellt haben Wird das K ltemit tel mit anderen K ltemitteln gemischt kann dies zu Sch den am Klimaserviceger t beziehungsweise a...

Page 106: ...sen Sicherheitsvorschriften beim Umgang mit Druckgasen Gesundheitsma nahmen beim Umgang mit Druckgasen Betrieb des Klimaserviceger ts und Durchf hrung von Wartungsarbeiten am Klimaserviceger t Der Bet...

Page 107: ...r improper operating or maintenance will result in unsatisfactory performance and a possible fail ure The manufacturer accepts no liability for any injury or damage to the product resulting from Incor...

Page 108: ...ers weiter steigt L fter berwachung Pr ft beim Start ob die L fter funktionieren 10 3 Stand by Men Das Standby Men zeigt die folgenden Informationen an Bestandsmenge K ltemittel Bestandsmenge Frisch l...

Page 109: ...ckmanometer 7 Display 8 Bedientastatur 9 Frontabdeckung 10 Feststellbare Vorderr der 11 Serviceschlauch f r Niederdruckanschluss blau nicht im Lieferumfang enthalten 12 Serviceschlauch f r Hochdruckan...

Page 110: ...s Um korrekte Messungen zu erzielen muss das Klimaserviceger t w hrend des Betriebs auf einer ebenen Fl che aufgestellt werden Errorcodes die bei der Erstinbetriebnahme auftreten Fehler suche und Fehl...

Page 111: ...der ersten Inbetriebnahme zeigt das Klimaserviceger t das Men zur K ltemittelauswahl an 1 Im K ltemittelauswahlmen mit den Pfeiltasten oder das gew nschte K ltemittel ausw hlen im fol genden Beispiel...

Page 112: ...instellen Hinweis Sollen l ngere oder k rzere Serviceschl uche f r das Ger t eingesetzt werden ist es erforderlich die F llmengen den neuen Schlauchl ngen anzupassen Der Serviceschlauch f r die Hochdr...

Page 113: ...tere Menues w hlen Short selection Free selection Other selections ENTER OK 3 Zur Best tigung ENTER dr cken 4 Mit der Pfeiltaste Bedienen w hlen 5 Zur Best tigung ENTER dr cken 6 Das Passwort 3667 ein...

Page 114: ...den Pfeiltasten oder wird die gew nschte Firmendatenzeile ausgew hlt 6 Mit der Bedientastatur und den Pfeiltasten die gew nschten Daten eingeben Zum Umschalten zwischen Gro oder Kleinbuchstaben die Ta...

Page 115: ...nge 0 UV Additive ml 0 F llmenge g 500 Logo anzeigen Ja 1 Im Grundmen mit den Pfeiltasten oder Weitere Menues w hlen Short selection Free selection Other selections ENTER OK 2 Zur Best tigung ENTER dr...

Page 116: ...Beh lter f r UV Additiv 18 Alt lbeh lter 19 2 Abdeckklappe 20 schlie en 3 Beh ltergr e f r Frisch l und UV Kontrastmittel eingeben Beh ltergr e eingeben auf Seite 114 12 11 Beh ltergr e eingeben F r...

Page 117: ...t tigung STOP dr cken Die aktuellen Bestandsmengen werden im Stand by Men angezeigt 2 Die externe K ltemittelflasche an das Klimaserviceger t anschlie en Hinweis Die Hinweise auf den K ltemittelflasch...

Page 118: ...Standby Men zu gelangen noch einmal STOP dr cken 12 Die externe K ltemittelflasche vom Klimaserviceger t trennen Das Klimaserviceger t ist nun betriebsbereit 13 Betrieb ACHTUNG Besch digungsgefahr Be...

Page 119: ...tigung ENTER dr cken 7 F llmenge f r K ltemittel eingeben Den entsprechenden Wert von dem F llmengenaufkleber im Fahrzeug entnehmen und mit der Bedientastatur und den Pfeiltasten eingeben und ENTER d...

Page 120: ...000 Standardeinstellung eingeben und zur Best tigung ENTER dr cken Insert ADM Code Hinweis Aus Sicherheitsgr nden muss jedes Mal ein neuer Administratorcode gew hlt werden der nicht 0000 sein darf da...

Page 121: ...ie beschrieben fortfahren Um das Men zu verlassen STOP dr cken 13 3 2 Benutzercodes eingeben Wenn ein Benutzercode erstellt wurde muss derselbe Code verwendet werden um das Klimaserviceger t zu aktivi...

Page 122: ...ENTER dr cken CAR DATA PLATE NR 4 Mit den Pfeiltasten oder Datenbank w hlen und zur Best tigung ENTER dr cken Filling Qt g 500 Database ENTER OK STOP EXIT 5 Personal DB w hlen und zur Best tigung ENTE...

Page 123: ...das Werkstatt Logo enthalten wenn eine Grafik auf den USB Stick kopiert wird die folgende Voraussetzungen erf llt Dateiformat JPEG Format Dateiname logo jpg jeder Buchstabe in Kleinbuchstaben Bildschi...

Page 124: ...ere Menues w hlen Short selection Free selection Other selections ENTER OK 2 Zur Best tigung ENTER dr cken 3 Mit der Pfeiltaste Bedienen w hlen und zur Best tigung ENTER dr cken Flushing Reset scales...

Page 125: ...f hrt um diese Verlustmenge auszugleichen Bei den bisherigen Standardfunktionsprozessen Schnellstart und Einzelne Prozesse ist bereits eine F llmengenkompensation f r die Serviceschl uche vorhanden s...

Page 126: ...f llen Vor jeder Arbeit an einer Fahrzeugklimaanlage muss eine Dichtheitspr fung durchge f hrt werden Hierzu wird die Klimaanlage mit einer Probef llung K ltemittel bef llt ber einen Zeitraum von 5 mi...

Page 127: ...ite 125 3 Mit der Pfeiltaste die Dauer der Vakuumphase eingeben 4 Beide Einstellungen mit ENTER best tigen Vacuum time min 20 Vacuum test time min 4 ENTER OK STOP EXIT Die Klimaanlage wird durch die V...

Page 128: ...Klimaservices Nachdem der Klimaservice beendet ist erscheint die Aufforderung die Serviceschl uche des Klimaserviceger ts von der Fahrzeugklimaanlage abzukuppeln 1 Serviceschl uche abkuppeln und zur B...

Page 129: ...le Adapter mit den Serviceanschl ssen des Klimaserviceger ts zu einem Sp lkreislauf verbinden Hinweis Bitte beachten Sie den Reparaturleitfaden des Fahrzeugherstellers 13 Im Grundmen mit den Pfeiltast...

Page 130: ...en Nachdem der F llvorgang beendet ist erscheint die Aufforderung die Schl uche des Klimaserviceger ts von der Fahrzeugklimaanlage abzukuppeln 31 Serviceschl uche abkuppeln und zur Best tigung ENTER d...

Page 131: ...t der letzten R ckstellung siehe Datum mit dem Klimaserviceger t durchgef hrt wurden 14 3 Nullpunkt berpr fung der lwaagen Hinweis F r eine korrekte Bemessung der lmengen und des UV Additivs ist es er...

Page 132: ...aagen 6 Beh lter wieder in die Arbeitspositionen bringen Beh lter f r die le 10 und 12 und das UV Additiv 11 wieder an den Schnellverschl ssen anschlie en und Abdeckklappe 13 schlie en 7 Um in das Sta...

Page 133: ...n und Trocknerfilter gerade herausziehen 16 O Ringe E ersetzen Neue O Ringe vor dem Einbau mit K ltemittel l benetzen 17 Neuen Trockner einsetzen und Schraube mit max 15 Nm anziehen 18 Netzstecker ein...

Page 134: ...ekupplungen wieder auf die Serviceschl uche 7 und 8 handfest aufschrauben Dabei die blauen und roten Kennzeichnungen an den Servicekupplungen und Serviceschl uchen beachten Hinweis Den aktuellen Atmos...

Page 135: ...pe flie t beim Ablassen durch die ffnung I im Boden des Klimaserviceger ts 4 leinf llschraube G herausdrehen 5 Zum lablassen lablassschraube J herausdrehen 6 Wenn das l vollst ndig aus dem Pumpengeh u...

Page 136: ...wechseln auf Seite 130 R1234 from system Total 07 03 17 g 1455 STOP EXIT R1234yf von System gibt an wie viel Gramm K ltemittel seit der letzten R ckstellung siehe Datum ber den Men punkt Schnellstart...

Page 137: ...e aktuelle Datenbank mit allen g ngigen Fahrzeugtypen und den entsprechenden Klimaanlagen F llmengen Sie k nnen Software und Datenbank unabh ngig voneinander aktualisieren 1 Die aktuelle Software auf...

Page 138: ...h Druck im A C System Absaugung gestartet Normale Meldung zu Beginn des Vaku umprozesses Es ist noch Druck in der Klimaanlage vorhanden Es sind keine Ma nahmen erforderlich Der Prozess l uft automatis...

Page 139: ...Display erscheint Vakuumpumpen l wechseln Fortfahren Meldung beim Einschalten des Kli maserviceger ts M glichst bald Vakuumpumpen l wechseln Vakuumpumpen l wechseln auf Seite 132 Zum berspringen 3 Se...

Page 140: ...gliche elektrische St rquellen wie z B Mobiltelefone oder Sch wei ger te vom Ger t fernhalten Im Display erscheint Error 00002 Die Messwerte sind unverh ltnism ig hoch M gliche elektrische St rquellen...

Page 141: ...penleistung 5 Fahrzeuge pro Stunde K ltemittelr ckgewinnungsquote Mindestens 95 Leistung des hermetischen Verdichters 0 32 kW Trockenfilterleistung 150 kg Vakuumpumpen l Laufzeit 60 h F llzylinder Spe...

Page 142: ...ger Druck 1 bar 20 bar K hlmittel R134a R1234yf R513A Verwendbares l Nur vom Hersteller zugelassenes l Maximal zul ssige Betriebstemperatur 5 C 40 C Lagertemperaturbereich 25 C 50 C Nach DIN EN ISO 37...

Page 143: ...German 17 1 Flussdiagramm ASC6300 G Legende 141...

Page 144: ...HP L3 Manometerschlauch LP L4 Manometerschlauch HP L5 UV Farbschlauch L6 lschlauch L7 Absaugleitung L9 Leitung Vakuumpumpe M1 Ventilblock P1 Vakuumpumpe PIT1 Niederdruckmanometer PIT2 Hochdruckmanomet...

Page 145: ...German Position Beschreibung X23 Magnetventil DO X3 Magnetventil UV X4 Magnetventil l X5 Magnetventil Z2 X6 Magnetventil Z2 X7 Magnetventil HP X8 Magnetventil HP X9 Magnetventil RE 143...

Page 146: ...German 17 2 Flussdiagramm ASC6400 G Legende 144...

Page 147: ...lauch LP L4 Manometerschlauch HP L5 UV Farbschlauch L6 lschlauch L7 Absaugleitung L9 Leitung Vakuumpumpe M1 Ventilblock P1 Vakuumpumpe P2 Fl ssigkeitspumpe PIT1 Niederdruckmanometer PIT2 Hochdruckmano...

Page 148: ...eibung X10 Magnetventil VC X16 Magnetventil CY X2 Magnetventil LP X23 Magnetventil DO X3 Magnetventil UV X4 Magnetventil l X5 Magnetventil Z2 X6 Magnetventil Z2 X7 Magnetventil HP X8 Magnetventil HP X...

Page 149: ...German 17 3 Schaltplan ASC6300 G 147...

Page 150: ...German 148...

Page 151: ...German 17 4 Schaltplan ASC6400 G 149...

Page 152: ...German 150...

Page 153: ...rms and conditions as set forth here in You agree to use this product only for the intended purpose and application and in accordance with the instructions guidelines and warnings as set forth in this...

Page 154: ...4 4 Tel 49 0 2572 879 0 5 6 Domestic 152...

Page 155: ...Russian 6 1 153...

Page 156: ...Russian 6 2 R1234yf 405 C R134a 743 C R153A 6 3 154...

Page 157: ...on and or improper operating or maintenance will result in unsatisfactory performance and a possible fail ure The manufacturer accepts no liability for any injury or damage to the product resulting fr...

Page 158: ...10 10 10 1 230 V 50 Hz 10 2 10 3 10 4 Short selection Free selection Other selections 156...

Page 159: ...11 11 1 2 3 4 ECO 5 6 7 8 9 10 11 12 13 14 15 157...

Page 160: ...Russian 16 USB 158...

Page 161: ...12 17 18 500 19 20 21 22 12 12 1 186 ENTER 1 2 3 161 4 5 I 35 mgas0081 mgas2107 LE640004 LF DB SW SN000000 LE ASC6400G Dometic Germany GmbH SW DB SN LF 6 160 159...

Page 162: ...TER ENTER OK Once done press OK connection hose Please install HP LP 4 5 ENTER Wait 6 7 ENTER ENTER OK R 513A Usage only with WARNING pressure mb Internal vessel Cleaning phase Don t connect to Softwa...

Page 163: ...OK 2 ENTER 3 Service Service 4 ENTER 5 7732 6 7 ENTER 12 4 1 2 Other selections Short selection Free selection Other selections ENTER OK 3 ENTER 4 Service 5 ENTER 6 5264 7 8 ENTER 9 12 5 1 2 Other sel...

Page 164: ...ENTER 9 12 6 1 2 Other selections Short selection Free selection Other selections ENTER OK 3 ENTER 4 Service 5 ENTER 6 2899 PAR Buzzer Loud Quiet ENTER OK 7 8 ENTER 9 12 7 1 Other selections Short sel...

Page 165: ...an 5 3282 20 Enter company data 01 05 6 C C 7 ENTER 8 9 12 8 1 Other selections Short selection Free selection Other selections ENTER OK 2 ENTER 3 Service 4 ENTER 5 8463 6 7 ENTER 8 12 9 1 1 4 0 0 500...

Page 166: ...Russian 1 Other selections Short selection Free selection Other selections ENTER OK 2 ENTER 3 Service 4 ENTER 5 7388 6 7 ENTER 8 12 10 1 20 17 18 164...

Page 167: ...selections Short selection Free selection Other selections ENTER OK 2 ENTER 3 Service Refrigerant Test Hybrid service Service ENTER OK STOP EXIT 4 ENTER 5 2688 6 Oil bottle 150ml 250ml 500ml UV bottle...

Page 168: ...elections ENTER OK 4 ENTER 5 Int vessel filling Int vessel filling Flushing Reset scales Service 6 ENTER Connect the HP hose to the external tank then open the valve ENTER OK STOP EXIT 7 ENTER Set the...

Page 169: ...13 2 Short selection 5 min Short selection SAEJ2099 1 2 3 Short selection Short selection Free selection Other selections ENTER OK 4 ENTER 5 6 ENTER 7 ENTER 8 HP LP PORT HP PORT LP PORT ENTER OK STOP...

Page 170: ...ns Short selection Free selection Other selections ENTER OK 2 ENTER 3 Service ENTER Flushing Reset scales Service ENTER OK STOP EXIT 4 9786 ENTER ADM Service 5 0000 ENTER Insert ADM Code 0000 6 ADM AR...

Page 171: ...A User number 1 9 ADM AREA User number 1 Insert new code 10 10 ADM AREA User number 1 Confirm new code 11 ENTER ADM AREA User number 1 User name John Citizen ADM AREA User number 1 John Citizen 12 Dat...

Page 172: ...100 1 Short selection Short selection Free selection Other selections ENTER OK 2 ENTER 3 ENTER CAR DATA PLATE NR 4 Database ENTER Filling Qt g 500 Database ENTER OK STOP EXIT 5 Personal DB ENTER Pers...

Page 173: ...R ____________ 0 ___________________ ____________ g ___ 0 9 ENTER AUDI 0 A4 8E 2000 2004 g 500 AUDI 0 A4 8E 1 10 Database 13 5 USB USB USB FAT32 HTML XLS Microsoft Excel USB JPEG logo jpg 370 x 50 162...

Page 174: ...TER 4 Service ENTER 5 ENTER 4910 4918 USB Error 52 6 ENTER 7 8 13 6 1 Other selections Short selection Free selection Other selections ENTER OK 2 ENTER 3 Service ENTER Flushing Reset scales Service EN...

Page 175: ...rom system 01 2017 g 2400 PRINT STOP EXIT 2017 2400 g ENTER STOP 13 7 A C system test Short selection Free selection 1 2 3 Other selections Short selection Free selection Other selections ENTER OK 4 E...

Page 176: ...se from Disconnect the HP 8 service hoses Recovery from the Wait STOP EXIT Process completed 9 13 8 Free selection Schnellstart Free selection 5 min 1 2 Free selection Short selection Free selection O...

Page 177: ...175 Pressure increase Test time min 1 ENTER OK STOP EXIT 13 8 2 1 ENTER Vacuum phase Yes No ENTER OK STOP EXIT 2 Vacuum phase 20 min 175 3 4 ENTER Vacuum time min 20 Vacuum test time min 4 ENTER OK S...

Page 178: ...g 500 ENTER OK STOP EXIT 0 13 8 4 1 LP HP HP LP 2 ENTER HP LP PORT HP PORT LP PORT ENTER OK STOP EXIT 3 ENTER Process start ENTER OK STOP EXIT 13 8 5 1 ENTER 2 13 9 Flushing 1 2 Free selection Short...

Page 179: ...uum phase No ENTER 8 Filling phase No ENTER 9 Process start ENTER 10 11 12 13 Other selections Short selection Free selection Other selections ENTER OK 14 ENTER 15 Flushing Flushing Reset scales Servi...

Page 180: ...4 Rec Recycling phase No ENTER 25 Vacuum phase ENTER 26 ENTER ENTER 27 Filling phase ENTER 28 29 ENTER 30 Process start ENTER 31 ENTER 32 14 14 1 14 2 1 Other selections Service 2 7782 3 ENTER 4 ENTER...

Page 181: ...ction Free selection Vacuum time 07 03 17 min 79 STOP EXIT Vacuum time Service completed 08 03 17 Number 4 STOP EXIT Service completed 14 3 10 ml 1 Other selections Short selection Free selection Othe...

Page 182: ...6 10 12 11 13 7 14 4 1 Free selection Short selection Free selection Other selections ENTER OK 2 ENTER 3 CAR DATA 4 Rec Recycling phase 5 Pressure increase Test time 1 6 ENTER 7 Vacuum phase 8 ENTER...

Page 183: ...Russian 11 Process start 12 ENTER 13 14 15 D 16 E 17 15 Nm 18 19 20 R1234yf from system 178 21 178 14 5 12 Code entry 181...

Page 184: ...selection Free selection Other selections ENTER OK 2 180 3 ENTER 4 Service Service 5 ENTER 6 2224 7 Pressure transducer ENTER 8 7 8 9 ENTER 10 7 8 www weatherpro com air pressure 11 ENTER 12 ENTER 13...

Page 185: ...Russian 2 D E 3 I 4 G 5 J 6 J 7 H G 8 9 10 Vacuum time 178 183...

Page 186: ...07 03 17 g 1455 STOP EXIT R1234yf from system Short selection Free selection R1234 from tank Total 07 03 17 g 3395 STOP EXIT R1234yf from tank Int vessel filling R1234 to system Total 07 03 17 g 1200...

Page 187: ...pleted 07 03 17 Number 4 STOP EXIT Service completed 14 10 USB USB USB FAT32 1 USB 2 USB USB 3 USB USB New firmware release found ENTER upgrade STOP EXIT AS5k0058 USB New database release found ENTER...

Page 188: ...SB 14 11 15 Warning Internal vessel over pressure ENTER Warning Internal vessel filled Warning Pressure inside the A C system Recovery start Warning Pressure inside the A C system Not enough vacuum Ca...

Page 189: ...sel Not enough UV Add Not enough oil Add Max filling time exceeded Carry on External tank empty or closed valve Check Change the equipment drier fil ter Go on 180 ENTER 3 Change the vacuum pump oil Go...

Page 190: ...Russian Error 09 Error 10 Error 12 Error 52 USB USB USB FAT32 Error 60 Error 61 Error G1 Error 00001 Error 00002 Error 00003 Error 00004 10 C 45 C 188...

Page 191: ...16 Error 00001 16 17 ASC 6300 G 9103303105 x x 560 mm 1300 mm 650 mm 110 230 V 240 V 50 Hz 60 Hz Zmax 0 431 30 kg h 5 95 0 32 150 60 h 16 62 dB A 10 g 1 g 189...

Page 192: ...f R513A 5 C 40 C 25 C 50 C ASC 6400 G 9103303106 x x 560 mm 1300 mm 650 mm 110 230 V 240 V 50 Hz 60 Hz Zmax 0 431 192 95 0 32 150 60 h 28 62 dB A 10 g 1 g 1 g 1 bar 20 bar R134a R1234yf R513A 5 C 40 C...

Page 193: ...Russian 17 1 ASC6300 G 191...

Page 194: ...Russian B1 UV dye B2 B3 B4 B5 B6 C1 F1 F2 KU1 KU2 L1 L11 L12 L2 L3 L4 L5 UV dye L6 L7 L9 M1 P1 PIT1 PIT2 PSH2 PT1 R1 R2 TT1 TZH1 TC1 V1 V2 V3 V4 NCG W1 X10 VC X16 CY X2 LP 192...

Page 195: ...Russian X23 DO X3 UV X4 X5 Z2 X6 Z2 X7 HP X8 HP X9 RE 193...

Page 196: ...Russian 17 2 ASC6400 G 194...

Page 197: ...Russian B1 UV dye B2 B3 B4 B5 B6 C1 F1 F2 KU1 KU2 L1 L11 L12 L2 L3 L4 L5 UV dye L6 L7 L9 M1 P1 P2 PIT1 PIT2 PSH1 PSH2 PT1 R1 R2 R3 TT1 TZH1 TC1 V1 V2 V3 V4 NCG W1 195...

Page 198: ...Russian X10 VC X16 CY X2 LP X23 DO X3 UV X4 X5 Z2 X6 Z2 X7 HP X8 HP X9 RE 196...

Page 199: ...Russian 17 3 ASC6300 G 197...

Page 200: ...Russian 198...

Page 201: ...Russian 17 4 ASC6400 G 199...

Page 202: ...Russian 200...

Page 203: ...failure to read and follow the instructions and warnings set forth herein may result in an injury to yourself and others damage to your product or damage to other property in the vicinity This produc...

Page 204: ...moderadas o leves No realice modificaciones en la unidad de servicio de aire acondicionado Peligro de sufrir lesiones por revent n de componentes si se superan los l mites de temperatura per mitidos...

Page 205: ...haya ajustado en la unidad de servicio de aire acondicionado Si se mezclan otros refrigerantes se pueden producir da os en la unidad de servicio de aire acondi cionado y en el sistema de aire acondic...

Page 206: ...esi n medidas de higiene para la salud al manipular gases a presi n Funcionamiento de la unidad de servicio de aire acondicionado y realizaci n de trabajos de servicio en la unidad de servicio de aire...

Page 207: ...roper installation and or operation of the product Poor in stallation and or improper operating or maintenance will result in unsatisfactory performance and a possible fail ure The manufacturer accept...

Page 208: ...l del ventilador comprueba en el arranque si los ventiladores funcionan correctamente 10 3 Men Stand by El men Stand by muestra la siguiente informaci n cantidad existente de refrigerante cantidad exi...

Page 209: ...ubierta frontal 10 Ruedas delanteras con inmovilizador 11 Manguera de servicio para conexi n de baja presi n azul no incluida en el volumen de entrega 12 Manguera de servicio para conexi n de alta pre...

Page 210: ...s correctas la unidad de servicio de aire acondicionado debe colocarse so bre una superficie plana y nivelada durante el funcionamiento Ignore los c digos de error que aparezcan con la primera puesta...

Page 211: ...e en la p gina 209 12 2 Selecci n del refrigerante En el arranque inicial la unidad de servicio de aire acondicionado muestra el men de selecci n de refrigerante 1 En el men de selecci n de refrigeran...

Page 212: ...s de servicio Nota Si en el aparato se utilizan mangueras m s largas o m s cortas para la unidad deber adecuar las cantidades de llenado a la longitud de la nueva manguera Las mangueras de servicio pa...

Page 213: ...recci n o para seleccionar Otras selecciones Short selection Free selection Other selections ENTER OK 3 Pulse INTRO para confirmar 4 Con la tecla de direcci n seleccione Manejo 5 Pulse INTRO para conf...

Page 214: ...os datos de la empresa 01 a 05 Seleccione con las teclas de direcci n o la l nea que desee de los datos de la empresa 6 Introduzca los datos con el teclado y las teclas de direcci n Para cambiar entre...

Page 215: ...AG ml cantidad extra 0 Aditivo UV ml 0 Rellenado g 500 Mostrar logotipo S 1 En el men b sico utilice las teclas de direcci n o para seleccionar Otras selecciones Short selection Free selection Other s...

Page 216: ...ara aceite usado 19 2 Cierre la tapa abatible 20 3 Introduzca el tama o de los recipientes para aceite nuevo y medio de contraste UV Introducci n del tama o de los recipientes en la p gina 214 12 11 I...

Page 217: ...n active el campo que desee los campos oscuros est n activados Oil bottle 150ml 250ml 500ml UV bottle 150ml 250ml 500ml 7 Pulse INTRO para confirmar 8 Para acceder al men Stand by pulse STOP 12 12 Ll...

Page 218: ...ionar Otras selecciones Short selection Free selection Other selections ENTER OK 4 Pulse INTRO para confirmar 5 Con las teclas de direcci n o seleccione Rellenado tanque Int vessel filling Flushing Re...

Page 219: ...de presi n Vaciado del aceite usado Evacuaci n del sistema Prueba de fugas comprobaci n de vac o Rellenar la cantidad necesaria de aceite nuevo Rellenar aditivo UV Rellenar refrigerante Al final de c...

Page 220: ...on ayuda del c digo de administrador pueden crearse usuarios 13 3 1 Creaci n de c digos de usuario 1 En el men b sico utilice las teclas de direcci n o para seleccionar Otras selecciones Short selecti...

Page 221: ...las y min sculas utilice la tecla amarilla Info 11 Introduzca el nombre de usuario y pulse INTRO para confirmar ADM AREA User number 1 User name John Citizen ADM AREA User number 1 John Citizen Se ha...

Page 222: ...cluso despu s de actualizar el software Las entradas se guardan ordenadas cronol gicamente y no en orden alfanum rico 1 En el men b sico utilice las teclas de direcci n o para seleccionar Selecci n au...

Page 223: ...La unidad flash USB debe estar formateada con el sistema de archivos FAT32 Cada informe se guarda en dos formatos como archivo HTML para abrir con cualquier navegador de Internet como archivo XLS para...

Page 224: ...aria y pulse INTRO para confirmar 7 Siga las instrucciones que aparecen en pantalla 8 Vuelva a la selecci n anterior con STOP 13 6 Indicaci n del consumo de refrigerante La unidad de servicio de aire...

Page 225: ...tema de aire acondicionado del veh culo le faltar el refrigerante que quede en las mangueras de servicio del equipo de aire acondicionado despu s de la prueba Para compensar esta cantidad perdida se h...

Page 226: ...de reciclado Extracci n reciclado del refrigerante prueba del aumento de presi n vaciado del aceite usado Fase de vac o Evacuaci n del sistema prueba de fugas control de vac o Fase de llenado Antes d...

Page 227: ...Proceso de llenado en la p gina 225 3 Utilice la tecla de direcci n para introducir el tiempo de la fase de vac o 4 Confirme los dos ajustes con INTRO Vacuum time min 20 Vacuum test time min 4 ENTER O...

Page 228: ...finaliza el mantenimiento del equipo de aire acondicionado aparece un mensaje exhort ndole a desconectar las mangueras de la unidad de servicio de aire acondicionado del sistema de aire acondicionado...

Page 229: ...o Recipientes de recogida Unidades de secado de filtros V lvula de expansi n 12 Conecte conforme a las especificaciones del fabricantes los componentes en los que se va a realizar un barrido a los pue...

Page 230: ...ulsando INTRO Cuando se termina el proceso de llenado aparece un mensaje exhort ndole a desconectar las mangueras de la unidad de servicio de aire acondicionado del sistema de aire acondicionado del v...

Page 231: ...r 4 STOP EXIT Servicio finalizado indica la cantidad de trabajos de mantenimiento realizados con la unidad de ser vicio de aire acondicionado desde la ltima puesta a cero ver fecha 14 3 Comprobar la c...

Page 232: ...e los recipientes Recipiente para aceite nuevo 10 Recipiente para aditivo UV 11 Recept culo para aceite usado 12 5 Una vez liberadas las b sculas pulse INTRO para confirmar El mensaje exhort ndole a r...

Page 233: ...O para confirmar 11 Seleccione Inicio del proceso 12 Pulse INTRO para confirmar Se vac an entonces las mangueras de servicio y se activa el men b sico de la unidad de servicio de aire acondicionado El...

Page 234: ...aire acondicionado se pone fuera de funcionamiento Cada c digo tiene un solo uso 14 6 Calibraci n del transductor de presi n Para poder realizar mediciones precisas es necesario que el transductor de...

Page 235: ...a acceder al men Stand by pulse dos veces STOP 14 Para evacuar las mangueras de servicio se ha de ejecutar una breve fase de vac o ver Selecci n libre en la p gina 224 14 7 Cambiar el aceite de la bom...

Page 236: ...8 Vuelva a colocar el panel frontal y el panel de control 9 Vuelva a conectar el enchufe de la fuente de alimentaci n 10 Ponga a cero el contador de Tiempo de aspirado Puesta a cero de los contadores...

Page 237: ...ionado Selecci n autom tica o Selecci n libre desde la ltima puesta a cero ver fecha Vacuum time Total 07 03 17 min 79 STOP EXIT Tiempo de aspirado indica cu nto tiempo ha estado la bomba de vac o en...

Page 238: ...ndicionado establece los ajustes por defecto Wait loading default parameters A continuaci n la unidad de servicio de aire acondicionado se reinicia y aparece el men Stand by 5 Extraiga la unidad flash...

Page 239: ...ex iones con la unidad de servicio de aire acondicionado En la pantalla se visualiza Cantidad demasiado grande Rellenar re cipiente interno Mensaje que aparece durante el input del proceso si no hay s...

Page 240: ...mpruebe la calibraci n del sensor de presi n Compruebe la presi n interna de la botella Compruebe el funcionamiento del compresor y de las electro v lvulas correspondientes En la pantalla se visualiza...

Page 241: ...haya sufi ciente presi n de refrigerante Aseg rese de que todas las mangueras est n conectadas que no est n dobladas y que es t n exentas de aceite 16 Gesti n de residuos AVISO Proteja el medio ambie...

Page 242: ...miento m xima admisible 5 C 40 C Rango de temperatura de almacenamiento 25 C 50 C ASC 6400 G N de art 9103303106 Dimensiones anchura x altura x profundidad 560 mm 1300 mm 650 mm Peso 110 kg Fuente de...

Page 243: ...i n ac stica en el puesto de trabajo de una unidad de servicio de aire acondicionado se ha determinado en diferentes condiciones de funcionamiento Tanto los val ores medios en dB A como los valores m...

Page 244: ...Spanish 17 1 Diagrama de flujo ASC6300 G Leyenda 242...

Page 245: ...L3 Manguera del man metro LP L4 Manguera del man metro HP L5 Manguera del colorante UV L6 Manguera de aceite L7 Tuber a de recuperaci n L9 Tuber a de la bomba de vac o M1 Bater a de v lvulas P1 Bomba...

Page 246: ...Descripci n X23 V lvula solenoide DO X3 V lvula solenoide UV X4 V lvula solenoide de aceite X5 V lvula solenoide Z2 X6 V lvula solenoide Z2 X7 V lvula solenoide HP X8 V lvula solenoide HP X9 V lvula...

Page 247: ...Spanish 17 2 Diagrama de flujo ASC6400 G Leyenda 245...

Page 248: ...n metro LP L4 Manguera del man metro HP L5 Manguera del colorante UV L6 Manguera de aceite L7 Tuber a de recuperaci n L9 Tuber a de la bomba de vac o M1 Bater a de v lvulas P1 Bomba de vac o P2 Bomba...

Page 249: ...X16 V lvula solenoide CY X2 V lvula solenoide LP X23 V lvula solenoide DO X3 V lvula solenoide UV X4 V lvula solenoide de aceite X5 V lvula solenoide Z2 X6 V lvula solenoide Z2 X7 V lvula solenoide H...

Page 250: ...Spanish 17 3 Esquema de conexiones ASC6300 G 248...

Page 251: ...Spanish 249...

Page 252: ...Spanish 17 4 Esquema de conexiones ASC6400 G 250...

Page 253: ...Spanish 251...

Page 254: ...4445103554 2022 05 02...

Reviews: